Añadir colores y texturas con materiales
Para añadir detalles y realismo a tus modelos, SketchUp permite pintar materiales sobre superficies. Los materiales son básicamente pinturas con color y textura opcional (definida por un archivo de imagen). Por ejemplo, en la siguiente figura se ve que el material de los tejados es azul y tiene una textura que imita el techado metálico. Los laterales del edificio y la hierba también son materiales con color y textura.
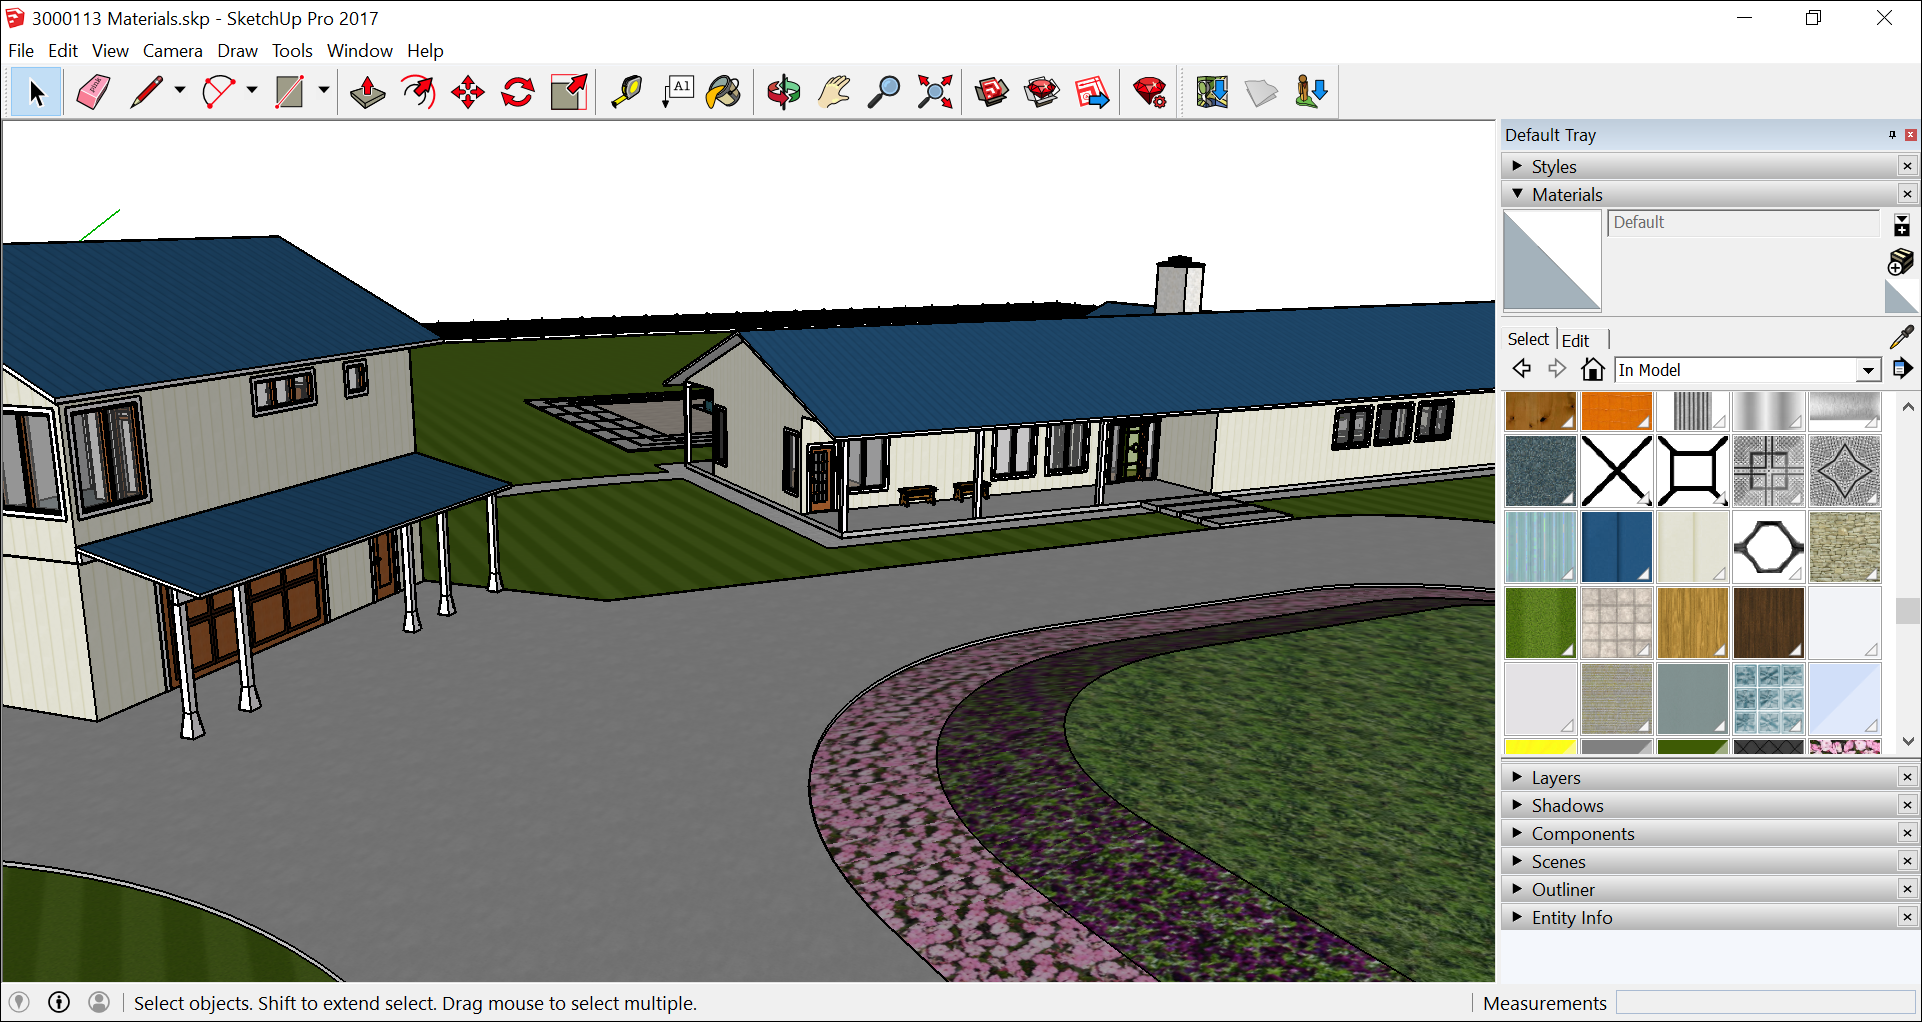
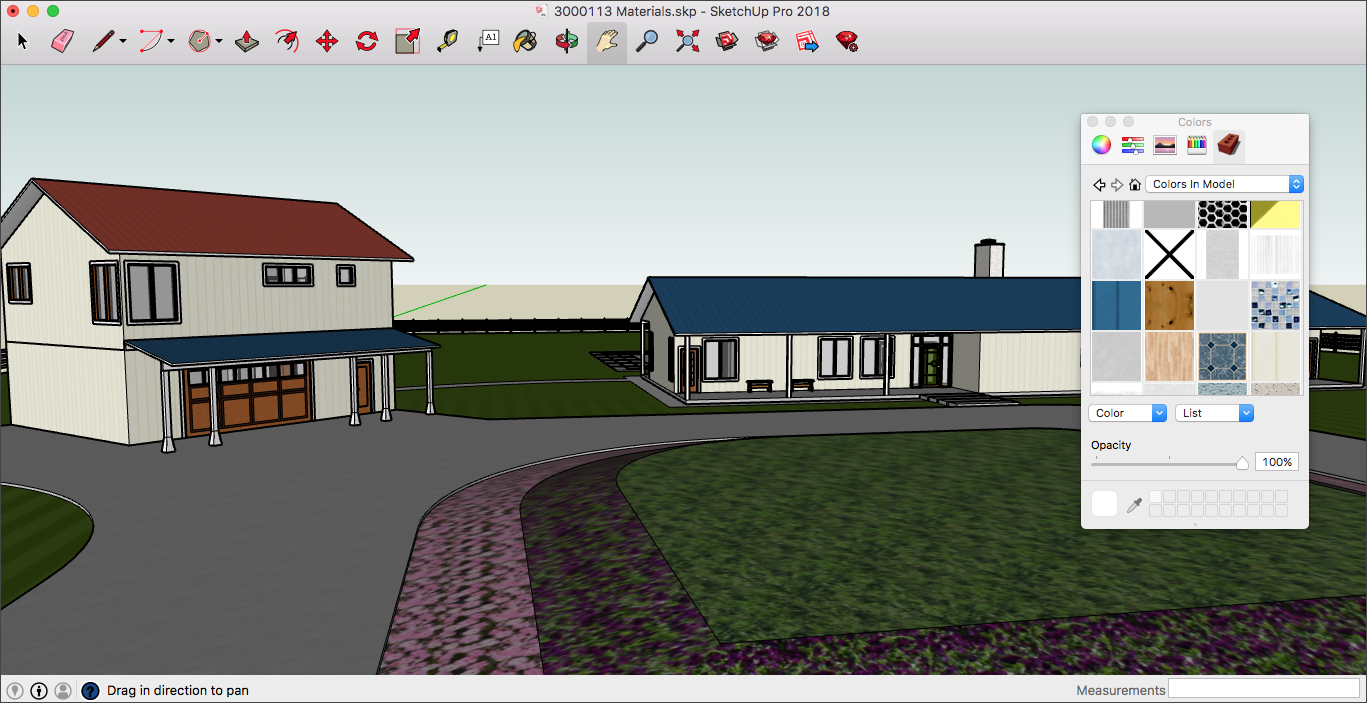
Tras aplicar materiales como estos a tu modelo, las capacidades especiales de los materiales de SketchUp te puede ayudar a hacer cualquiera de estas cosas:
- Cambiar un material por otro: indica que quieres poner un tejado metálico en vez de tejas. Puedes cambiar este material por tejas fácil y rápidamente.
- Modificar el material: como el color y la textura van por separado, se pueden cambiar de forma independiente. Por ejemplo, se puede cambiar el color de los laterales del edificio (¿qué te parece un amarillo?) pero conservando la textura. También puedes cambiar la opacidad del material, que controla si un material es más opaco o más transparente.
- Calcular la cantidad de material necesaria: SketchUp te indica el área de los tejados y de las paredes. Para que este cálculo resulte útil, hace falta crear un modelo preciso para que los números de ajusten al tamaño real del modelo.
En la interfaz de SketchUp se pueden modelar materiales con la herramienta Cubo de pintura ( ) y el panel de Materiales (Microsoft Windows) o el de Colores (macOS). El panel de Materiales o Colores también permite ver, gestionar y organizar los materiales. El panel de Materiales o Colores registra los materiales del modelo, y es el lugar en el que se crean colecciones de materiales personalizados específicos para tus proyectos o flujos de trabajo.
En el siguiente vídeo se indica cómo aplicar materiales y realizar algunos cambios habituales, como reemplazar un material por otro. Si quieres ver instrucciones detalladas sobre cómo utilizar estos materiales paso a paso, echa un vistazo a las siguientes secciones.
Índice
Aplicación de materiales
Aplicar materiales a tu modelo es bastante sencillo: selecciona una superficie o superficies y después selecciona el material deseado. Si estás pintando grupos o componentes, echa un vistazo a los consejos del final de esta sección, que pueden facilitar aún más la aplicación de materiales.
Puedes aplicar materiales al modelo con la herramienta Cubo de pintura ( ), que encontrarás en las siguientes partes de la interfaz de SketchUp:
- Barra de Primeros pasos
- Barra de conjunto de herramientas grandes
- Barra de herramientas principal
- Herramientas > Cubo de pintura en la barra de menú
Para empezar a aplicar materiales a tu modelo, sigue estos pasos:
- Selecciona la herramienta Cubo de pintura (
 ).
). - Cuando se abra el panel de Materiales, pulsa la pestaña Seleccionar. Si no se abre el panel de Materiales en la bandeja, el cuadro de diálogo podría estar en una bandeja oculta. En este caso, coloca el cursor sobre la pestaña de bandejas ocultas para abrir la bandeja. Desde aquí podrás abrir el panel de Materiales.
- Selecciona una colección de materiales en el menú desplegable.
- Pulsa sobre el material que quieras usar. Consejo: para tomar una muestra de un material que ya esté en tu modelo, mantén pulsada la tecla Alt y cambiarás temporalmente a una herramienta de muestra. Pulsa sobre la superficie de cuyo material quieras tomar la muestra con el cursor de cuentagotas de la herramienta de muestra. Suelta la tecla Alt para volver a la herramienta Cubo de pintura.
- En la zona de dibujo, pulsa sobre una superficie o superficies para aplicar el material.
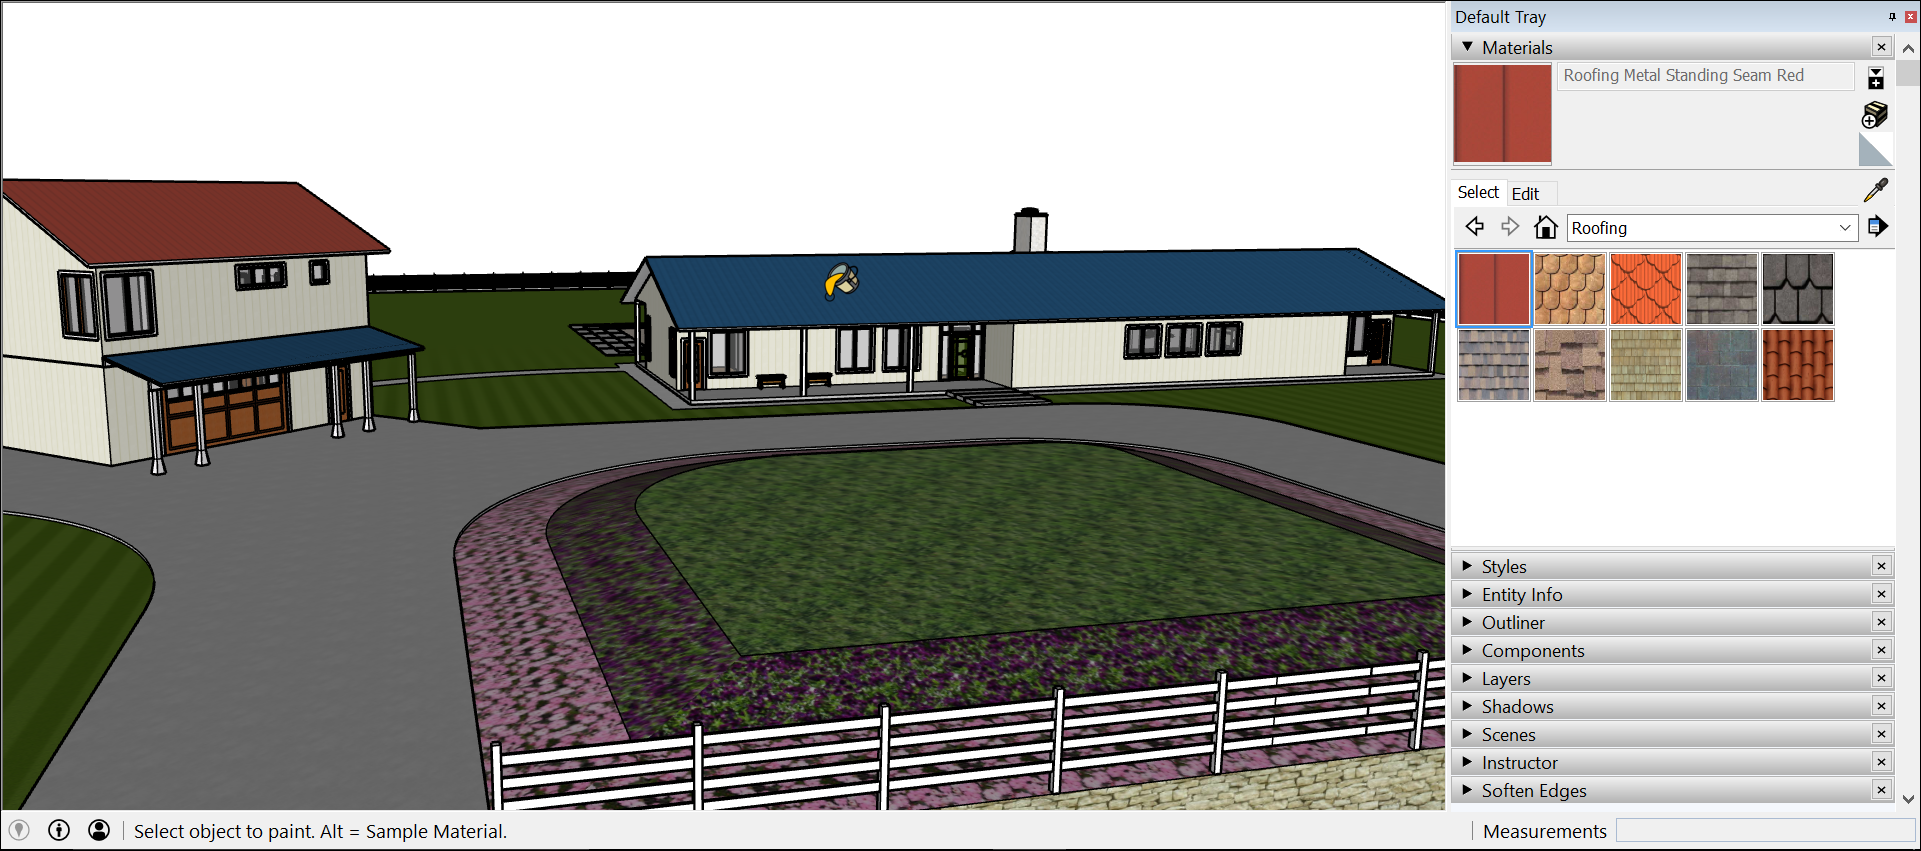
 ) en la esquina superior derecha y pulsa sobre una superficie de tu modelo para aplicar los colores por defecto.
- Barra de conjunto de herramientas grandes
- Herramientas > Cubo de pintura en la barra de menú
- Paleta de herramientas
Para empezar a aplicar materiales a tu modelo, sigue estos pasos:
- Selecciona la herramienta Cubo de pintura (
 ). Cuando aparezca el panel de Colores, podrás seleccionar un color en una de las cuatro pestañas de selección de color o utilizar las colecciones de materiales.
 - Para explorar las colecciones de materiales, pulsa la pestaña Paletas de texturas, cuyo icono es un ladrillo. (Consulta Mezcla de colores en el selector si necesitas más información sobre el uso de las otras pestañas, que se utilizan para seleccionar colores).
- Selecciona una colección de materiales en el menú desplegable. En la siguiente figura, está seleccionada la colección Tejados.
- Pulsa sobre el material que quieras aplicar a tu modelo.Consejo: para tomar una muestra de un material que ya esté en tu modelo, pulsa la herramienta de Cuentagotas en la parte inferior de la pestaña Paletas de texturas. Pulsa sobre la superficie de cuyo material quieras tomar la muestra con el cursor circular grande. Al hacer esto, se carga el material como muestra y se vuelve al cursor del Cubo de pintura.
- En la zona de dibujo, pulsa sobre una superficie o superficies para aplicar el material.

También puedes pulsar y arrastrar una muestra de material desde el área principal de la pestaña de Paletas de texturas a una superficie de tu modelo. (No se pueden arrastrar muestras desde la paleta de la parte inferior del panel de Colores en macOS. Si necesitas más información sobre el uso de estas muestras guardadas, consulta Mezcla de colores en el selector).
Si tus estilos muestran texturas, tu ordenador podría no tener suficiente memoria para mostrar los materiales de tu modelo. Consulta Resolución de problemas en SketchUp si necesitas ayuda.
Puedes pintar varias superficies y bordes al mismo tiempo. Para ello, utiliza la herramienta de Selección ( ) para seleccionar los bordes y las superficies que quieres pintar. Selecciona la herramienta Cubo de pintura y aplica un material. (Selección de geometría ofrece consejos para hacer selecciones).
Cuando apliques materiales a varias superficies a la vez, recuerda lo siguiente:
- Las superficies tienen dos caras: una frontal y una trasera. Puedes pintar la cara frontal o la trasera de todas las superficies seleccionadas, pero no ambas. El lado pintado será el que se pulse con el cursor del cubo de pintura. En la siguiente figura, pulsar la parte frontal de una superficie pinta todas las caras frontales de la selección, aunque se vean dos caras frontales y dos traseras.
- Control del aspecto de los bordes traseros con estilos. Cuando seleccionas una superficie y todos sus bordes y pintas la parte frontal de la superficie, se pintan también los bordes seleccionados. Pero si pintas las caras traseras, no se pinta ningún borde. Para combinar los bordes traseros con los materiales, abre el panel de Estilos, pulsa la pestaña Edit, pulsa el icono de Configuración de bordes y selecciona Por material en el menú desplegable de color.

Se pueden aplicar materiales a un grupo o a un componente en su conjunto, o a geometrías concretas dentro del grupo o componente:
- Para pintar un grupo o componente completo, selecciónalo y aplica un material. Al seleccionar un grupo o componente y aplicar un material, solo se pintan las superficies que tengan el material predeterminado.
- Para pintar geometrías en el grupo o componente, haz doble clic sobre él para abrir el contexto. Después, selecciona las superficies que quieres pintar con el material.
Este vídeo muestra varios consejos y trucos para aplicar materiales a componentes. También puedes seguir leyendo las instrucciones paso a paso para pintar todos o algunos de tus componentes.
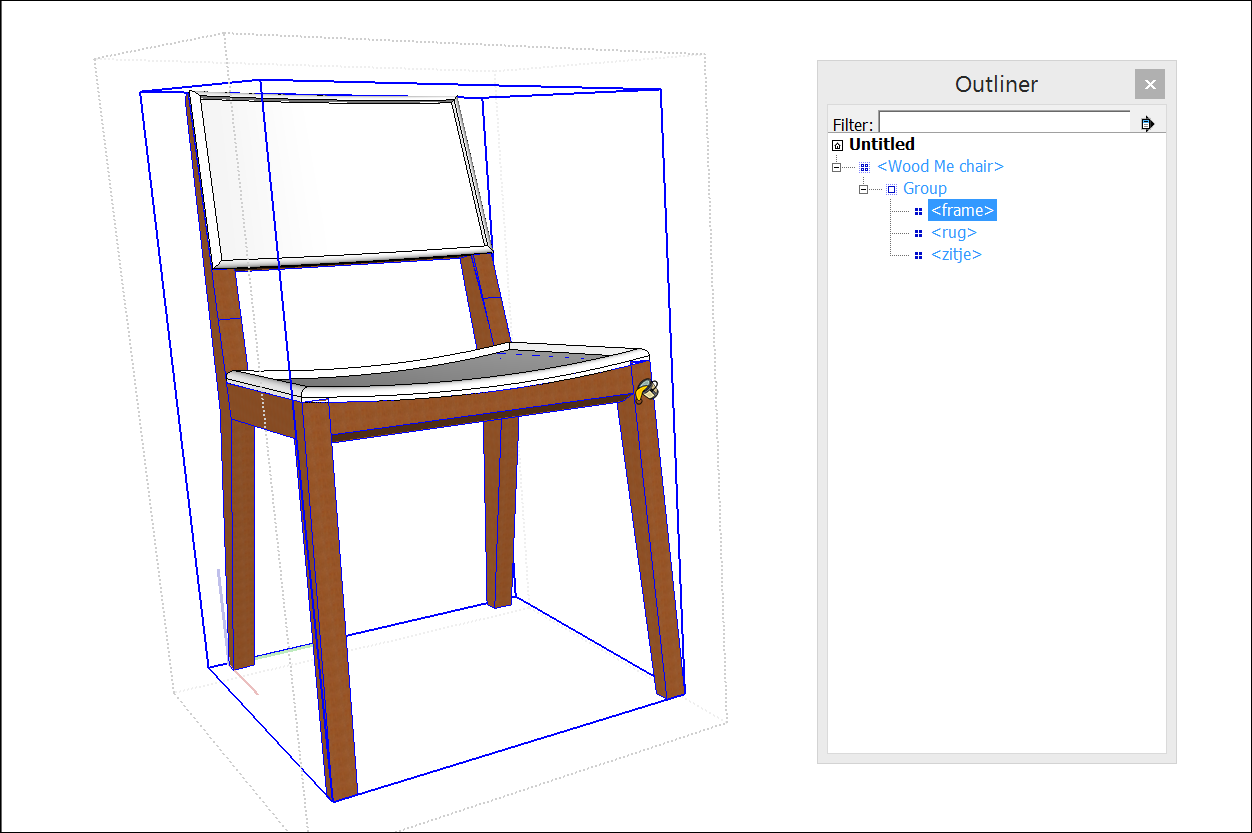
Un ejemplo para ver cómo funciona este consejo: digamos que estás modelando una silla con una estructura de madera y dos cojines y quieres mostrar los cojines en cuatro colores. En el organizador, que se muestra aquí, se ve que cada elemento de la silla (estructura y dos cojines) forman un mismo grupo que está anidado dentro de un grupo, que a su vez está anidado en un componente. (Consulta Organización de un modelo para más información sobre el organizador).
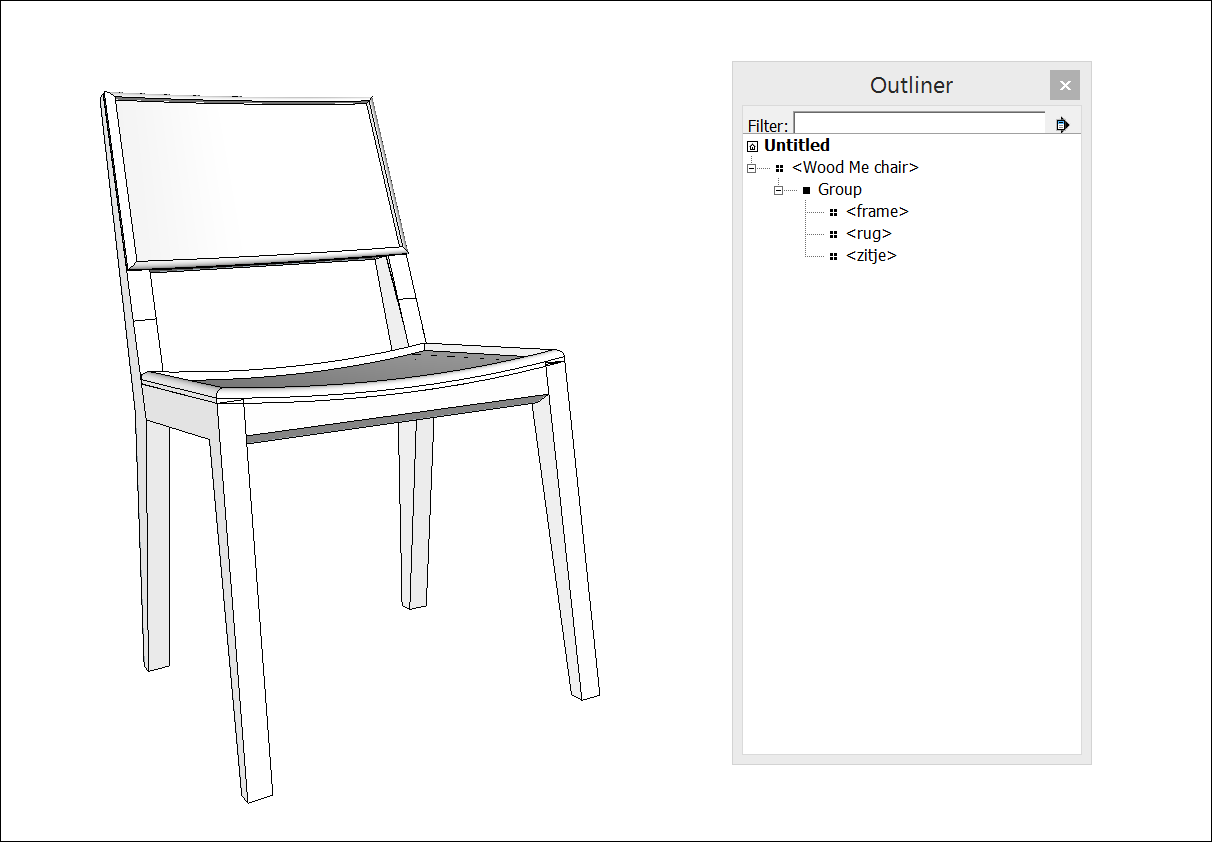
Los siguientes pasos explican la forma más fácil de aplicar materiales y mostrar las cuatro opciones de color:
- La estructura es la misma en todas las sillas, por lo que se puede seleccionar el grupo de estructuras y aplicar el material de madera como se muestra aquí.
- Crea una copia por cada color de cojín diferente. (Copiar lo dibujado anteriormente explica cómo hacer esto).
- Selecciona un componente y aplica el material de color de cojín. Como la estructura ya está pintada pero los cojines siguen teniendo el color por defecto, solo se pintan los cojines con el material de color. La estructura conserva el material de madera.
- Repite el paso anterior para cada color diferente. El resultado quedaría así.

Cambio de un material por otro
Como SketchUp permite cambiar un material por otro, puedes experimentar con materiales fácil y rápidamente. Puedes probar diferentes materiales para la encimera de una cocina, como granito negro, azulejo azul y composite blanco. Si estás eligiendo colores para pintar la casa, podrás comparar la pared amarilla con el reborde verde oscuro y la pared azul marino con el reborde color crema. Una vez que conozcas los modificadores del teclado, el proceso será muy sencillo. Los puedes ver en esta tabla.
| Para cambiar un material por otro… | Tecla modificadora (Microsoft Windows) | Tecla modificadora (macOS) |
|---|---|---|
| En superficies adyacentes | Ctrl | Opción |
| En todas las superficies del contexto seleccionado (por ejemplo, el mismo grupo o componente) | Mayús | Mayús |
| En todas las superficies conectadas | Ctrl+Shift | Opción+Shift |
Aquí tienes un ejemplo que te ayudará a visualizar cómo funciona cada atajo. Imagina que estás decidiendo qué colores utilizar para un mural abstracto en dos paredes distintas. En esta figura se ve el mural pintado temporalmente con materiales de la colección Colores.

Para ver cómo quedaría cambiar el rojo por el verde, selecciona la herramienta Cubo de pintura y después el verde en el panel Materiales (Microsoft Windows) o Colores (macOS). Si haces clic en el triángulo rojo de la parte superior izquierda mientras mantienes pulsada la tecla Ctrl o la tecla Opción, solo se cambiarán las superficies adyacentes de material rojo por verde, como se muestra en esta figura.

Si haces clic mientras mantienes pulsada la tecla Shift, todas las superficies rojas se volverán verdes:

Pero si haces clic mientras pulsas Ctrl+Shift o mientras pulsas Opción+Shift, las superficies rojas se volverán verdes solo en la pared de la izquierda:

Modificación de materiales
SketchUp te permite modificar materiales. Al hacer cambios, las superficies pintadas con el material que has modificado se actualizan automáticamente. Puesto que todos los materiales tienen un color y una textura opcional, puedes modificar el color y la textura independientemente uno del otro.
La modificación de materiales en SketchUp es especialmente útil cuando ya hay un material aplicado a varias superficies. Si modificas el material de una superficie en lugar de cambiarlo por otro, cualquier superficie pintada con el material que has modificado se actualiza automáticamente. Puesto que todos los materiales tienen un color y una textura opcional, puedes modificar el color y la textura independientemente uno del otro.
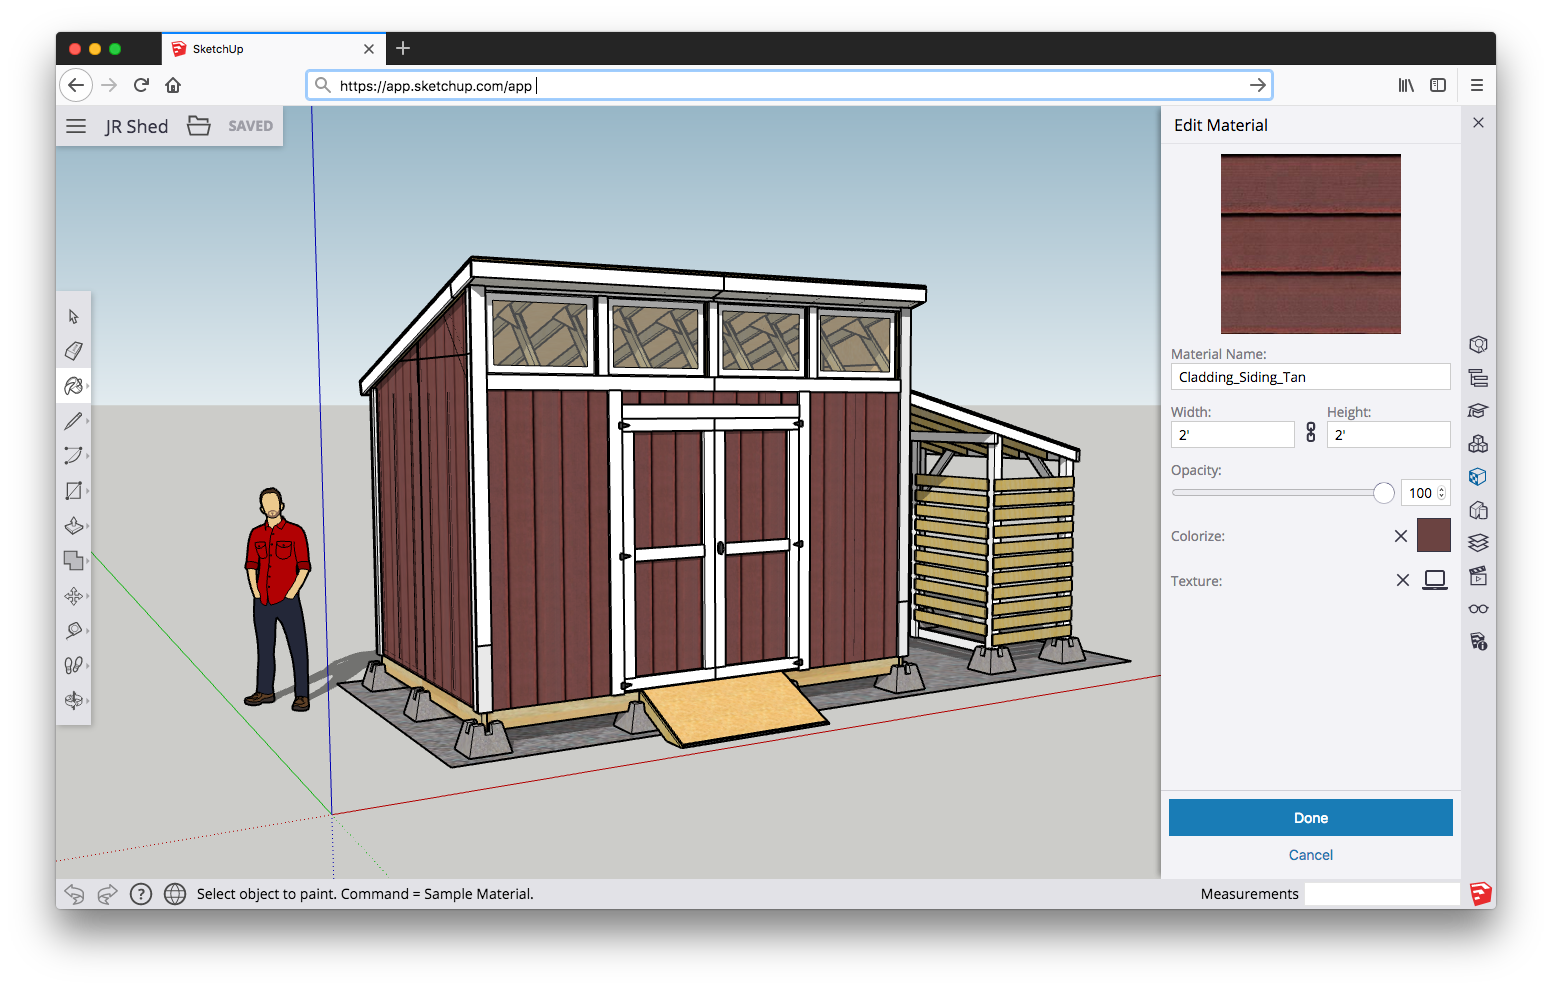
Para modificar un material, primero hay que guardarlo en el modelo. Para ver los materiales guardados en el modelo, abre el panel Materiales en la bandeja de utilidades a la derecha de la pantalla.
Para modificar un material, selecciónalo en tus materiales del modelo (bajo el icono de inicio) o utiliza una muestra de la ventana de modelado tomada con la herramienta Cuentagotas, que selecciona el material automáticamente en el panel Materiales. Una vez seleccionado el material, pulsa el icono de edición junto a la miniatura del material.
Al modificar materiales, puedes configurar:
- Nombre del material: escribe el nombre nuevo del material que estás editando.
- Color: puedes personalizar el color de tu material manualmente con el selector de color de SketchUp o introduciendo valores RGB, HSL o HEX. A medida que vayas realizando cambios de color, verás que las modificaciones se producen en tiempo real.
- Imagen: añade o cambia la imagen de textura que quieras asociar a tu material. Añadir o cambiar la imagen de textura podría modificar el color del material. También puedes eliminar una imagen de textura de un material por completo pulsando la X.
- Tamaño del material: cuando aplicas una imagen de textura a una superficie, se ajusta en mosaico para rellenar dicha superficie. Indica un valor en las casillas Alto y Ancho para cambiar el tamaño del mosaico de textura. Se mantiene por defecto la relación de aspecto de la imagen. Si escribes 2 en la casilla de anchura, la casilla de altura cambiará automáticamente para mantener la relación de aspecto. Pulsa el icono de la cadena para poder cambiar la relación de aspecto como quieras. Si no te gusta el resultado, puedes pulsar "Cancelar" al final del menú o deshacer los cambios con Ctrl/Comando + Z.
- Opacidad: también puedes modificar la opacidad o transparencia del material. Si mueves la barra de opacidad hacia la derecha aumentarás la opacidad. 100 equivale a una opacidad completa. Si mueves la barra de opacidad hacia la izquierda aumentarás la transparencia. 0 equivale a una transparencia completa. También puedes escribir un número del 0 al 100 en el campo Opacidad.
Windows
Para modificar un material, primero hay que guardarlo en el modelo. Para ver los materiales guardados en el modelo, abre el panel Materiales y pulsa el icono En modelo ( ) para mostrar tu colección En modelo, según aparece en la siguiente figura.
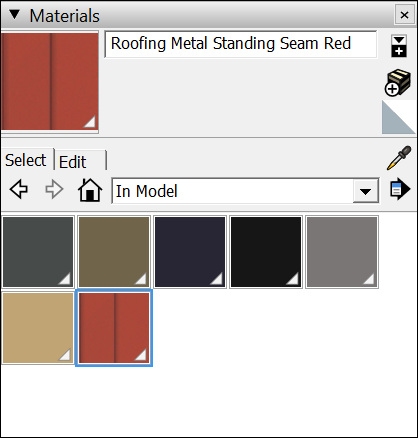
Si el material que quieres editar no aparece en la colección En modelo, puedes guardar el material en ella tanto si está aplicado actualmente a las superficies de tu modelo como si no. Para añadir un material a tu colección En modelo, sigue estos pasos:
- Pulsa el icono Mostrar panel de selección secundaria (
 ) en la esquina superior derecha del panel Materiales.
 - En el panel secundario de la parte inferior, busca entre las colecciones el material que quieres editar.
- Arrastra la muestra de material a tu colección En modelo.
Para modificar el material, selecciónalo en la colección En modelo y pulsa la pestaña Editar como se muestra en la siguiente figura.
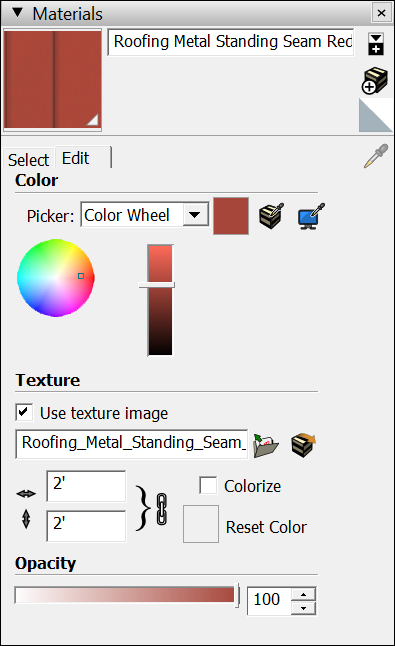
Aquí tienes una breve introducción a todas las herramientas de edición de color de un material:
- Menú desplegable del selector: Utiliza el menú desplegable del selector para elegir el modo de selección entre HLS (Hue, Light, Saturation), HSB (Hue, Saturation, and Brightness), RGB (Red, Green, Blue) y la rueda de colores. Consulta Mezcla de colores en el selector si necesitas más información sobre el selector de colores.
- Recuadro de deshacer cambios en el color: púlsalo para deshacer todos los cambios de color que hayas realizado en una sesión.
- Botón de aplicar color de objeto del modelo: pulsa este botón y el cursor pasará a ser un cuentagotas. Haz clic con el cuentagotas en una entidad para tomar una muestra de color y aplicar ese color al material que estás editando. Consejo: si tomas una muestra de un material con textura, las variaciones de la textura podrían alterar ligeramente el color del material. Para tomar una muestra de un color concreto dentro de una textura, utiliza el botón Aplicar color de pantalla para mejorar el resultado.
- Botón Aplicar color de pantalla: pulsa este botón y después haz clic en cualquier parte de la pantalla con el cuentagotas para tomar una muestra de color de un píxel. SketchUp aplicará este color al material seleccionado.
Las siguientes herramientas permiten modificar la textura del material:
- Uso de la casilla de textura de imagen: si esta casilla está marcada, puedes incluir un archivo de imagen que represente una textura. Desmarcar la casilla elimina el archivo de imagen para la textura. (Ten en cuenta que volver a marcar la casilla no restaura el archivo de imagen. Al hacerlo, se solicita un nuevo archivo de imagen).
- Archivo de imagen para textura y botón de búsqueda: el campo de imagen de textura contiene el nombre de un archivo de imagen (que representa una textura), si es que lo hay, asociado al material actual. Para cambiar la textura, arrastra un archivo de imagen o pulsa el botón de búsqueda para mostrar el cuadro de diálogo Elegir una imagen, donde se puede buscar un archivo de imagen en el disco duro. Después de aplicar una textura, también puedes ajustar la forma del mosaico en tu modelo. Consulta la sección siguiente, Reposicionamiento de texturas, para más información.
- Botón de edición de la imagen de textura en editor externo: al pulsar este botón, SketchUp abre el archivo de imagen de la textura en tu editor de imagen por defecto.
Nota: tu editor de imagen viene definido en el cuadro de diálogo de preferencias de SketchUp en el panel de Aplicaciones. Consulta Personalización del espacio de trabajo para más información sobre cómo establecer esta preferencia. Si no has indicado ningún editor de imagen, SketchUp lanzará el editor predeterminado de tu sistema operativo o la aplicación de visualización de imágenes. - Casilla de aplicar color: selecciona esta casilla para aplicar el mismo tono a toda la textura. El color viene definido en el área de Color de la pestaña Editar. Esta opción resulta útil cuando hay archivos que no muestran los colores adecuados.
- Recuadro de restablecer color: pulsa este recuadro para restablecer el color del material al del archivo de imagen de textura.
- Campos de tamaño: cuando pintas una superficie con una textura, la imagen se ajusta en mosaico para rellenar dicha superficie. Indica un valor en las casillas de altura y anchura para cambiar el tamaño del mosaico de textura. Se mantiene por defecto la relación de aspecto de la imagen. Si escribes 2 en la casilla de anchura, la casilla de altura cambiará automáticamente para mantener la relación de aspecto. Pulsa el icono de la cadena para poder cambiar la relación de aspecto. Si no te gusta cómo queda, pulsa los botones de flecha horizontal y vertical para volver a los ajustes de altura y anchura anteriores.
- Barra de opacidad: la opacidad se refiere a cómo de transparente o de opaca es una imagen. Si mueves la barra de opacidad hacia la derecha aumentarás la opacidad de la textura. 100 equivale a una opacidad completa. Si mueves la barra de opacidad hacia la izquierda aumentarás la transparencia de la textura. 0 equivale a una transparencia completa. También puedes escribir un número del 0 al 100 en el campo Opacidad.
MacOS
Para modificar un material, primero hay que guardarlo en el modelo. Para ver los materiales guardados en tu modelo, selecciona Ventana > Materiales para abrir el panel de Colores. En la pestaña Paletas de texturas (el icono de ladrillo), pulsa el icono de Colores del modelo ( ) o selecciona Colores del modelo en la lista desplegable para mostrar la colección Colores del modelo, como aparece en la siguiente imagen.
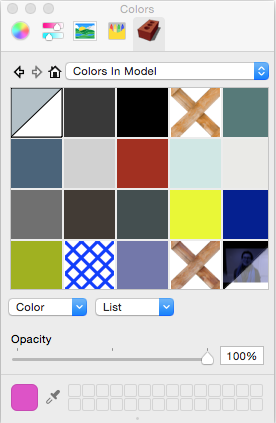
Si el material que quieres editar no aparece en la colección Colores del modelo, aplica el material a una superficie de tu modelo. (Ten en cuenta que, si después cambias un material por otro, el material original seguirá en la colección Colores del modelo hasta que elimines los materiales no utilizados).
Cuando lo tengas todo listo para editar un material, sigue estos pasos:
- En la pestaña Paletas de texturas (el icono de ladrillo), abre la colección Colores del modelo.
- Selecciona el material que quieras editar.
- Selecciona Editar en el menú desplegable de Color. También puedes hacer Ctrl + clic en el material y seleccionar Editar en el menú que aparece.
- Elige las modificaciones que quieras en el panel Editar material, que se muestra en la imagen.
- Pulsa el botón Cerrar cuando termines.
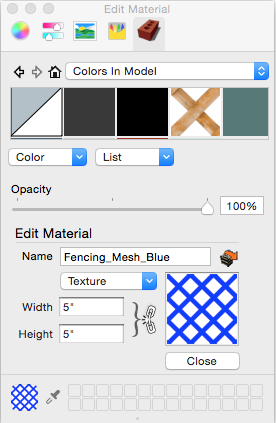
Aquí tienes una introducción a las opciones del panel Editar material:
- Nombre: escribe el nombre nuevo del material que estás editando para cambiarlo.
- Edición de la imagen de textura en editor externo: pulsa este botón para abrir el archivo de imagen de la textura en tu editor de imagen o programa de visualización de imágenes por defecto.
Haz las modificaciones que desees y guárdalas en el archivo y los cambios aparecerán en el material - Menú desplegable de texturas: las opciones de este menú desplegable permiten editar la textura desde SketchUp. Selecciona Subir para elegir un archivo de imagen nuevo para la textura. Selecciona Eliminar para borrar el archivo de imagen de la textura. (Cuando la imagen de la textura se elimina, aparece una aproximación en un solo color de la imagen eliminada). Si has aplicado color a la textura, selecciona Restablecer color para eliminar el color aplicado. Si seleccionas Editar, se abrirá el archivo de imagen de la textura en tu editor de imagen o programa de visualización de imágenes por defecto. Después de aplicar una textura, también puedes ajustar la forma del mosaico en tu modelo. Consulta la sección siguiente, Reposicionamiento de texturas, para más información.
- Altura y anchura: cuando pintas una superficie con una textura, la imagen se ajusta en mosaico para rellenar dicha superficie. Indica un valor en las casillas altura y anchura para cambiar el tamaño del mosaico de textura. Se mantiene por defecto la relación de aspecto de la imagen. Si escribes 2 en la casilla de anchura, la casilla de altura cambiará automáticamente para mantener la relación de aspecto. Pulsa el icono de la cadena para poder cambiar la relación de aspecto. Si no te gusta cómo queda, tendrás que escribir los valores originales en los campos correspondientes para volver a las dimensiones iniciales de la imagen.
- Aplicar color: con el panel Editar material abierto, se puede aplicar color a un archivo de textura. Utiliza cualquiera de las pestañas de color para seleccionar un color y aplícalo a la vista previa del material en el panel Editar material. También puedes pulsar sobre la herramienta de Cuentagotas al final del panel de Colores y pulsar sobre cualquier material del modelo o de la pestaña Paletas de texturas (icono de ladrillo).
Consejo: aplicar color es una buena forma de probar variaciones en el color del material. - Opacidad: con el panel Editar material abierto, también podrás editar la opacidad del material, que se refiere a cómo de transparente o de opaca es una imagen. Si mueves la barra de opacidad hacia la derecha, aumentarás la opacidad de la textura. 100 equivale a una opacidad completa. Si mueves la barra de opacidad hacia la izquierda aumentarás la transparencia de la textura. 0 equivale a una transparencia completa. También puedes escribir un número del 0 al 100 en el campo Opacidad.
Reposicionamiento de texturas
Tras aplicar la textura a una o más superficies de un modelo 3D, se puede ajustar la forma del mosaico sobre la superficie. Para ello tendrás que utilizar la herramienta de Situar textura, que tiene dos modos:
- Modo Alfileres fijos: en este modo se puede mover, rotar, cambiar el tamaño a escala y distorsionar una textura. Se podría, por ejemplo, ajustar una textura a una superficie para que quede alineada con la misma textura de otra superficie, como las paredes de dos lados de un edificio.
- Modo Alfileres sueltos: si necesitas estirar o encoger una textura, utiliza este modo.
Así se ajusta una textura en el modo Alfileres fijos:
- Haz clic en el contexto del material y selecciona Textura > Situar en el menú que aparece. Verás una matriz de líneas de puntos que representa cada cuadro del mosaico de la textura. El cursor pasa a ser una mano y aparecen cuatro alfileres.
- Si ves los cuatro alfileres de colores como se muestra en la imagen, ve al paso siguiente. Si no aparecen, haz clic en el contexto del material y selecciona Alfileres fijos.

- Utiliza el cursor de la mano y los alfileres para ajustar la textura. En este ejemplo, el objetivo es mover el alfiler verde para que la dirección de la textura de madera de la parte superior del armario sea igual que la del lateral. Aquí tienes un resumen de todas tus opciones:
- Pulsa y arrastra el material con el cursor de la mano para recolocar la textura en conjunto.
- Pulsa un alfiler para levantarlo y púlsalo otra vez para soltarlo en otra parte de la textura.
- Arrastra un alfiler para modificar la textura. Arrastrar el alfiler azul corta la textura o la modifica a escala. Arrastrar el alfiler amarillo distorsiona la textura. Arrastrar el alfiler verde modifica la textura a escala o la gira en torno al eje del alfiler de movimiento. Arrastrar el alfiler rojo, que es el alfiler de movimiento, mueve la textura.
Consejo: en el modo Alfileres fijos también se puede abrir el menú contextual de la textura para ver más opciones: girar la textura en vertical o en horizontal o rotarla 90 grados. La opción Restablecer devuelve la textura a su estado original, mientras que la opción Deshacer se limita a deshacer el último comando. Si deshaces una acción, también se activa la opción Rehacer. - Cuando hayas terminado de modificar la textura, abre el menú contextual y selecciona Hecho. También puedes pulsar fuera de la textura para salir del modo Alfileres fijos.
En el modo Alfileres sueltos, puedes establecer el tamaño del mosaico en relación con el modelo. El proceso consiste en lo siguiente:
- Haz clic en el contexto del material y selecciona Textura > Situar en el menú que aparece. Se empieza por defecto en el modo Alfileres fijos.
- Cambia al modo Alfileres sueltos abriendo el menú contextual de la textura y borrando la opción Alfileres fijos. En el modo Alfileres sueltos se ven cuatro alfileres blancos, como se muestra en la siguiente imagen.
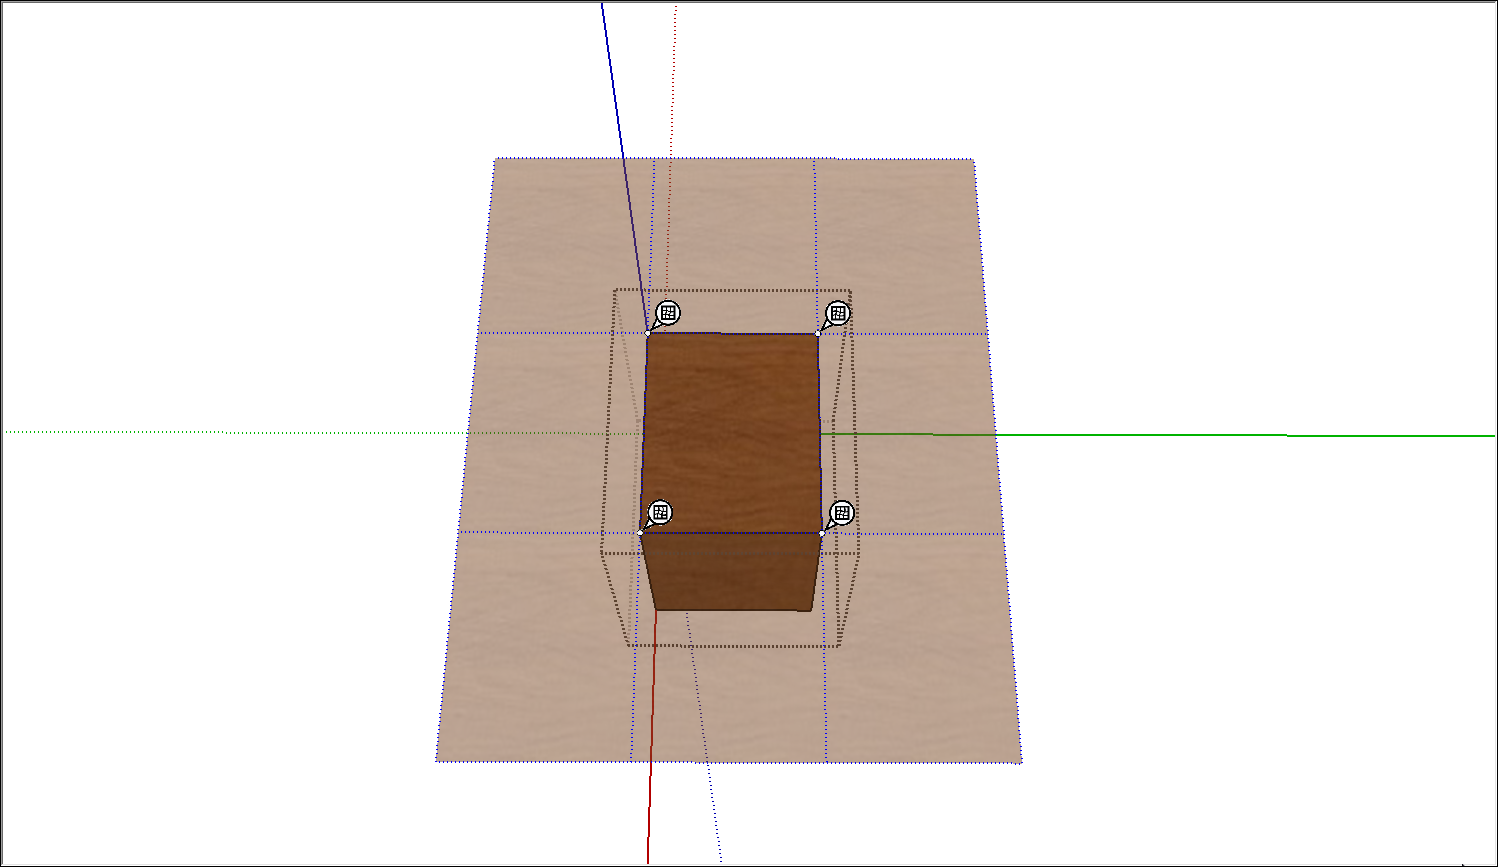
- Pulsa un alfiler para levantarlo y púlsalo otra vez para soltarlo en otra parte. Haz esto con todos los alfileres para establecer las esquinas del mosaico de la textura. Si colocas los alfileres en una configuración no rectangular, se distorsionará la textura.
- Cuando hayas terminado, abre el menú contextual y selecciona Hecho. También puedes pulsar fuera de la textura para salir del modo Alfileres sueltos.
Cálculo automático del área de un material
Si quieres que SketchUp calcule el área de la superficie pintada con un material, puedes abrir el menú contextual del material y seleccionar Área > Material. En Windows también se puede abrir el menú contextual del material en el panel de Materiales y seleccionar Área en el menú. (Si el elemento del menú Área aparece en gris, el material no está aplicado a ninguna superficie).
El cuadro de diálogo muestra el área total de las superficies a las que está aplicado el material seleccionado. Las unidades (como los pies cuadrados o los metros cuadrados) dependerán de las unidades especificadas en la plantilla. Consulta Configuración de plantillas si necesitas instrucciones para cambiar las unidades predeterminadas.
Si utilizas clasificaciones IFC, puedes generar informes sobre materiales de tu modelo. Consulta Clasificación de objetos (y en concreto la sección generación de informes) para más información.
Gestión y organización de materiales
El panel Materiales (Microsoft Windows) o Colores (macOS) te ayuda a encontrar y organizar materiales. La siguiente lista explica cómo gestionar materiales en el sistema operativo que hayas seleccionado en el Centro de asistencia.
Windows
- Explorar las colecciones incluidas: en la pestaña Seleccionar, elige una colección de la lista desplegable para ver los materiales.
- Ver todos los materiales del modelo: pulsa el icono En modelo (
 ) para ver todos los materiales que hayas aplicado al modelo.
 - Eliminar materiales innecesarios: aunque cambies un material por otro, de forma que el material original ya no aparezca en el modelo, el material original sigue en la colección En modelo hasta que lo elimines abriendo el menú contextual y seleccionando Eliminar. Para eliminar todos los materiales sin utilizar de un modelo, asegúrate de tener seleccionada la colección En modelo. Después pulsa la Flecha de más información (
 ) y selecciona Eliminar materiales sin usar. También puedes seleccionar Eliminar todos para eliminar todos los materiales de tu modelo y de la colección En modelo.
 - Crear colecciones propias: puedes crear una colección para un proyecto concreto o hacer una colección de materiales que vayas creando, como un esquema de color concreto, muestrarios de telas, opciones de paisajismo o cualquier otra cosa que utilices repetidamente. En la pestaña Seleccionar, pulsa la Flecha de más información (
 ) y elige Abrir o crear colección En el cuadro de diálogo Seleccionar carpeta de colección o crear nueva, ve a la carpeta en la que quieras crear tu colección. Pulsa el botón Carpeta nueva, elige un nombre para la carpeta (que será el nombre de tu colección) y pulsa Seleccionar carpeta. Una vez creada la colección, podrás ir a la carpeta para abrir la colección. Para añadir materiales a una colección, arrástralos desde el panel de selección secundaria hasta tu colección o guarda en tu colección los materiales que hayas creado.
 - Añadir colecciones de uso frecuente a tus favoritas: en la pestaña Seleccionar, pulsa la Flecha de más información y elige Añadir colección a Favoritas. La colección seleccionada aparecerá en una lista de favoritas al final de la lista desplegable. Puedes seleccionar la colección, pulsar la Flecha de más información y elegir Eliminar colección de Favoritas si ya no necesitas que la colección esté en tu lista de favoritas.
Nota: si pulsas la Flecha de más información podrás elegir ver los materiales como cuadrados pequeños, medianos, grandes o muy grandes. Elige la opción Lista para ver los nombres de los materiales en lugar de la vista previa.
MacOS
- Explorar colecciones incluidas: para ver los materiales incluidos en SketchUp, pulsa el icono de Paletas de texturas (el ladrillo) y elige una de las colecciones del menú desplegable, como Ladrillo y revestimiento, Vallas, Techado, Traslúcido o Madera. Cada material de una colección aparece como una muestra en la que se puede pulsar con el icono del Cubo de pintura para aplicarlo a tu modelo.
- Ver todos los materiales del modelo: el panel de Colores incluye una colección de materiales especial llamada Colores del modelo, que contiene todos los materiales que estén en uso en el modelo. El contenido de esta colección se genera automáticamente al añadir materiales al modelo de SketchUp. Para ver esta colección, selecciona Colores del modelo en el menú desplegable de la colección de materiales o pulsa el icono de Colores del modelo (
 ).
). - Eliminar materiales innecesarios: aunque cambies un material por otro, de forma que el material original ya no aparezca en el modelo, el material original sigue en la colección Colores del modelo hasta que lo elimines abriendo el menú contextual y seleccionando Eliminar. Para eliminar todos los materiales sin utilizar de un modelo, asegúrate de tener seleccionada la colección Colores del modelo. Después selecciona Lista > Eliminar materiales sin usar. También puedes seleccionar Borrar todos para eliminar todos los materiales de tu modelo y de la colección Colores del modelo.
- Crear colecciones propias: puedes crear una colección para un proyecto concreto o hacer una colección de materiales que vayas creando, como un esquema de color concreto, muestrarios de telas, opciones de paisajismo o cualquier otra cosa que utilices repetidamente. Selecciona Lista > Nueva. Aparecerá un cuadro para el nombre de la lista, escribe un nombre y pulsa OK. Se verá el nombre que hayas elegido en la lista desplegable de colecciones.Para añadir materiales a una colección nueva, puedes arrastrar la miniatura que hay junto al cuentagotas en la parte inferior del panel de Colores al panel de muestras de la colección nueva. También puedes crear texturas nuevas y guardarlas en la colección. Para eliminar la colección, selecciona Lista > Eliminar.
Creación de materiales propios
Los materiales incluidos en SketchUp te ayudan a empezar a usarlos y a explorar cómo funcionan. Para aplicar materiales específicos a tu diseño o edificio, seguramente necesites crear tus propios materiales. El proceso es bastante sencillo: empieza con una imagen para crear un mosaico de textura e indica un color si es necesario.
Windows
Para crear un material nuevo desde tus propios archivos o códigos de color, sigue estos pasos:
- En el panel de Materiales, pulsa el icono Crear material (
 ) en la esquina superior derecha.
 - Se abrirá un cuadro de diálogo de creación de material. Escribe el nombre del material nuevo en el campo de texto de la parte superior.
- Elige el color, la textura y la opacidad de tu nuevo material. Las opciones funcionan exactamente igual que las del panel de Editar. Consulta la sección anterior, Edición de materiales, para más información. Si necesitas ayuda con las opciones de color, consulta Mezcla de colores en el selector.
- Pulsa OK. Tu material nuevo aparecerá seleccionado en la colección En modelo.
MacOS
Para crear un material nuevo con textura, sigue estos pasos:
- En el panel de Colores, pulsa la pestaña Paletas de texturas (el icono del ladrillo).
- Selecciona la colección en la que quieres que aparezca el material nuevo.
- Selecciona Color > Textura nueva.
- En el cuadro de diálogo que aparece, selecciona un archivo de imagen para la textura.
- Escribe el nombre de la textura en el panel que aparece, establece la altura y anchura de cada cuadro del mosaico y pulsa OK. Si quieres aplicar color a la textura, sigue los pasos de la sección anterior, Edición de materiales.
Para guardar un color concreto como material hay que hacer lo siguiente:
- Utiliza cualquiera de las pestañas de color para crear el color que quieras, que aparecerá en el muestrario de colores en la parte inferior del panel de Colores. Consulta Mezcla de colores en el selector para más información.
- Selecciona la pestaña Paleta de texturas (también conocida como el icono del ladrillo).
- Ve a la colección en la que quieres guardar el color.
- Arrastra el recuadro de color desde la parte inferior del panel de Colores hasta el muestrario de la colección.
