Whether you want to draw the long arc of history or just a precise section of a circle, LayOut has four arc tools that enable you to draw an arc any way you like:
- The basic Arc tool (
 ) draws an arc around a center point.
 - The 2 Point Arc tool (
 ) pulls out the bulge of an arc from a chord, or straight line.
 - The 3 Point Arc tool (
 ) creates an arc by bending the arc on a pivot point.
 - The Pie tool (
 ) creates a closed pie shape after you define the arc.
Table of Contents
Getting started with arcs
With each tool, you can draw the arc visually or use the Measurements box to create a precise arc. In the following sections, you learn how both methods work for each tool. Before you get started, here are a few general tips for drawing arcs visually or precisely:
- Although the methods are presented in two separate steps lists, you can actually alternate between placing arc points visually and precisely with the Measurements box. For example, you might click to place an arc’s starting point but then use coordinates for the second point, so the arc points are a specific distance apart.
- When you draw an arc visually, you see many of the same inference points that you see in SketchUp, such as Center, On Point, On Line, and On Shape. An inference also appears when the arc you're drawing bisects another line or arc.
- As in SketchUp, LayOut doesn’t require you to click in the Measurements box before you type a value.
- As you create an arc, the Measurements box prompts you for the value to enter, such as Center, Radius, or Angle.
Drawing an arc around a center point
To draw an arc around a center point, you use the Arc tool (![]() ), which you find on the default toolbar’s Arcs menu or by selecting Tools > Arcs > Arc.
), which you find on the default toolbar’s Arcs menu or by selecting Tools > Arcs > Arc.
To draw the arc visually with this tool, follow these steps:
- Make sure the Arc tool is selected.
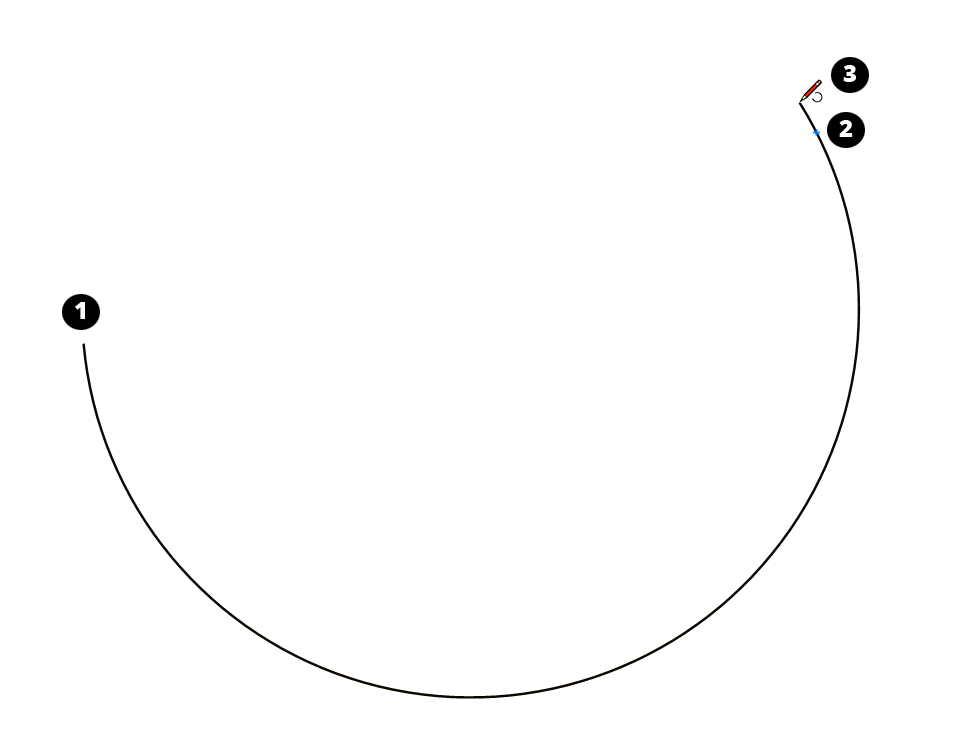
- Click to set a center point. (See Callout 2 in the following figure.)
- Move the cursor away from the center point and click again to set the arc’s starting point. (Callout 3)
- Move the cursor clockwise or counter-clockwise and then click to set the arc’s ending point. (Callout 4)
To create a precise arc with the Arc tool, here are the steps to follow instead:
- With the Arc tool selected, set the arc’s center point by typing absolute coordinates, which are measured from the upper left of the drawing area. For example, to set a center point at 5 inches across and 4 inches down, type [5“,4”] and press Enter (Microsoft Windows) or Return (Mac OS X).
- (Optional) Move the mouse cursor in the direction where you want the arc to begin. If you skip this step, the arc’s starting point is the X axis.
- Type a length for the arc’s radius, such as 3", and press Enter or Return.
- To set the arc’s end point, type a degrees value (such as 45). Alternatively, you can type a percentage of 360 degrees (such as 50% for a semicircle) or absolute coordinates. Press Enter or Return after you type a value.
Pulling a bulge from a chord
To create an arc by pulling the bulge of the arc out from a chord, you use the 2 Point Arc tool (![]() ), which you find on the default toolbar’s Arcs menu or by selecting Tools > Arcs > 2 Point Arc.
), which you find on the default toolbar’s Arcs menu or by selecting Tools > Arcs > 2 Point Arc.
If you need to draw an arc that's tangent to another arc or rectangle, the 2 Point Arc tool has a tangent inference. When an arc-in-progress is tangent to a rectangle or another arc, it turns turquoise.
To draw the arc visually, follow these steps:
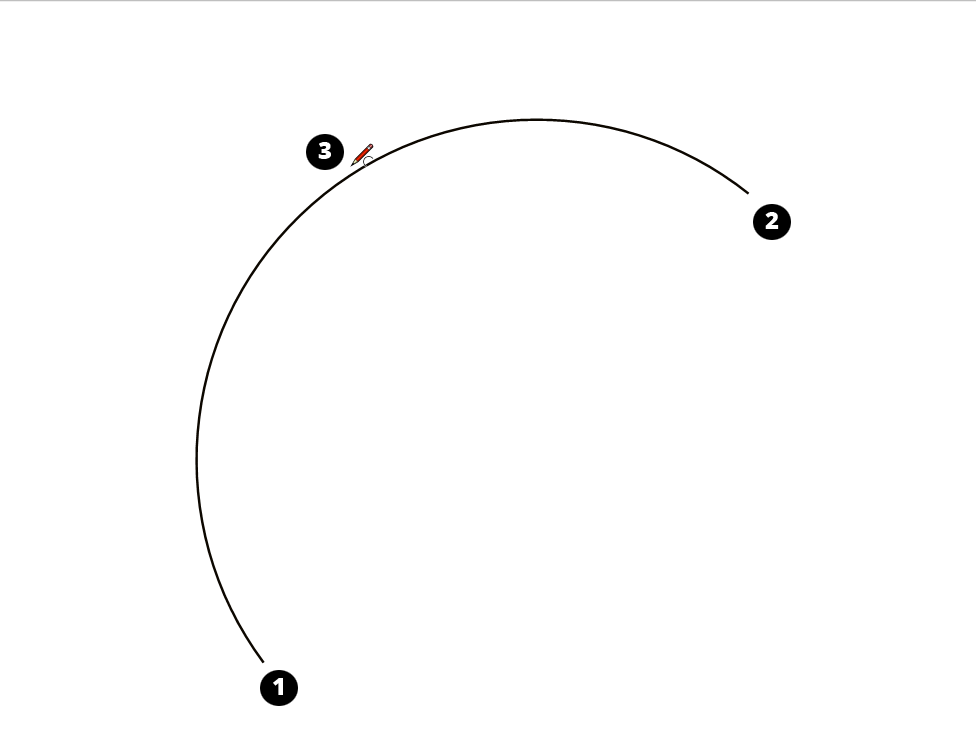
- With the 2 Point Arc tool selected, click in the drawing area where you want to place the arc’s starting point. (See Callout 1 in the following figure.)
- Click where you want to place the chord’s end point. (Callout 2)
- To pull out the arc’s bulge, move the cursor perpendicular to the chord and click to set the bulge distance. (Callout 3)
To draw the 2-point arc using precise coordinates, use the following steps:
- With the 2 Point Arc tool selected, set the starting point by typing absolute coordinates and then press Enter (Microsoft Windows) or Return (Mac OS X). For example, to set the point’s X axis at 2 inches and the Y axis at 6 inches, type [2“,6”].
- To define the chord’s end point, type absolute coordinates, relative coordinates, or polar coordinates. See the table in the article, Drawing Basic Lines, for details about each type of coordinate. When you’re done, press Enter or Return.
- To set the distance from the chord to the arc’s bulge, type a length value and press Enter or Return. For the length, you can use a point value or a unit of measurement.

With the 2 Point Arc tool, you can fillet corners with a tangent arc. As you fillet a corner, look for help from the inference engine: The normally turquoise tangent inference turns magenta at the point where it fillets a corner. This technique works not only on rectangles, but also polygons.
To create a chamfer (which is a straight line instead of a curve), follow the same steps to create a fillet, but when the Measurements box prompts you to enter a radius, type 0 (zero) and press Enter.
Bending an arc on a pivot point
When you create an arc with the 3 Point Arc tool, the pivoting action may seem a little unpredictable at first. So if this is your first time using the tool, allow yourself to make a few practice arcs to start.
You find the 3 Point Arc tool (![]() ) on the default toolbar’s Arcs menu or by selecting Tools > Arcs > 3 Point Arc.
) on the default toolbar’s Arcs menu or by selecting Tools > Arcs > 3 Point Arc.
To visually draw an arc by bending the arc on a pivot point, follow these steps:
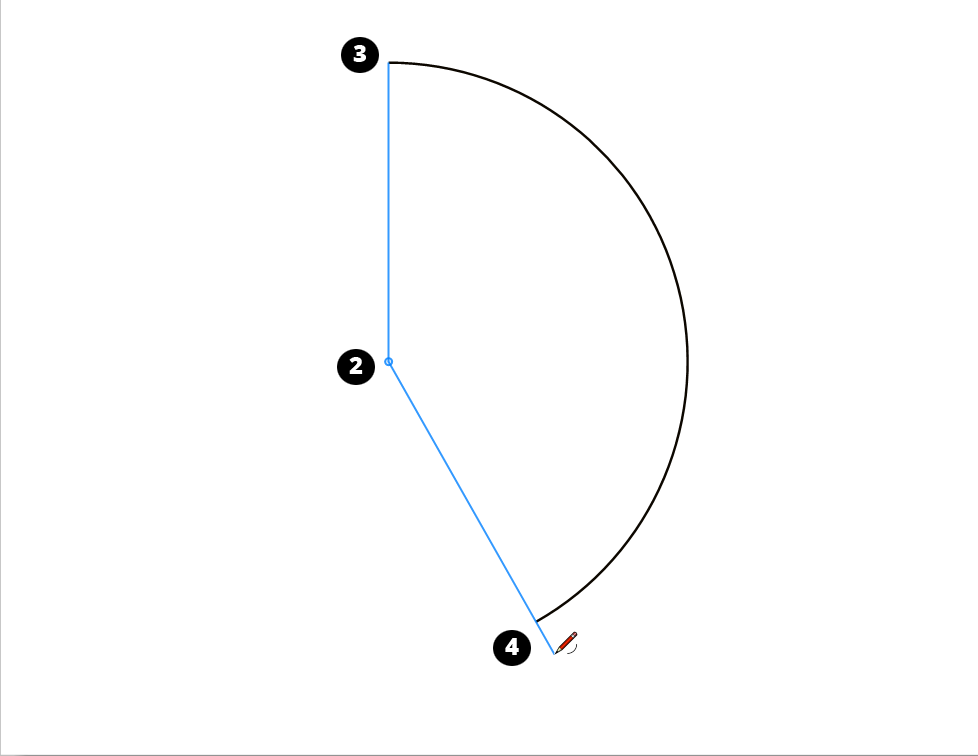
- With the 3 Point Arc tool selected, click in the drawing area to set the arc’s starting point. (See Callout 1 in the following figure.)
- Click elsewhere in the drawing area to set the arc’s pivot point. A blue pivot point appears, as shown at Callout 2 in the following figure.
- Move the cursor up to pivot the arc downward (Callout 3 in the figure), or move the cursor down to pivot the arc upward.
- When you like the arc’s shape, click to set the arc’s end point and complete the arc.
To draw with the 3 Point Arc tool using precise coordinates, follow these steps:
- With the 3 Point Arc tool selected, type absolute coordinates to place the arc’s starting point. For example, to place the starting point exactly 2 inches across on the X axis and 4 inches down on the Y axis, type [2“,4”] and press Enter (Microsoft Windows) or Return (Mac OS X).
- To place the pivot point, you can type absolute, relative, or polar coordinates. See the table in the article, Drawing Basic Lines, for details about each type of coordinate. When you’re done, press Enter or Return.
- To set the end point, you can again use absolute, relative, or polar coordinates. When you’re done, press Enter or Return.
Making a closed pie shape
The Pie tool (![]() ) creates a closed pie shape from an arc. You find the tool on the default toolbar’s Arcs menu or by selecting Tools > Arcs > Pie from the menu bar.
) creates a closed pie shape from an arc. You find the tool on the default toolbar’s Arcs menu or by selecting Tools > Arcs > Pie from the menu bar.
Although LayOut’s pie pieces aren’t as delicious as apple pie, they’re much easier to make. Here’s how to draw a pie slice visually:
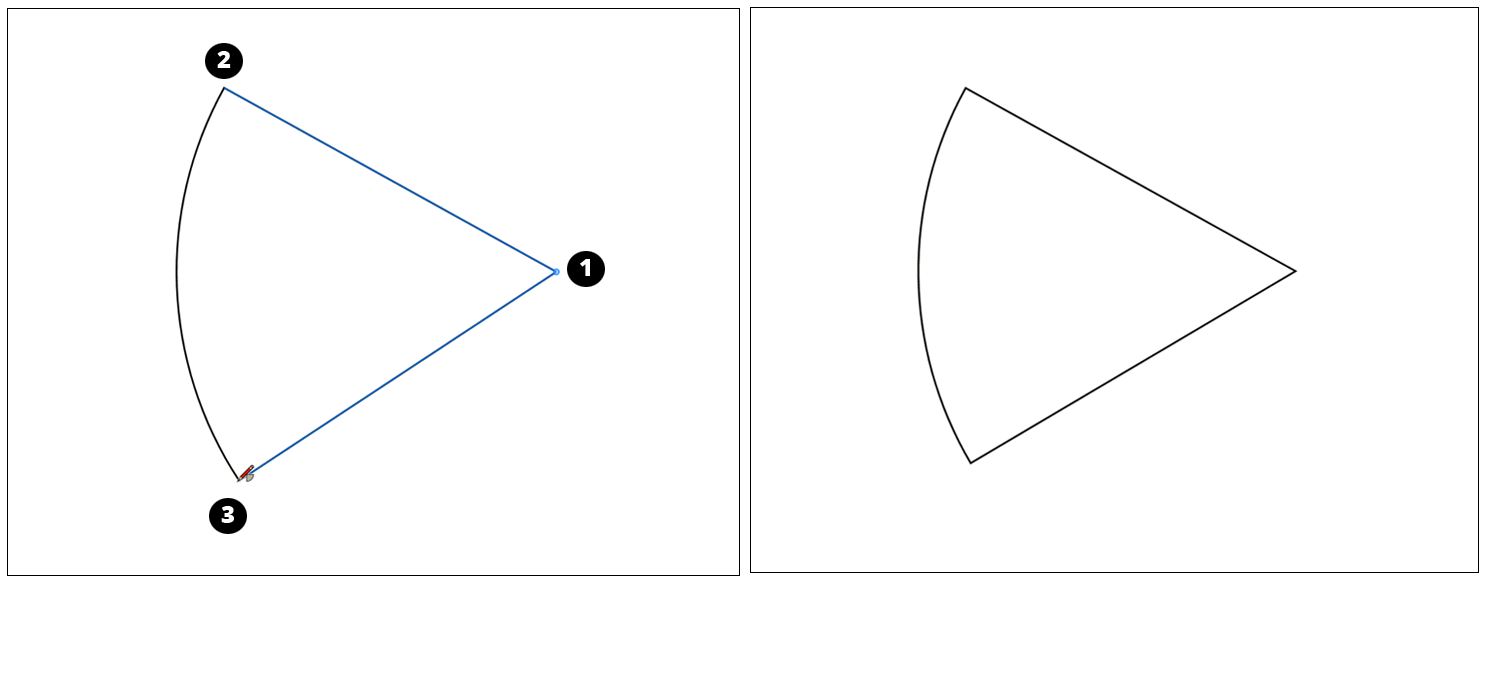
- With the Pie tool selected, click in the drawing area to set a center point (Callout 1 in the following figure).
- To set the starting point for the pie’s arc, click elsewhere in the drawing area. (Callout 2)
- Move the cursor clockwise or counter-clockwise and click to set the end point for the pie’s arc (Callout 3). After you set the end point, your closed pie shape appears, as shown in the righthand figure.
You can also create a pie shape using precise coordinates (absolute, relative, or polar). See the table in the article, Drawing Basic Lines, for details about each type of coordinate.