In LayOut, whenever you click a color swatch (like the swatches in the Shape Style panel) or select Window > Colors, LayOut transports you to the Colors panel, where you have a half dozen ways to choose and organize the colors for your LayOut document.
Table of Contents
Navigating the Colors panel interface
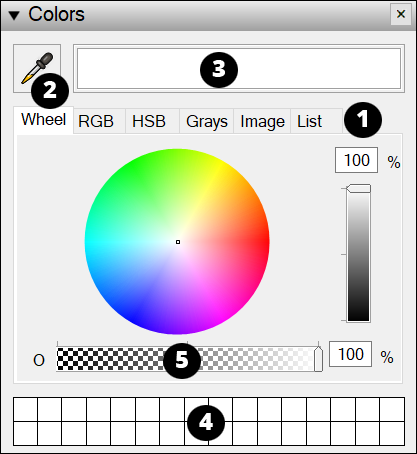
As you pick out color swatches like a TV-show decorator with thirty minutes to makeover a whole home, some interface elements appear wherever you go in the Colors panel. Here’s a quick introduction to the tools and features the Colors panel always keeps at your fingertips (or mouse pointer):
- Tabs: Each tab holds a different type of color picker, such as a wheel, color sliders, and so on.
- Eyedropper tool: Select the Eyedropper tool to select any color visible on-screen as the active color.
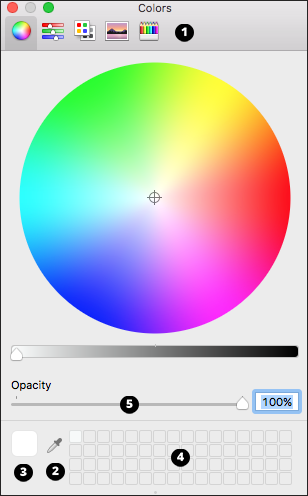
- Active color well: Here, you see the current color selection. You can drag and drop this color onto any shape in your LayOut document to apply the color as a fill or into any visible color well.
- User palette: To keep a color for later use, drag and drop the color from any visible color well. Dropping a new color over an existing color replaces the color. If you need to see more wells, click and drag the size handle at the bottom of the Colors panel to expand the number of visible color wells.
- User palette: To keep a color for later use, drag and drop the color from the active color well (3) to a square on the palette. Dropping a new color over an existing color replaces the color. If you need to see more wells, click and drag the size handle at the bottom of the Colors panel to expand the number of visible color wells. Note that you can no longer use this palette as a library for material textures.
- Opacity slider: This slider changes your color's opacity, or how transparent the color is. When the Opacity is set to 100%, the color is opaque. As the Opacity percentage decreases, the color becomes more transparent.
The callouts in the following figure correspond to the numbers in the preceding list.
Selecting a color from the color wheel
The color wheel picker arranges the color hue radially around the wheel, with the highest saturation at the wheel’s outer edge. The color wheel is the simplest and most versatile of your color-picking options, although the color wheel is also the least precise.
The following steps walk you through the color wheel options:
- To select a color, click a color hue on the color wheel. The color you select appears in the active color well.
- (Optional) To adjust the color’s brightness, drag the brightness slider (to the right of the color wheel) or type a percentage in the box above the slider.
Choosing colors precisely with RGB, HSB, Grayscale, or CMYK sliders
The Colors panel has sliders that enable you to enter precise color values, using any of the following methods:
- RGB: RGB colors are traditionally used to specify on-screen colors. Use a slider to specify a red, green, and blue value. These values mix to create the color you see in the active color well.
- HSB: HSB is another system used to specify on-screen colors, but in this case, you set hue, saturation, and brightness values. Because the saturation value has its own slider, this method is especially intuitive if you want a desaturated color.
- Grayscale: When you want a pure gray (without any color undertones), check out the grayscale slider.
- CMYK: On Mac OS X only, you find sliders for setting CMYK (cyan, magenta, yellow, and black) color values, a system used in professional printing, where colors are specified using percentages of four basic ink colors.
To select a color using any of the sliders, follow these steps:
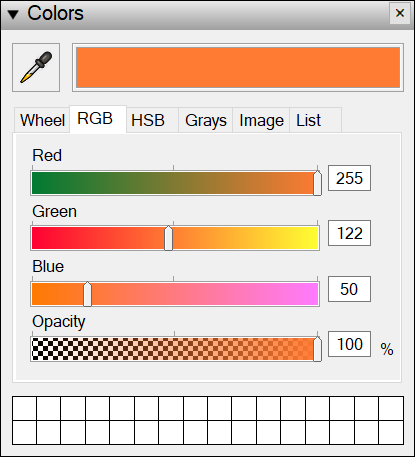
- Select the tab that corresponds to the color system you want to use: RGB, HSB, or Grays.
- Click and drag a slider to set a value for each option, or type a numerical value in the box next to each slider. For example, if you know your document needs to use an RGB value of Red 255, Green 122, and Blue 50, you can type those values in the boxes, as shown in the following figure. If you select the HSB tab, you see Hue, Saturation, and Brightness sliders. If you select the Grays tab, you see a Gray slider.
- At the top of the Colors panel, select the Color Sliders tab.
- From the menu at the top of the tab, select the color value system you want to use: Gray Scale Slider, RGB Sliders, CMYK Sliders, or HSB Sliders. In the following figure, HSB Sliders is selected.
- Click and drag a slider to set a value for each option, or type a numerical value in the box next to each slider. For example, if you know your document needs to use an HSB value of Hue 21, Saturation 80, and Brightness 100, you can type those values in the boxes, as shown in the following figure. If you select the Gray Scale Slider option, you see a Brightness slider as well as five grayscale preset values. If you select the RGB Sliders option, you see Red, Green, and Blue sliders plus the color’s Hex Color number (also called a hexadecimal value). If you select the CMYK Sliders option, you see Cyan, Magenta, Yellow, and Black sliders.
- (Optional) To limit your color options to a specific color profile, click the gear icon (to the right of the drop-down menu) to see color profile options related to the color value system you selected. Note: Typically, you use color profiles to help match what you see on screen to the color profile set for your printer. In most cases, the default color profile works just fine. If you’re working with a printing service, the service technician can tell you whether you need to select a specific color profile.

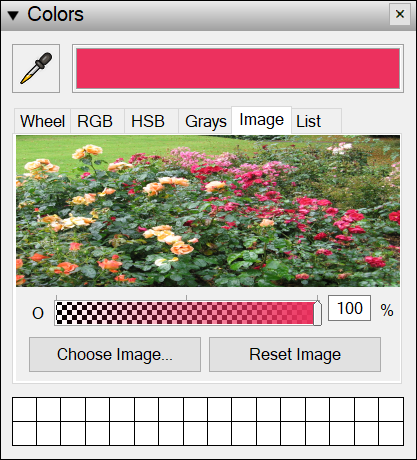
Picking up colors from an image
Have an image with the colors you need, but aren’t sure of the colors’ specific values? Check out the image feature on the Colors panel, which enables you to load an image into the color picker and select colors from anywhere in that image.
By default, you see a spectrum. To load your image and start picking colors, follow these steps:
- On the Colors panel, click the Image tab.
- Click the Choose Image button.
- In the Open dialog box that appears, navigate to the image you want to load in the color picker and select it.
- Click the Open button. Your image appears in the color picker, as shown in the following figure.
- Click the image to select a color. Remember that you can also click and drag the cursor around the image to see a dynamic preview of colors in the active color well.
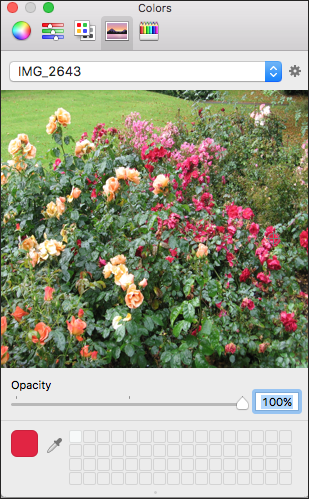
- On the Colors panel, click the Image Palettes tab.
- Click the gear icon next to the drop-down list, and select New from File from the menu that appears. Or if you’ve copied an image to the clipboard, select New from Clipboard.
- In the New Color Palette dialog box that appears, navigate to the image you want to load in the color picker and select it.
- Click the Open button. Your image appears in the color picker, as shown in the following figure.
- Click the image to select a color. Remember that you can also click and drag the cursor around the image to see a dynamic preview of colors in the active color well.
Selecting colors from preset lists
LayOut’s Colors panel includes color presets that you can choose from a list. To select from these presets, follow these steps:
- Click the List tab.
- Scroll through the list of colors and click a color to make it the active color.
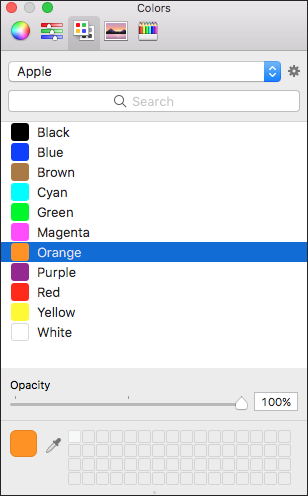
- At the top of the Colors panel, select the Color Palettes tab.
- From the drop-down list at the top, select a palette. By default, this menu includes palettes for basic Apple colors, Web Safe colors, and Crayon colors (which are also available on the Crayons tab). If you define a custom palette, as explained in the following Tip, you can select that palette from this list, too.
- From the list of colors that appears, select a color to make it the active color. If you can’t find a color, try typing its name in the Search box.
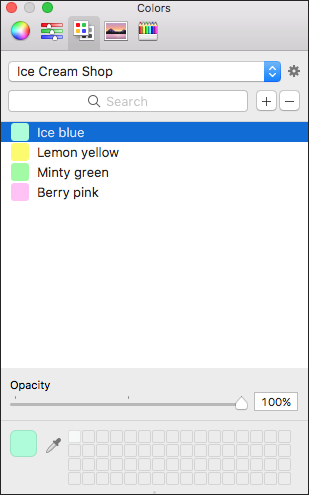
On Mac OS X, you can create a custom palette of colors that you define. Here’s how:
- With the Color Palettes tab selected, click the gear icon and select New from the menu that appears. In the new Unnamed palette that appears, the active color becomes the first color in your palette.
- To add more colors, choose a new active color and click the plus sign icon next to the Search box. Or, simply drag a color into the list. To delete a color that you’ve added, select it in the list and click the minus sign icon.
- (Optional) To give the color palette a name, click the gear icon and select Rename. In the box that appears, type a name and click the Rename button.
- (Optional) To rename a color, double-click it and type a new name.
In the following figure, you see a custom color palette for an ice cream shop.