Whether you’re an architect, woodworker, or engineer — basically, anyone who creates construction documents — you probably need to add tables to those documents.
With LayOut’s table feature, you can create and edit tables of text in LayOut or import table data from an Excel file (.xlsx) or a .csv file.
In the sections that follow, you discover how to create tables and edit their spacing, rows, columns, and cells. Also, find out how to format a table and table text.
Table of Contents
Creating a table
Creating a table is a simple three-click process. Follow these steps:
- Select the Table tool (
 ) from the toolbar or select Tools > Table from the menu bar. To set the default shape style and text formatting of your tables, select your options before you proceed to the next step.
 - Click to place a table corner. Or type an absolute coordinate (such as [3,2]) and press Enter.
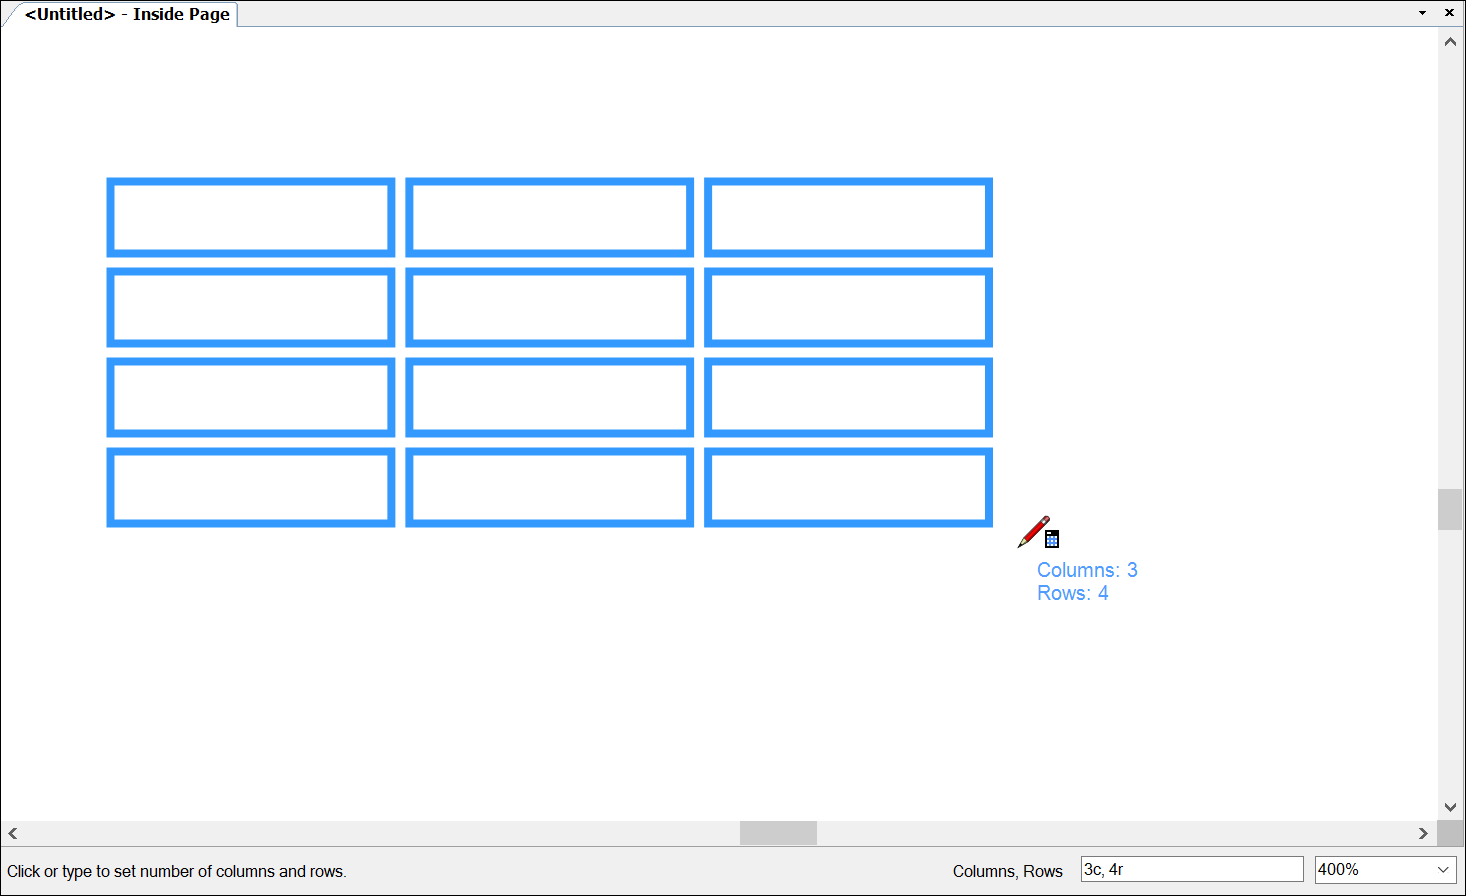
- To draw your table visually, move the cursor up, down, left, or right, and click when your table contains the desired number of rows and columns, as shown in the following figure. Tip: To enter a precise number of rows and columns, use the Measurements box by typing a value and pressing Enter. For example, to create a table with 3 columns and 4 rows, type the the following value: 3c,4r. To remind you of this format, the Measurements box displays a prompt.
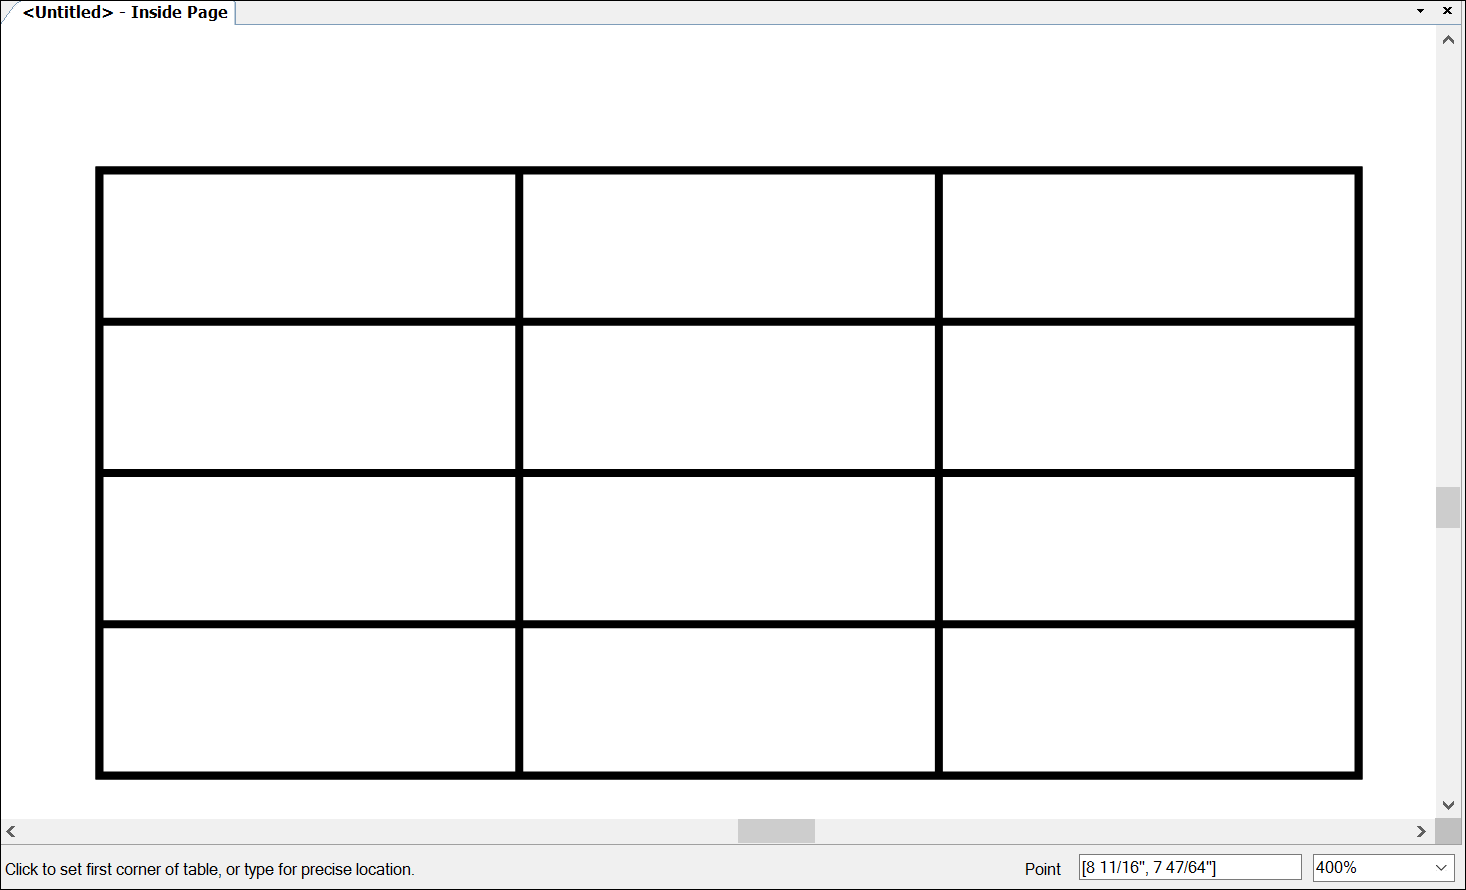
- Move the cursor to adjust the table dimensions and click when your table is the desired size. Alternately, type a relative value (a value in angle brackets, as shown in the Measurements box prompt) or an absolute value for the width and height, and press Enter. Your table appears in your LayOut document, as shown in the following figure.
Editing a table
Does your table data need room to breathe? Are you missing a row or column? Would merging or dividing table cells help you organize your table data? Well, you’re in luck. This section explains how to do all these things.
Adjust spacing
To change the spacing of rows and columns, you can do any of the following:
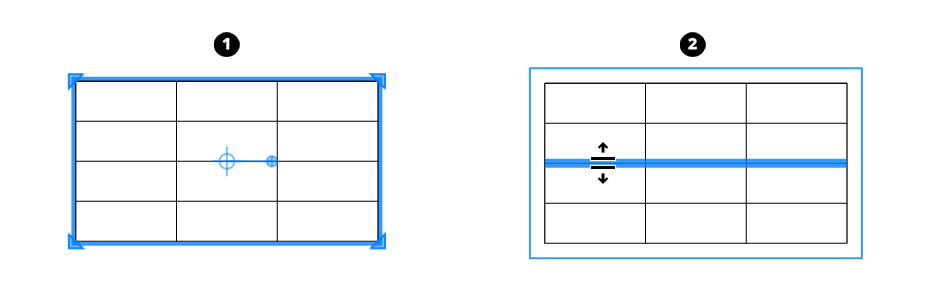
- Resize the whole table. Click the table, and a thick blue selection border appears around your table. (See Callout 1 in the following figure.) Click and drag any edge or corner to resize the table. To maintain the table’s aspect ratio, hold down the Shift key as you drag.
- Resize a row or column. Double-click the table so that a thin blue selection border surrounds the table. (See Callout 2.) Then click and drag a row or column edge to resize the row or column.
- Space rows or columns evenly. Context-click the table and select Space > Rows Equally or Space > Columns Equally.
- Resize a selection of rows or columns. Shift+click to select multiple row or column edges. Then drag to resize the selected rows or columns and click to set the new size. Alternately, you can select cells in the rows or columns that you want to resize, context-click the selection, and choose Space > Rows Equally or Space > Columns Equally.
- Size rows or columns to fit the text. Context-click the table and select Size > Rows to Fit or Size > Columns to Fit.
Add or delete rows and columns
After you create a table, you can insert a row or column as follows:
- With the Select tool (
 ), double-click the table so that the thin blue selection border surrounds the table.
 - Click a cell that’s adjacent to the point where you want to insert the row or column.
- Context-click the table and select one of the following options: Insert Row Above, Insert Row Below, Insert Column Left, or Insert Column Right.
To delete a row or column, follow these steps:
- With the Select tool (), double-click the table so that the thin blue selection border surrounds the table.
- Click a cell that’s in the row or column that you want to delete.
- Context-click the table and select Delete Row or Delete Column.
Merge or divide cells
To merge cells in a table, follow these steps:
- Select two or more cells in the same row or column.
- Context-click the selection, and choose Merge Cells.
After you merge cells, you can divide them so that the table returns to its original state. Simply select the merged cell, context-click the selection, and choose Unmerge Cells.
Formatting table grid lines and cell colors
To edit the grid lines and cell background color in a table, use the Shape Style panel. The following sections explain the different table elements you can edit in this panel.
Grid lines
The Shape Style panel enables you to select a stroke color, width, dashes, and so on. You can also hide grid lines by toggling off the stroke. In a table, you can edit the grid lines of the whole table, the outer border, or individual grid lines:
- Whole table: With the Select tool, click the table. Then select your desired options in the Shape Style panel.
- Selected grid lines: Double-click the table. Then you can select the outer border and/or individual grid lines that you want to edit. To select multiple lines, hold down the Shift key while you click to select grid lines. If you have trouble selecting lines instead of cells, hold down the Ctrl key (Windows) or Option key (Mac) to select only gridlines. After you select the lines you want to edit, choose stroke formatting options in the Shape Style panel.
Fill
You can edit the fill for the table or a cell:
- Table fill: Click the table, and use the Shape Style panel to select your fill or pattern options.
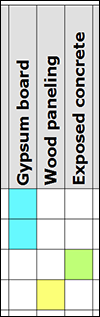
- Cell fill: Double-click the table and then select the cell whose fill you want to edit. Then use the Shape Style panel to select a different fill for that cell.
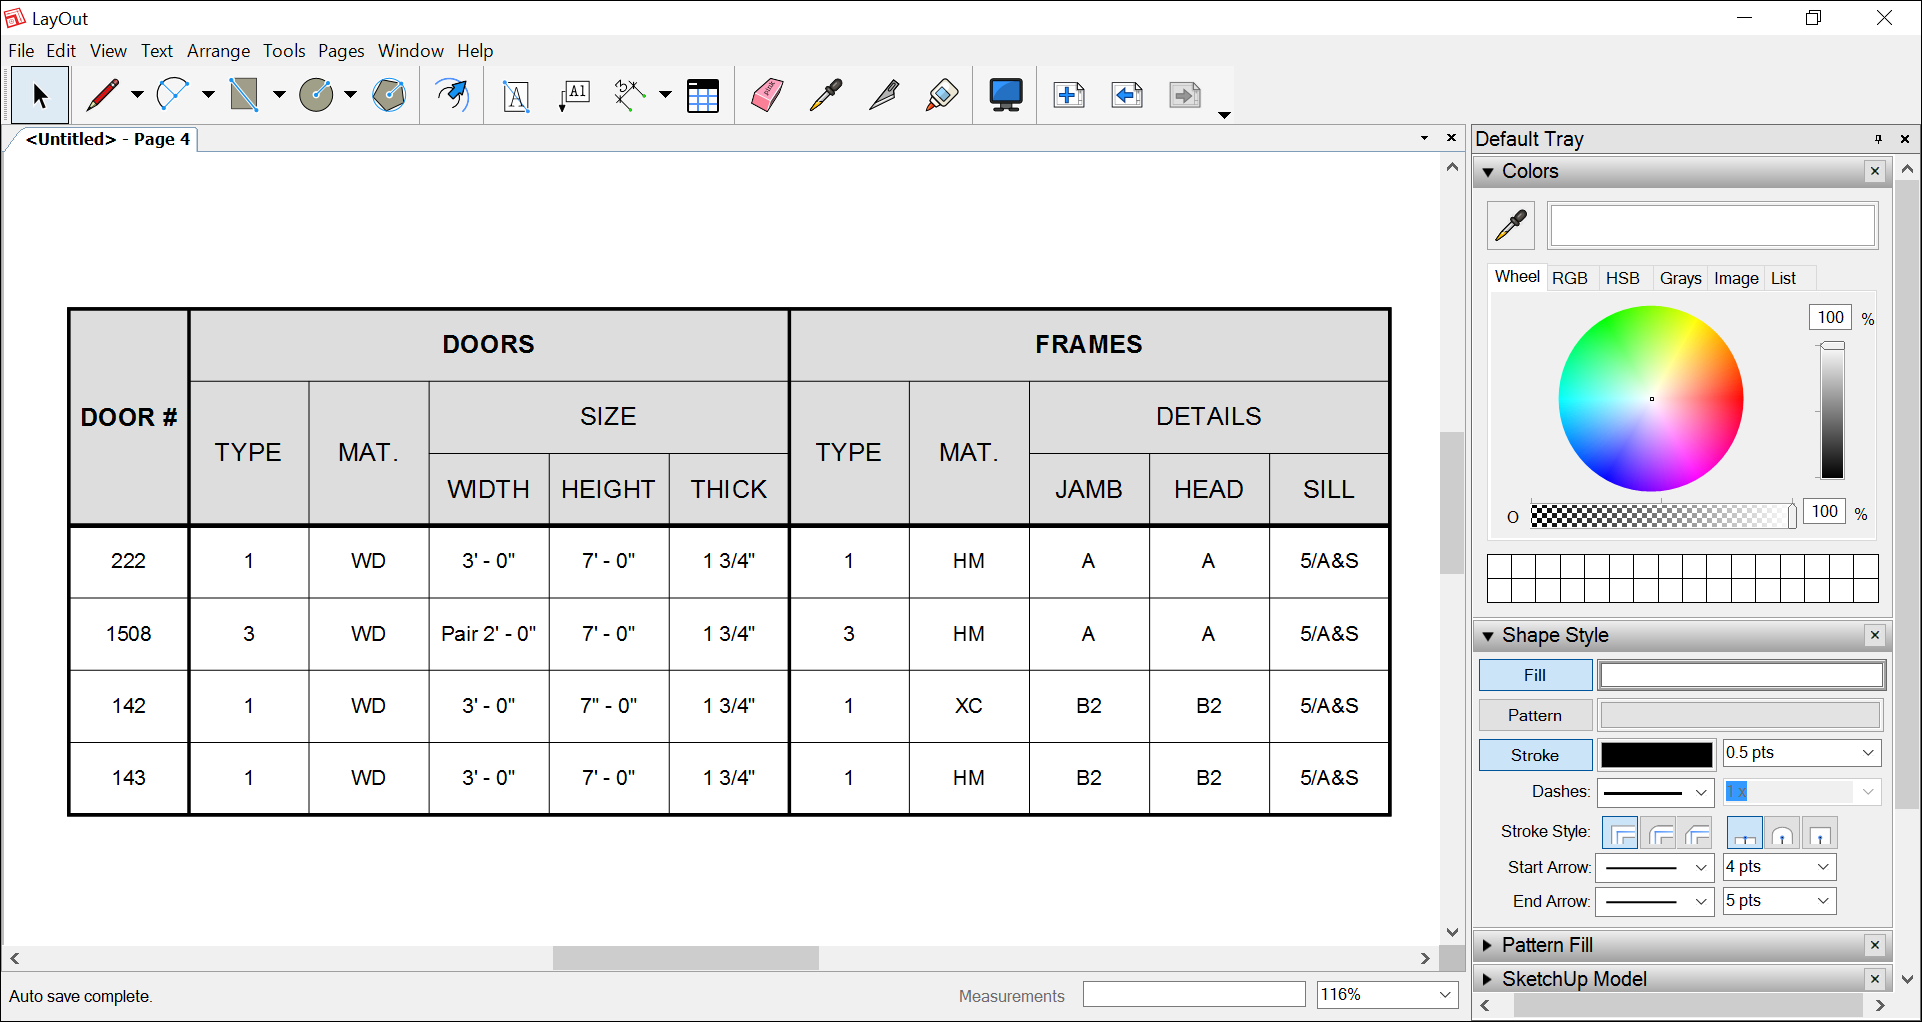
In the following figure, grid lines that separate the table's key sections are thicker, and the table header was filled with light gray.
- Apply a table’s shape style and text formatting to another table: Select the Style tool (
 ) and click the table whose formatting you want to copy. Then select the Table tool () and create a new table.
 - Copy a cell’s fill and text formatting to another cell: Double-click the table, select the cell the cell whose style you want to copy, context-click the selection, and select Copy Style. Then, select the cell or cells where you want to paste the style, context-click the selection, and choose Paste Style.
Typing text into a table
To type data into a table, follow these steps:
- With the Select tool (), double-click the table so that the thin blue selection border surrounds the table.
- Click the cell in which you want to type.
- Type your text.
- To continue adding data to your table, press the Tab key to move to the next cell, or double-click another cell. To exit text-editing mode, double-click outside the table.
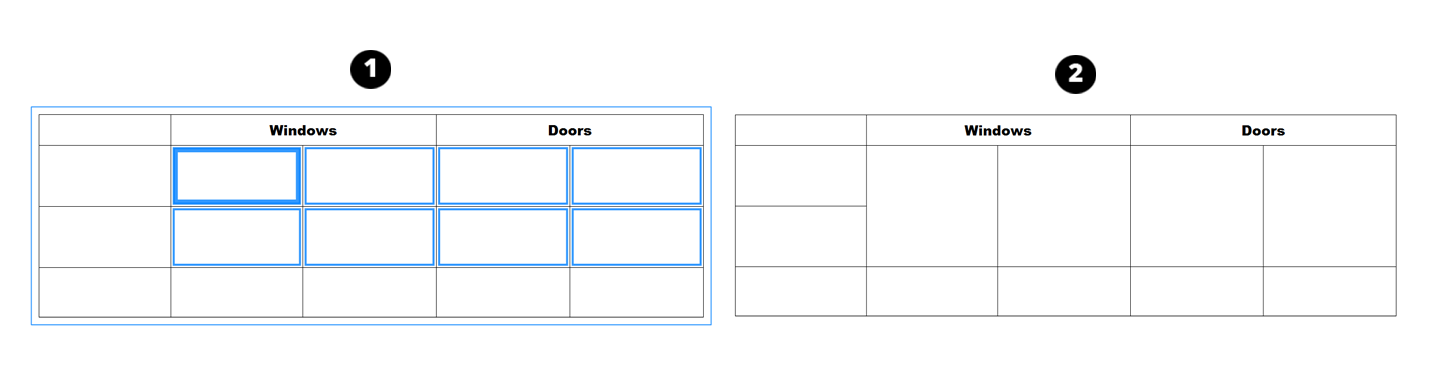
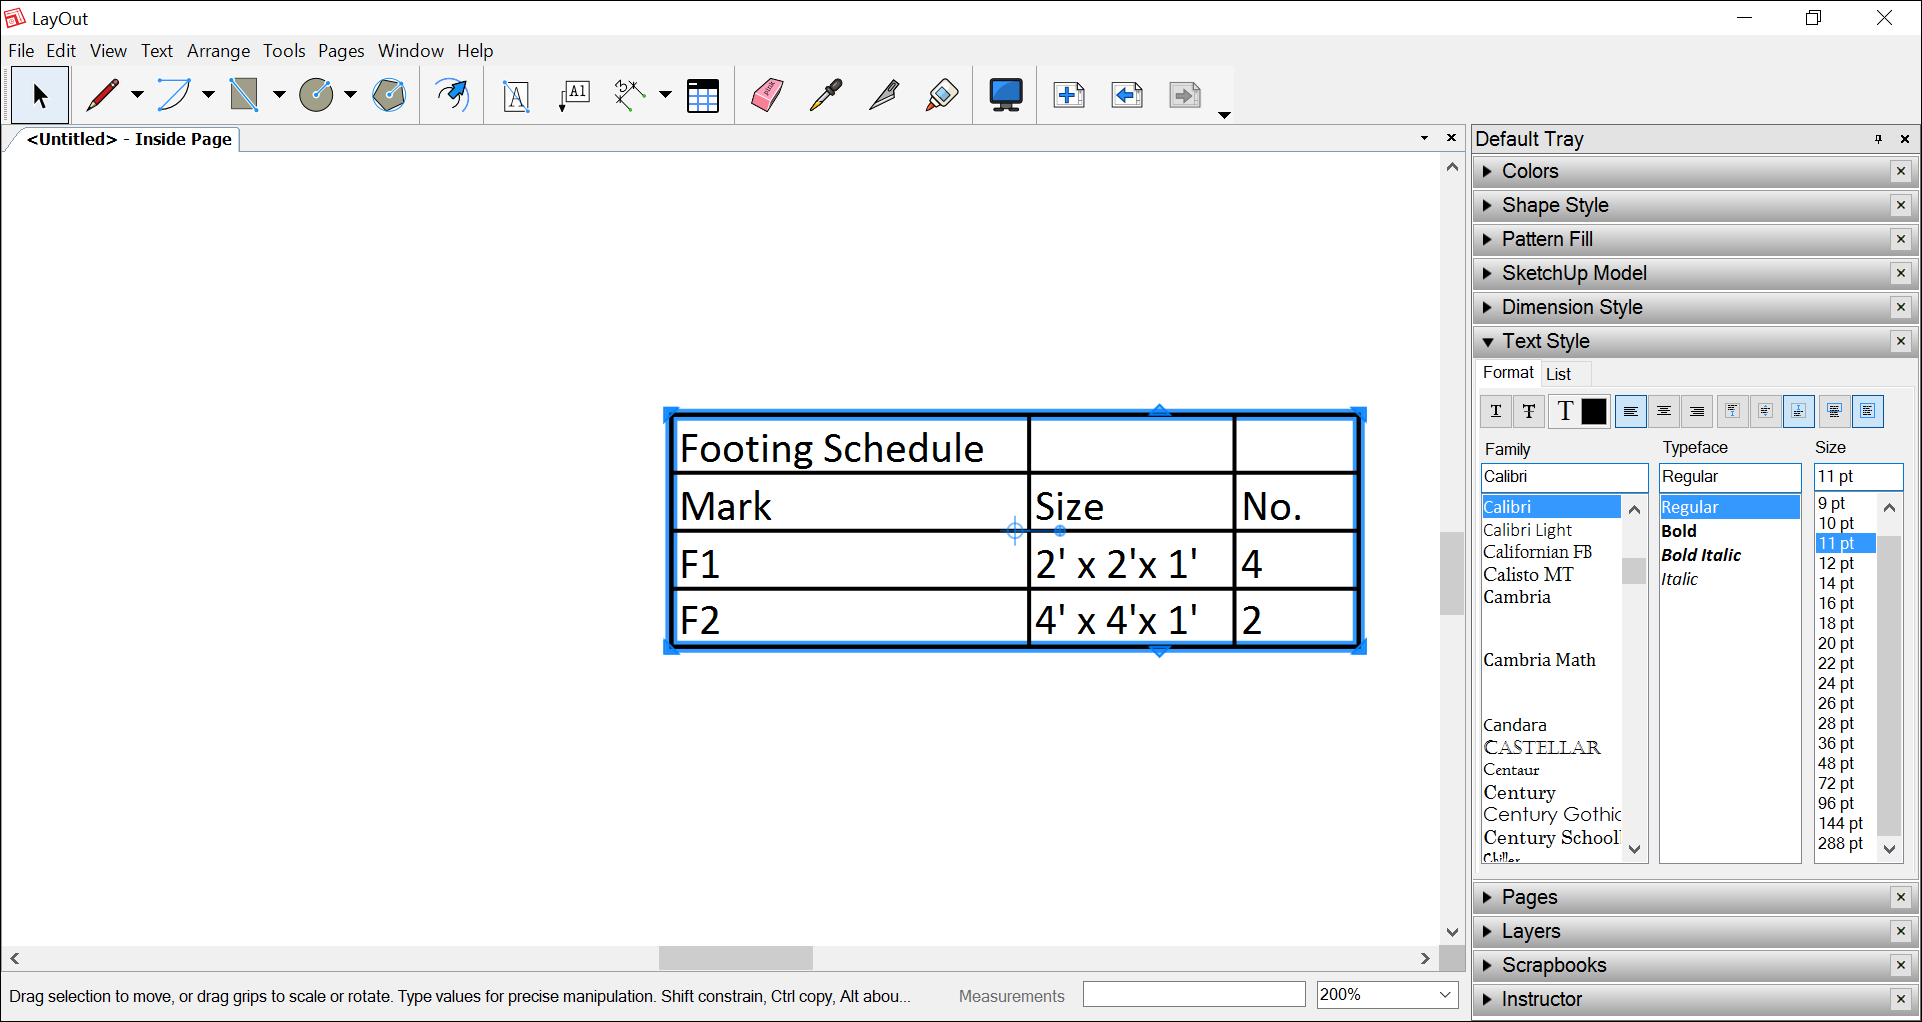
If your table includes a finish schedule or otherwise needs rotated text, as shown in the following figure, you can rotate the text after you enter it into the table. Select the cells whose text you want to rotate, context-click the selection, and choose Rotate Text > Clockwise or Rotate Text > Counterclockwise. Each time you select an option, the text rotates 90 degrees in the direction you choose.
Navigating a table with the keyboard
The keyboard can help you move quickly from cell to cell as you type text or select cells. The following table outlines all the ways you can move around a table using your keyboard.
| Key | In Table Text-Edit Mode | When Cell Is Selected |
|---|---|---|
| Tab | Move to the next cell in a row (or the first cell in the next row). If there’s no next row, tabbing doesn’t move anywhere. | Move to the next cell in a row (or the first cell in the next row). If there’s no next row, tabbing doesn’t move anywhere. |
| Shift+Tab | Move to the cell to the left. | Move to the cell to the left. |
| Enter | Moves to the next cell in a column. | Moves to the next cell in a column. |
| Shift+Enter | Moves up a cell in the column. | Moves up a cell in the column. |
| Ctrl+Enter | Creates a carriage return in the cell. | n/a |
| Arrow keys | n/a | Moves in arrow direction. |
Importing data from a spreadsheet
If your table data is saved in a spreadsheet, you can simply import the spreadsheet data into LayOut. You can also generate a report from SketchUp that's saved as a .csv file. (See Generating an attribute report in the Classifying Objects article for details.)
After you review your spreadsheet's data and formatting, make sure the spreadsheet is saved as a .xlsx or .csv file. Then follow these steps in LayOut:
- Select File > Insert.
- In the open dialog box that appears, navigate to the location where you saved your spreadsheet file.
- Select the file and click the Open button. If you select an Excel file (
.xlsx), the Excel Reference Options dialog box appears. If you select a.csvfile, the data is imported into your LayOut document as a table entity. - From the Sheet drop-down list, make sure the sheet you want to display is selected.
- (Optional) By default, all cells on the sheet are imported. To set a range, clear the All checkbox and specify a range in the text box to the right. Note: To specify a range for a
.csvfile, context-click the table in LayOut and select CSV Reference Options. - (Optional) By default, any formatting applied to your spreadsheet appears in LayOut. To ignore your spreadsheet formatting, clear the Import Excel Formatting checkbox.
- Click OK, and the spreadsheet data appears as a table entity in your LayOut document, as shown in the following figure.
Split a table
An imported table can be so packed with data that the table doesn’t fit on the page. That’s okay. Just split the table as many times as you want. Every time a table splits, the breakup is amicable: LayOut can keep track of the original referenced file so that you maintain all the data-management features explained in the upcoming section, Manage changes to imported table data.
To split a table after a row, follow these steps:
- Double-click the table.
- Select a cell in the row after which you want to split the table.
- Context-click the selection and choose Split Table After Row # (where # is the row number of the selected cell). Your table splits.
- Move the table pieces so they’re side-by-side or broken across multiple pages. To move a table piece to a new page, use the cut and paste commands to cut it from the current page and paste it on another page. See Managing and Navigating Pages for help with the Pages panel.
Manage changes to imported table data
After you import data into a LayOut table, you can edit the table data in the source application. For example, if you import an Excel file, you can edit the data in Excel, and LayOut updates the table to reflect your changes. Follow these steps to edit and update your table data:
- Context-click the table and select Open with Table Editor. The application, such as Excel, opens the file you inserted into LayOut.
- Edit your table data and save the file. Back in LayOut, your table reflects the changes you made.
Moving a table
You move a table with the Select tool (). To move a table entity, simply click and drag it to your desired location. Alternately, you can select the table, type precise coordinates (such as 2,4), and press Enter.
To rotate a table, click the table with the Select tool (). A thick blue selection border appears around your table, and a rotation handle appears in the center. You can click and drag the rotation handle or immediately type an angle of rotation and press Enter. For example, type 90 and press Enter to rotate the table 90 degrees.
Saving a table in a scrapbook
)and apply the formatting to any new table with a single click. First, in a new, blank LayOut document, create the table with all the formatting and data that you want to use in every document. For example, if your table always has the same title, include the title. When you’re ready, see Working with Scrapbooks of Reusable Entities for details about creating a custom scrapbook.