Tags help you organize the objects in your SketchUp model and control their visibility. SketchUp allows you to hide tagged objects in one click rather than select each object individually. Hiding large chunks of your model using tags helps to find things faster and even speed up SketchUp a bit too. You can use tag visibility to not only set up scenes in SketchUp, but also to set up your model for efficient operation.
To control visibility with tags, first create tags in the Tags panel. You can then assign tags to selected objects using the Tag tool or the Tag dropdown in Entity Info.
By default, any new raw geometry you create has the 'Untagged' tag. Before assigning tags, make sure you understand the process of making groups and components. Your models will be much more predictable if you refrain from assigning tags to entities like edges or faces, or changing the active tag. (Unless you are an experienced modeler, don't use the pencil icon in the Tags panel).
Now that you understand the basics, let's walk through SketchUp's Tags in three parts:
Getting to know Tags
You can create and manage tags using the Tags panel. Find this panel under Window > Tags on MacOS, or in the default tray on Windows. (Window > Default Tray).
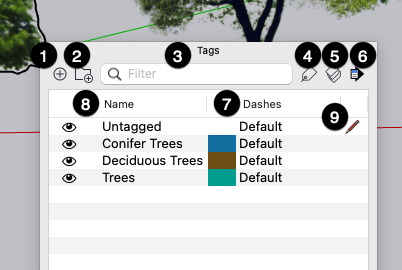
Let's get to know the Tags panel:
- Add Tag: Selecting the plus sign in the upper left adds a new tag. Type a name for the tag and press Enter (or Return). To rename a tag, double-click its name in the Tags panel and enter a new name. Remember, you will need to add a tag before you can assign it to an object.
- Add Tag Folder: Selecting the folder icon (
 ) creates a folder you can use to organize your tags. Grouping tags together in a folder can make things easier when your model has a long list of tags in use. You can also toggle the visibility of every tag in a folder all at the same time, allowing you to turn off large chunks of your model all at once.
 Filter Tags: To quickly zero in on a tag or tag folder, use the filtered search option at the top of the Tags panel. As you type, the Tags panel will only show tags that match what you type.
Note: While filtering, we suggest using the 'Expand All' option in the Details Menu (see below) to see tags in folders.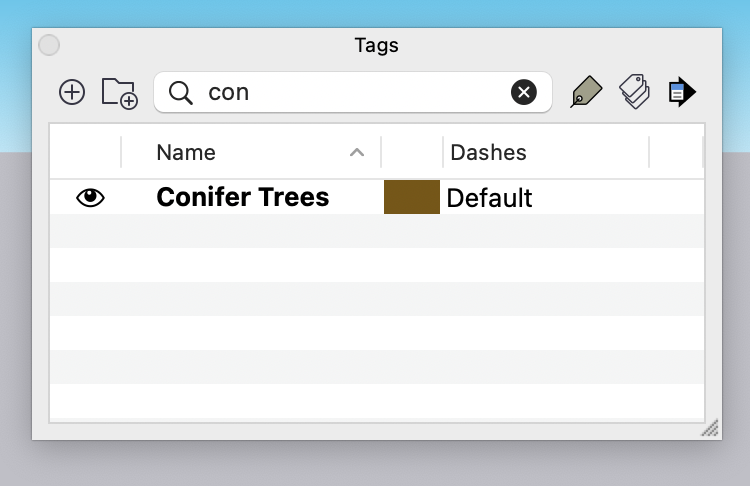
- Tag tool: Click the Tag tool icon (
 ) to the right of the filter to activate the Tag tool. See Using the Tag tool below for more detail.
 - Color by Tag: Using the Color by Tag icon, you can change the color of all objects with the selected tag to the color you chose for that tag. To set a tag color, select the color swatch next to its name. Switching to Color by Tag gives you a very clear understanding of how objects have been tagged.
- Details Menu: This sidecar menu offers the following options for managing your tags:
- Expand All - Opens all folders, showing all tags within them.
- Collapse All - Closes all folders, hiding the tags within them
- Select All - Selects all tags
- Delete Tag - Deletes the selected tag
- Delete Tag Folder - Deletes the selected tag folder
- Purge - Deletes all tags not assigned to an entity.
- Select All Tagged - Selects all entities with the selected tag.
- Dash Pattern: Set the dash pattern of a tag to style the lines of all objects with this tag.
- Sort: You can sort the list of tags by name (ascending or descending alphabetically) by selecting the Name header. You can sort by visibility (visible or not visible) by selecting the Visible column header.
- The 'Active Tag': Remember, this is the setting we recommend not messing with! With the active tag you can create new geometry by default on a tag. This option is only recommended for seasoned SketchUp users.
Now that you are familiar with the Tags panel, let's take a quick look at how to control tag visibility. An icon shaped like an eye (![]() ) appears next to each tag in the Tags panel and helps you control the visibility of objects with that tag. Clicking the icon toggles the visibility for that tag.
) appears next to each tag in the Tags panel and helps you control the visibility of objects with that tag. Clicking the icon toggles the visibility for that tag.
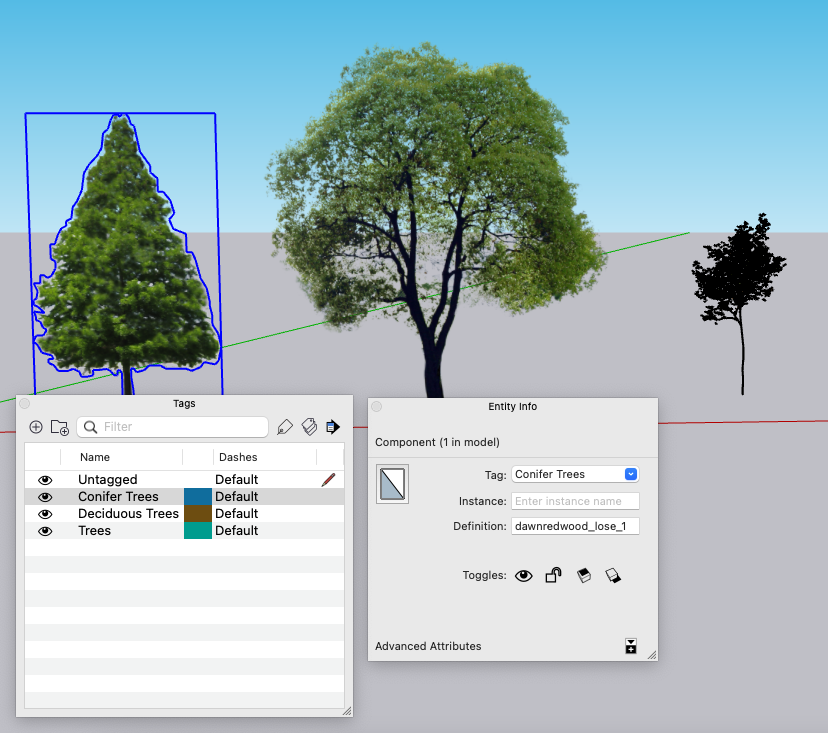
In the following figure, each group has been assigned its own tag, and each tag appears in the Tags panel. When you toggle the icon in the example below, the Conifer tag is deselected, hiding the tree. When you click again, the tree appears. Simple as that!

Using the Tag tool
The Tag tool (![]() ) helps you quickly apply a tag to an object. You can find the Tag tool in the Tags panel, the Large Tool Set, or the Tools menu. If the Tags panel isn't already open, selecting the Tag tool from the toolbar will open it. To use the Tag tool:
) helps you quickly apply a tag to an object. You can find the Tag tool in the Tags panel, the Large Tool Set, or the Tools menu. If the Tags panel isn't already open, selecting the Tag tool from the toolbar will open it. To use the Tag tool:
- Select a single tag in the Tags panel. Note: If multiple tags or a tag folder are selected, the Tag tool will not apply tags.
- Select the Tag tool icon in the Tags panel or in your toolbar if you haven't already
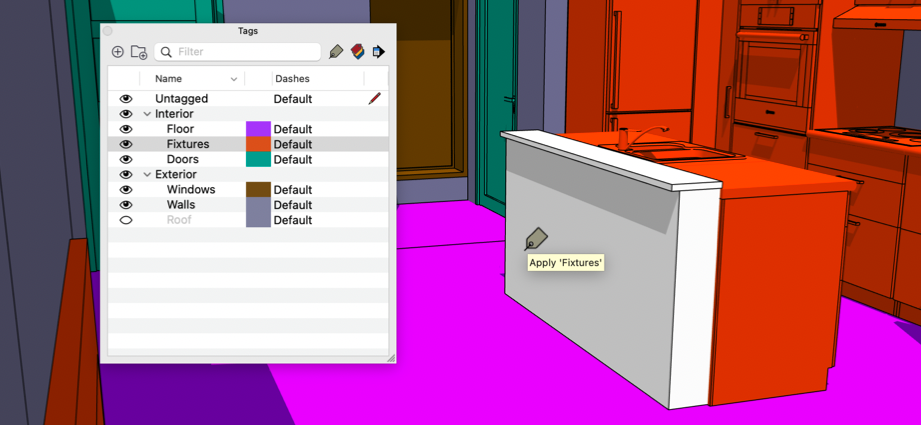
- Select an entity in the modeling window.
- The entity will flash purple to let you know that tag is now assigned to that entity.
Using modifiers you can change the mode of the tag tool to perform the following actions:
| Tool mode | Modifier Key (Windows/MacOS) | Functionality |
| Sample | Alt/Command | Makes the tag associated with a clicked entity the selected tag. Sampling a tag in the modeling window is a fast way to select that tag in the Tags panel and ready for use with the Tag tool. |
| Replace All | Shift/Shift | Replaces the tag of all entities that share a tag with the clicked entity with the selected tag in the Tags panel. |
| Tag All Instances | Ctrl/Option | Tags all instances of a component with the selected tag in the Tags panel. |
Working with Tag Folders
The more complicated your model gets, the more the Tag window will fill with a list of similarly named tags. A long list of tags can be hard to scan and may slow you down when you want to do things like control visibility. To help make your tag list more manageable you can group your tags together in Tag Folders. For example, if you have tags for "chair", "sofa", and table you can keep all of those tags together in a folder called "furniture". We encourage you to choose names for your folders that best help you organize your tag list.
In the Tags panel, create a new folder using the Add Folder icon (![]() ). If no tags are selected then this will create an empty, unnamed folder. Type the name of your new folder and hit Enter to continue. If you don't name your folder, SketchUp automatically numbers it. Now, select one or multiple tags and drag them into your folder.
). If no tags are selected then this will create an empty, unnamed folder. Type the name of your new folder and hit Enter to continue. If you don't name your folder, SketchUp automatically numbers it. Now, select one or multiple tags and drag them into your folder.
To add a new tag to an existing folder, select the folder then use the Add Tag icon. The new tag will appear in that folder. You can even add new folders to a folder in the same way; with the destination folder selected, use the Add Folder icon.
If one or multiple tags are already selected when you create a folder those tags will move to that new folder. To select multiple tags use the CTRL (Command on Mac) key to select tags one at a time or use the Shift key to select a range of tags.
Using a filter you can narrow down your tag list, use the Details menu to Select All, and create a folder containing tags from your filtered results. For example, type "floor" as your tag filter to show all tags that have "floor" in the name, select all, and create your "floor" filter!