Geolocating a model or adding terrain puts your SketchUp design into real-world surroundings. By using SketchUp’s Add Location feature, importing data or site context, or creating your own terrain, you can enhance your model with specific and accurate location data and site context.
Add Location
SketchUp’s Add Location feature is a great way to add both geolocation data and site context to your models. To jump right in, see Getting Started with Add Location. If you run into trouble, see Troubleshooting Add Location for some possible solutions.
Geolocation Data
Adding geolocation data to your model applies information about real-world surroundings. For example, SketchUp’s Add Location feature can help add data like latitude, longitude, and elevation. This data can provide some interesting insights and help with collaboration.
Shadow Studies
Geolocating a model helps SketchUp more accurately represent how shadows appear within your model. Add Location helps:
- Make sure shadow visualizations are accurate.
- Better assess how shadows appear in relation to your designs.
- Determine how surrounding objects or architecture create overshadowing within your model.
For more information on how you can use shadows in SketchUp see Casting Real World Shadows.
Coordinate Your Designs
A geolocated model can help coordinate when working with others by:
- Better aligning your model with other geolocated models.
- Coordinate more effectively with other designers, architects, or stakeholders.
- Precisely plan infrastructure and landscaping elements.
To get started, see Geolocation in SketchUp.
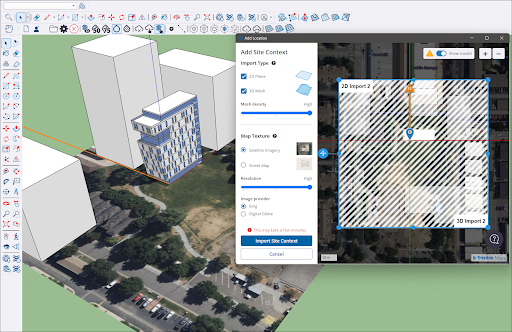
Adding or Creating Site Context
Adding or creating site context, like adding terrain with Add Location, helps to accurately visualize your model in its correct location and bring key views to life. Site context enhances your model with its surroundings by adding it on top of 2D imagery or 3D terrain. With the added detail of satellite imagery as a reference, site context helps to better model surrounding buildings, roads, and green spaces.
Understand Site Conditions
Using Add Location or creating your own terrain to add site context can help get your project started before receiving surveys or even visiting the site. Studying the imagery and terrain you see when geo-locating your model provides a better understanding of your site's details that may affect your design. Examples include:
- Topography affecting placement of buildings
- Site boundaries and associated setbacks
- The impact of nearby buildings or trees on views
- Vehicular and pedestrian site access
To get started, see Site Context and Terrain.