Working with Hierarchies in the Outliner

With the Outliner in SketchUp you can view a model's groups, components, and section planes in a hierarchical tree. The Outliner panel makes it easy to:

  • Navigate around and identify objects in large models.
  • Name objects and section planes.
  • Find components or section planes.
  • Restructure the model hierarchy.
  • Control the visibility of all objects.

To open the Outliner, as shown in the following figure, select Window > Outliner from the menu bar. Your model's name appears at the top of the hierarchy. In this example, the model is named Two story house and within the House group, it contains three objects named First floor, Second floor, and Roof. (The Roof object is hidden.) You also see a section plane called Plan view, although the section plane isn't visible and the section cut isn't active.

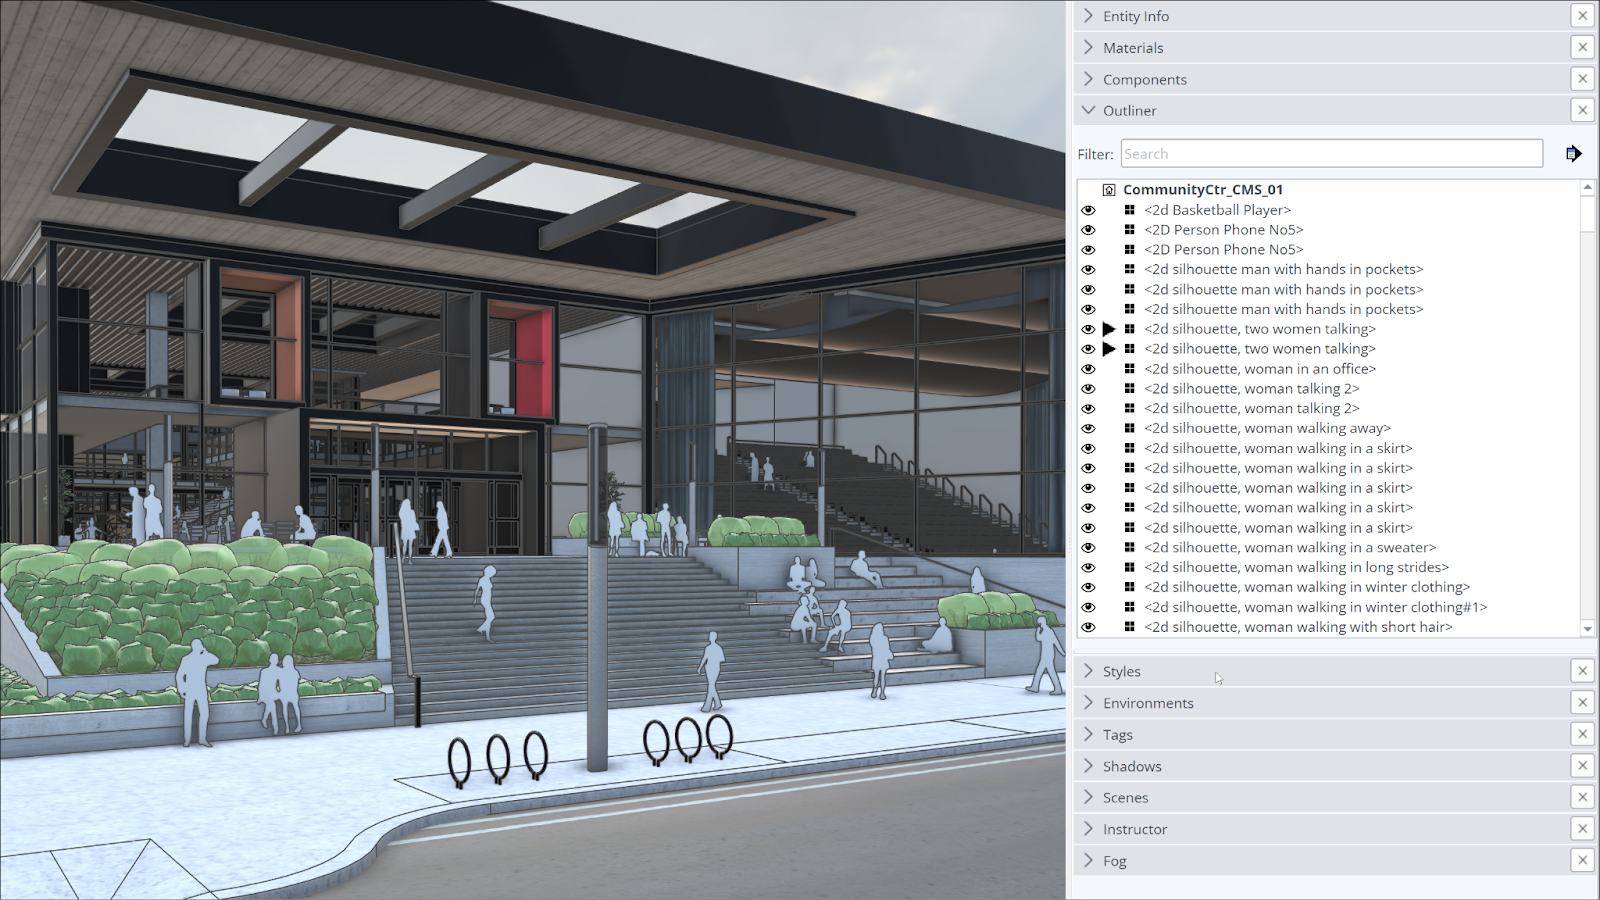
When an object contains nested elements, the Outliner's navigation tree displays a triangle arrow next to the object's name.

You can explore the hierarchy of your model in the following ways:

  • To see what's nested in a object, click the triangle next to its name the right-pointing triangle turns downward. After you display nested elements, you can then click the downward triangle to close that branch of the hierarchy.
  • To see all the objects, and section planes in a model's hierarchy, click the Details arrow () and select Expand All from the menu.
  • To close the hierarchy, click the Details arrow and select Collapse All.

In the sections that follow, you find details about naming and finding objects and section planes and changing the structure of your model's hierarchy.

Renaming an object or section plane

After you create an object or section plane, the Outliner enables you to give that entity a meaningful name.

Tip: Giving these entities meaningful names enables you and others to find, select, and edit the entities quickly and easily. For example, a meaningful name might describe an object’s location. In a model of a housing development, you might create a group for each plot of land and name it after the plot numbers. As you continue to build the model, you might import SketchUp models of standard house designs, and each component's name would reflect the design name. In the preceding figure, each group was given a more descriptive name than the default name, Group. With the descriptive names, you can easily see which group is the roof, first floor, or second floor.

Rename a group

To name (or rename) a group in the Outliner, follow these steps:

  1. Context-click (or triple click) the group name in the Outliner and select Rename from the menu that appears.
  2. Type a name.
  3. Press Enter (Microsoft Windows ) or
  4. Return

Rename a component

Compared to renaming groups, renaming components is a bit more complicated. You can rename the component definition or an instance of that component's definition. ( Adding Premade Components and Dynamic Components explains the difference between a component definition and a component instance.)

By default, every component instance has the same name as its definition, and in the Outliner, all components are enclosed in angle brackets. If you have several component instances with the same name, you may have a hard time finding the instance you need. Say you have four instances of the same chair component, and each instance illustrates a different color option. To locate each color option quickly and easily in the Outliner, you might add the color name to each component instance. To rename a component instance, follow the same steps you use to rename a group.

When you rename the component definition, you change the name of every component instance in your model. To rename a component definition, follow these steps:

  1. In the Outliner, context-click the component name and select Entity Info from the menu that appears.
  2. In the Definition text box, select the component definition name and type a new one, as shown in the following figure. When you're done, you can close the Entity Info box. Back in the Outliner, your component instances all show the new definition name.

Rename a section plane

The Outliner enables you to rename both the section plane and its symbol. To rename a section plane via the Outliner, context-click the section plane and select Rename Section Plane or Rename Symbol. Then type your desired name for the plane or symbol and press Enter.

For details about section planes, see Slicing a Model to Peer Inside.

Finding an object or section plane

When you need to find a specific object or section plane in your model, here's how the Outliner can help:

  • Select: When you select an object or section plane in your model, it becomes highlighted in the Outliner, too. Conversely, select an object or section plane in the Outliner, and you select that object or section plane in your model. Selecting a non visible Object in the Outliner will display a hatched Object in your model.
  • Sort: To sort all the model entities in the Outliner by name, click the Outliner's Details arrow () and select Sort By Name. If this menu item is selected, choosing it deselects the Sort By Name option. When Sort By Name is deselected, components are sorted by creation or insertion.
  • Filter: At the top of the Outliner, type a term to filter what entities appear in the Outliner. In the following figure, you see the Outliner is filtered to show only entities that contain the word Floor.

Identifying the status of an object

The Outliner uses icons and text to identify an object or section plane, as well as its status (open, locked, or hidden). The following table shows how the icon and text change as the object's status changes.

Tip:

StatusGroupComponentSection Plane
Closed
Open
Locked
Hidden
Visible
Inactivenana

Restructuring a model's hierarchy

If a model's object hierarchy needs to be adjusted, you can click and drag an item to a new position in the Outliner.

For example, say you want the sofa to be tucked inside the First floor group, so that the hierarchy reflects where the sofa is located. Simply drag the sofa component to the desired position, as shown in the figure.

Controlling visibility with the Outliner

As mentioned in the table earlier in this article, any item that's grayed out in the Outliner is hidden. Indeed, the Outliner can be a helpful way to hide or show elements in your model as you work on it.

To hide an object or section plane in the Outliner, simply toggle the eyeball icon off or context-click it and select Hide from the menu that appears. Everything your element contains becomes hidden. For example, to hide everything in the second floor and see only the first floor, all you have to do is hide the Second floor group and Roof group, as shown in the figure.

To see the hidden object or section plane again, toggle the eyeball icon on or context-click and select Unhide.

You can actually edit geometry in your SketchUp model even if it’s hidden within the Outliner. Just select the Object from the Outliner list and it will be visible in the model window in the hidden wireframe mode. Double clicking that object (either in the model window or Outliner) will allow you to enter the context and make edits as you would a normal, visible piece of geometry.

When you’re done, you just switch to the Select tool and click outside of the object to finish. It will disappear with your edits applied.

Was this article helpful?