Erasing and Undoing

Everyone makes mistakes. In SketchUp, you can correct mistakes with the Undo command or the Eraser tool.

Using the Undo Command

The Undo command reverses your most recent action. For example:

  • If you draw a line and then Undo it, the line will disappear.
  • If you try to copy a piece of complex geometry with the Move tool and accidentally stretch it instead, Undo can put things back the way they were.
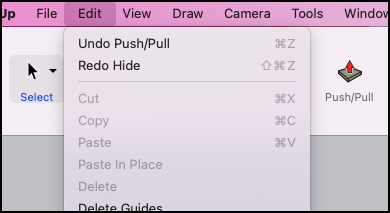
Undo is available under the Edit menu You'll see the word Undo with a description of the last action you performed. For example, if you last used the Push/Pull tool, you'll see Undo Push/Pull in the Edit menu.


The default keyboard shortcut for Undo is Alt+Backspace. However, Ctrl+Z (Microsoft Windows) or Command+Z (macOS) also work.

Anything you Undo you can Redo. When you Undo an action, the option to Redo that action will appear in the Edit menu.

Erasing Geometry

You can erase geometry from your model using either the Eraser tool or the Erase context command.

The Eraser tool can help you remove, soften or unsoften, and hide parts of your model no matter when you created it. For now, we'll be focusing on how to remove geometry. See this article for more information on how to use the other functions of the Eraser tool.

You can find SketchUp's Eraser () tool in a few different locations:

  • The Getting Started toolbar
  • The Drawing toolbar
  • The Large Tool Set toolbar
  • The Principal toolbar
  • The Tool Palette (macOS only)

When you want to remove parts of your model, here are the ways the Eraser tool can get it done:

  • Select the Eraser tool from a toolbar and click an edge with the Eraser tool cursor. You'll erase that edge and any faces it bounds.Tip: The Eraser tool doesn't allow you to erase faces. Technically, faces are erased when you erase their bounding edges, opening and reshaping your geometry. See introduction to drawing basics for more information on how this works.
  • Click and drag over multiple lines with the Eraser tool. Any line highlighted in blue will be erased once you release your mouse button.

The Erase context command helps you remove selected geometry, including faces. To use the Erase context command:

  • Context-click a face or edge and select Erase from the context menu.
  • To remove multiple edges and faces at the same time, use the Select tool to select the geometry then context-click your selection and choose Erase.


Softening, Smoothing, and Hiding Geometry

The real world isn't all sharp edges and hard angles, and your model shouldn't be either. SketchUp provides the tools you need to soften and smooth edges, or even hide geometry, without compromising your model's structural integrity.

Tip: Softening and Smoothing edges changes their visibility and can make your model look more realistic while reducing geometry. The less geometry your model has can also improve your computer's performance.

With this introduction to soft, smooth, and hidden geometry we'll talk about how it's done and the types of entities you can create. After we go over the basics we'll even throw in a few tips for improving your model's appearance and efficient modeling.

Table of Contents
  1. Understanding the edge properties
  2. Softening and smoothing edges at once
  3. Hiding geometry
  4. Viewing hidden geometry

Understanding the edge properties

In SketchUp you can add the following properties to the edges in your model, in various combinations, enable you to control their appearance:

  1. Smooth - Smoothing an edge adds shading that makes the faces look smooth. When used alone, the edge remains visible.
  2. Soft - Softening an edge hides it and all bounding faces become a surface entity. Surface entities join two or more faces so they look round. Surface entities act like single entities when selected but retain all inferences from the geometry they were made from.
  3. Hide - Hiding an edge makes the edge invisible without creating a new surface entity.


Softening and smoothing edges at once

In SketchUp, softening and smoothing edges go hand-in-hand. That's why both the Eraser tool and the Soften Edges dialog box apply these properties together.

Tip: Use the Eraser tool to quickly smooth and soften your edges. Open the Soften Edges dialog box when you need more fine-tuned control.

To soften and smooth edges with the Eraser tool:

  1. Select the Eraser tool () or press the E key.
  2. Tap the Ctrl key (Microsoft Windows) or the Option key (macOS) to toggle Smooth Edges and then "erase" these lines the same way you would to delete them.
  3. If you make a mistake or change your mind, tap the Alt (Microsoft Windows) or Command (macOS) and click the edges to undo the softening and smoothing.

To soften and smooth with the Soften Edges dialog box, follow these steps:

  1. Use the Select tool and highlight the edges you want to soften and smooth. (See Selecting geometry for tips and selection techniques.)
  2. Open the Soften Edges dialog box using one of these methods:
    • In macOS, open the Window menu and select Soften Edges.
    • In Windows, open the Window menu, select Default Tray followed by Soften Edges.
    • Context-click your selection and choose Soften/Smooth Edges.

       
    • Click and drag slider labeled Angle Between Normals. This slider sets the maximum size of all angles that will be smoothed or softened. The higher the setting, the more angles you are likely to smooth or soften. In the example, the slider is set to 20 degrees, which smooths and softens most of the rock's surface.


    • (Optional) The Smooth normals check box is selected by default. If you don't want the shading effect that makes your edges look smooth, clear this check box.
    • (Optional) Select the Soften coplanar check box to soften edges between coplanar surfaces, essentially deleting those edges. In the example of the rock, selecting the checkbox doesn't impact the rock much, because few (if any) of its faces are on the same plane.

To check or change the properties applied to an edge, context-click and choose Entity Info. You'll see the type of entity in the upper left and can select or clear the Soft and Smooth check boxes. Select a face, and you can see whether it's a surface entity or another type of geometry.


Tip: Softened and smoothed edges make basic geometry look polished. In a complex model, relying on soft and smooth edges can noticeably lighten the load on your computer's memory. For example, you can create the corbel shown in the figure by creating a 2D drawing in the shape of the selected edges. Then extrude the face into the 3D shape shown here. The shape is quite basic, but the softened and smoothed edges enhance the model's dimensions and shape. Also, if you draw and extrude arcs, circles, or curves, these entities apply soft and smooth edges by default.


Hiding geometry

As you draw a model, you don't necessarily want a line marking every edge in your model. Soften Edges hides lines, but also creates a surface entity, which means you can only apply one material to any face in the surface entity. If you want to hide an unsightly line without creating a surface entity, seek out the Hide feature. You can hide lines, faces, and any SketchUp entity.

Follow these steps to hide a line or any geometry:

  1. Select the geometry you want to hide.
  2. Context-click the selection and choose Hide from the context menu that appears, as shown in the figure. You can also open the Edit menu and select Hide. Even though it's still there, the selected geometry disappears from view like a ghost in the machine.


Hidden geometry can't be selected. To make hidden geometry selectable, you must display hidden geometry or unhide the geometry. See Viewing hidden edges for details.

Tip: In SketchUp, styles change the look of your whole model. All you have to do is click a style preset. If you're hiding edges or geometry to see through your model or change the appearance of your model as a whole, consider whether styles offer an easier way to get the job done.

Viewing hidden geometry and objects

In SketchUp, any geometry that's hidden is still there. You just can't see or select it.

To see the hidden geometry or objects but keep them hidden, open the View menu and select Hidden Geometry or Hidden Objects. All hidden entities appear in a ghosted pattern (as shown in the figure), allowing you to select them. Select Hidden Geometry or Hidden Objects again to clear the option and make the ghost pattern or object disappear.

To change geometry from hidden to visible, you need to unhide it. Select the hidden geometry, context-click the selection, and choose Unhide. (The Hide menu item changes to Unhide when selected geometry is hidden.)

 
Was this article helpful?