In Style Builder, you can adjust some of the same style settings and effects that you can add or edit to styles in SketchUp, including halos, extensions, profiles, and depth cue.
.style file with another SketchUp user.
Style Builder’s Settings tab, shown in the following figure, contains most of the global settings for all the strokes in the Sets pane. You can also change the stroke width in the toolbar at the top of the Sets pane.
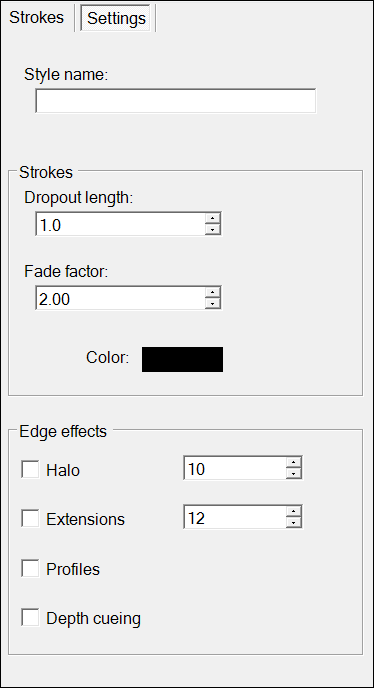
Table of Contents
Selecting global settings on the Settings tab
Here’s an introduction to all the options you find on the Settings tab:
- Style Name: Before you save your file, type a name for your style in this box. In SketchUp, this name appears as the style name.
- Dropout Length: This value determines when strokes drop from view to enhance the style’s 3D effect. This value is a percentage of the screen’s diagonal length and can range from 0 to 100 percent. Note that you can edit the Dropout Length value only in Style Builder, not in SketchUp.
- Fade Factor: This value is a multiple of the Dropout Length and determines when strokes start fading from view. For example, if the Dropout Length is set to 5 percent and the Fade Factor value is 4, then the style edges begin to fade when they reach 20 percent of the screen’s diagonal length.
- Color: Click the color swatch to change the strokes’ color. Microsoft Windows displays a Color dialog box, where you can choose from basic colors or define custom colors using a slider, spectrum, RGB value, or HSL value. On Mac OS X, you see the Colors panel, which includes a color wheel, sliders, preset colors, and the ability to select a color from an image. Mixing Colors in the Color Picker explains how these options work for your current operating system. For Microsoft Windows, the Colors dialog box is a little different from the one you see in SketchUp, but the concepts are the same.
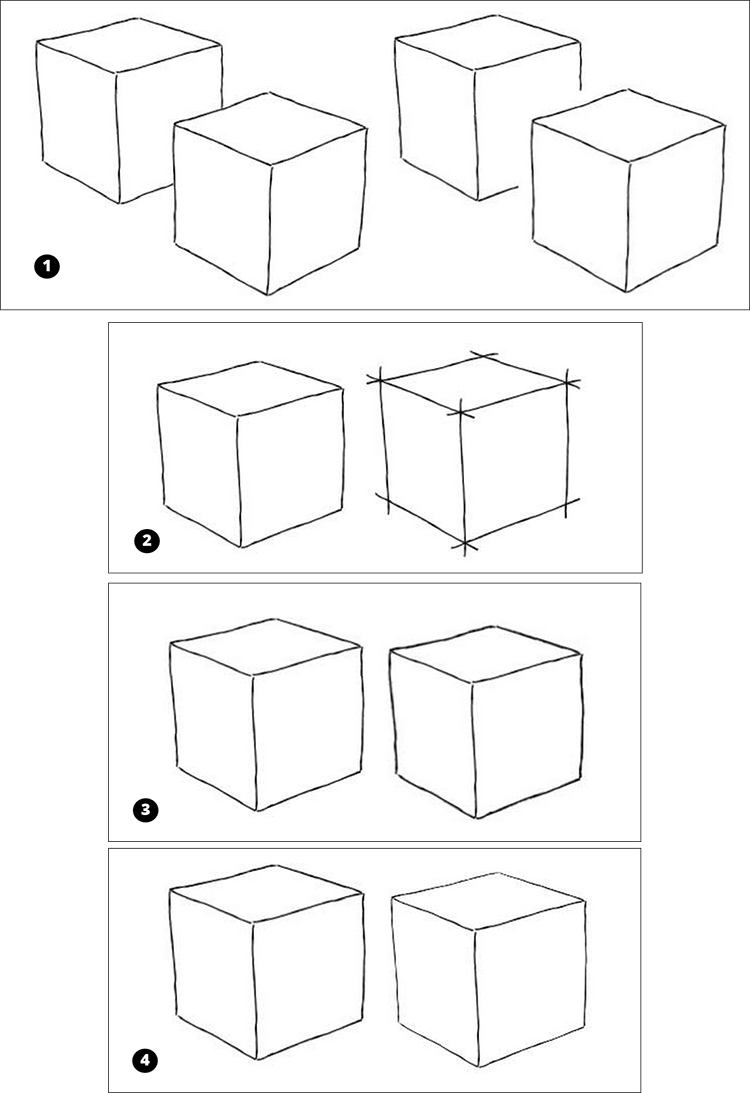
- Halo: The Halo effect leaves space between lines where they overlap. When you select the Halo checkbox, the value you enter in the text box sets the distance from the intersection where the lines end. The value is in pixels. For example, if you set the Halo value at 15, overlapping lines end 15 pixels before the lines intersect, as shown in Callout 1 in the following figure.
- Extensions: The Extensions effect continues a line slightly past its endpoint. (Don’t worry about this effect changing how SketchUp inferences work; the effect doesn’t impact the SketchUp inference engine.) To apply this effect to your sketchy edge style, select the Extensions checkbox and enter a pixel value in the text box. In the following figure, Callout 2 illustrates how applying an Extensions effect of 15 pixels changes a cube’s appearance.
- Profiles: The Profiles effect darkens and thickens the outer lines, or profiles, of major shapes. This effect emphasizes your geometry’s 3D appearance. To apply the Profiles effect, simply select its checkbox. In Callout 3, the Profiles effect is applied to the cube on the right.
- Depth Cueing: The Depth Cueing effect makes lines in the foreground thicker. As lines extend into the background, they come thinner, as the cube on the right illustrates in the following figure (Callout 4). Depth Cueing is another effect that emphasizes geometry’s 3D appearance. To apply this effect to your sketchy edge style, select the Depth Cueing checkbox.
Setting the stroke width in the Sets pane
You most likely set your stroke width when you generated a template for drawing your strokes. Setting the stroke width when you create the strokes is the best method. However, if you want to change the stroke width after you create your strokes, you don’t have to re-create the strokes all over again.
Instead, at the top of the Sets pane, you can change the global stroke width for all the strokes in your style by selecting a value from the Width drop-down list. Just know that Style Builder has to scale your stroke images in order to change their width.