In LayOut, layers enable you to control the entities on your document pages as follows:
- Shared or nonshared: Regular layers don't share entities among pages, but shared layers do.
- Draw order: Entities on a top layer are displayed over top of entities on a lower layer.
- Visibility: A layer (and thus its entities) can be visible or hidden.
- Locked or unlocked state: You can't accidentally (or intentionally) edit a layer's entities if the layer is locked.
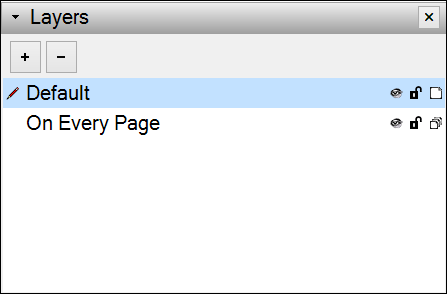
You create, navigate, and manage layers on the Layers panel, shown in the following figure (as the panel appears in Microsoft Windows). To open the Layers panel, click its name in the panel tray or, if it's not on-screen, select Window > Layers. In the far-right column, a single-page icon indicates a regular layer; a four-page icon indicates a shared layer.
In the sections that follow, find out how to create and navigate among a LayOut document's layers and use all the features in the Layers panel.
Table of Contents
Understanding regular and shared layers
In Layout, regular layers (also called non-shared layers) enable you to control the visibility of document content. For example, if you want to separate text from SketchUp model entities, you can place each type of entity on its own layer. If you're using regular layers, you just need to remember to create or move each entity type to its respective layer on every page.
Shared layers display content on every page. When you need to display a logo, title, or other element on every page of your document, put it on a shared layer and you need to place the element only once.
Creating and deleting layers
When you create a layer, you have access to the layer on every page in your LayOut document, including new pages that you add. To create a new regular or shared layer, follow these steps:
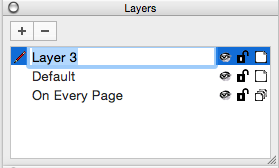
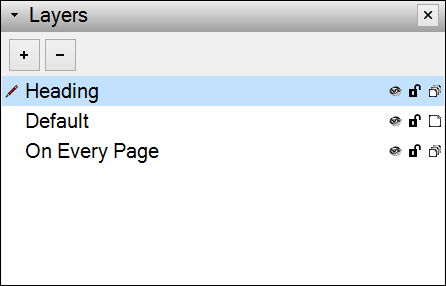
- In the Layers panel, click the Add New Layer button (the plus sign). A new, regular layer appears in the Layer's panel's list of layers, and becomes the active layer, which the red pencil icon indicates.
- Double-click the new layer's name to open the name for editing or select it and press Enter, as shown in the following figure (as the panel appears in Mac OS X).
- Type a name for the layer and press Enter. For example, if you want the layer to hold all the headings at the top, Heading is an intuitive name.
- (Optional) To make the layer a shared layer, click the single-page icon in the layer's far right column, and the icon changes to a four-page icon, indicating a shared layer.
If you ever need to delete a layer, select the layer in the Layers panel and click the Delete Selected Layer icon (the minus sign).
Adding or moving content to a layer
Until you select a different layer, all the content you add to a LayOut document appears on the Default layer. When you select a layer in the Layers panel, it becomes the active layer, and content is added to that layer instead.
To move any entity to a different layer, follow these steps:
- In the Layers panel, select the layer that you want to contain the entities. This layer becomes the active layer.
- With the Select tool (
 ), select the entities that you want to move. In the Layers panel, a dot appears next to the selected content's current layer.
 - Context-click your selection, hover over Move to Layer on the menu that appears, and select Current from the flyout menu. Alternatively, you can select any layer from the flyout menu. If you use this option, you don’t have to select the layer first, as noted in Step 1. The entities now appear on the layer you selected.
If a group is selected during the move command, all entities within that group will be moved to the same layer as well.
Toggling visibility and locking layers
When you organize content on a layer, you can toggle the content's visibility or lock entities on a layer.
- To toggle a layer's visibility, click the Visibility icon (the eye). When a layer isn't visible, the Visibility icon is gray instead of black. Click the Visibility icon again to see the layer's contents. Whether a layer is a regular or shared layer, the visibility setting applies only to the current page. So, for example, you can use a shared layer to display an entity on every page except a cover page by changing the visibility only on the cover page.
- To lock a layer so its contents can't be edited, click the Lock icon. When a layer is locked, its padlock icon is closed. Click the Lock icon again to unlock the layer and open the padlock. Whether you lock a regular or a shared layer, the layer becomes locked on every page.
Changing a layer's type
You can change a regular layer to a shared layer, or vice versa.
- When a regular layer becomes a shared layer, you're asked to choose whether the layer contains entities on multiple pages: You can include only the entities from the current page, or collect entities from all pages. To perform this magic, simply click the layer's single-page icon in the far right column of the Layers panel. The icon changes to a four-page icon, which indicates a shared layer, and the layer's content appears on every page.
- When a shared layer becomes a regular layer, you have to decide how you want the change to affect the layer's contents. To put the transformation in motion, click the shared layer's four-page icon. In the dialog box that appears, select Keep Contents on This Page Only or Copy Contents to All Pages and click the Apply button.