A repetitive dynamic component is a component containing a sub-component that repeats, such as the pickets of a fence component, or the steps of a stair component.
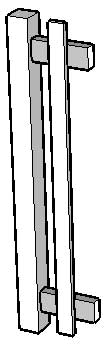
The example below is an image of the fence component. This component contains 4 sub-components: a top rail, a bottom rail, a picket, and a post. You are going to replicate the picket sub-component as the component is scaled in the X direction. The main issue when creating a replicating sub-component is the spacing between each replicated part and how the part is replicated (linearly for a fence, diagonally for stairs, circular for circular stairs, and so on).
- Create the component with one of the replicating subcomponents, such as the fence with one picket.
- Context-click on the component. The component's context menu is displayed.
- Select the Dynamic Components > Component Attributes menu item. The Component Attributes dialog box is displayed.
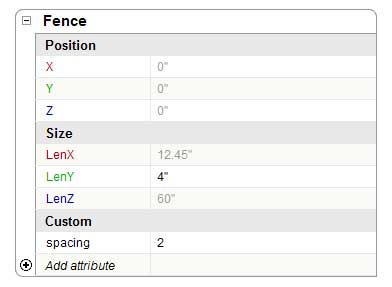
Click the plus (+) button next to the Fence component. A list of attributes appears for the component.
Note: A list of attributes will only appear if you have constrained the component before trying these steps. See Constraining Attributes of a Dynamic Component for more information.
- Click on the Add attribute button in the last row of the Fence component. A list of predefined attributes is displayed. The field is opened for editing.
- Type
spacingand press the Enter (Microsoft Windows) or Return (Mac OS X) key. An attribute named 'spacing' is placed in a list of attributes called 'Custom.' The field next to the spacing attribute is opened for editing. - Type
2. - Press the Tab key to accept the value. You have established a spacing value of 2" between pickets.
- Click the plus (+) button next to the Picket component. A list of attributes appears for the component.
- Click on the add attribute button in the last row of the Picket component. A list of predefined attributes is displayed. The field is opened for editing.
- Click on the 'Copies' attribute in the list. The field is populated with the word 'Copies' and the field next to the 'Copies' attribute is opened for editing. You need to create a formula that will yield a number of copies given the length of
TopRail (or BottomRail)component. - Type
=(TopRail!LenX)/(Picket!LenX+Fence!spacing)-1. Press the Tab key to accept the value. The first part of this formula,
TopRail!LenXis the length of the TopRail component in the X direction. This number is then divided by the width of a picket plus the spacing (Picket!LenX+Fence!spacing). A value of 1 is then subtracted from the total. As mentioned, this formula yields the number of pickets that are created given the length of TopRail. These copies are placed at the same X, and, Z coordinate as the original Picket component (so all your pickets are exactly at the same spot). Next, we will use a formula to position, in the X direction, each copy of Picket.Note: Open the Outliner to see the copies being made as the component is scaled. The copies of the original picket will display as Picket copy 1, Picket copy 2, Picket copy 3, and so on.- Double-click on the value in the value field for the 'X' attribute.
- Press the Backspace (Microsoft Windows) or Delete (Mac OS X) key to delete the current value for the 'X' attribute.
- Type
=5+COPY*(Fence!spacing+LenX). Press the Tab key to accept the value. This formula uses a predefined attribute called 'Copy' to determine X positioning for each picket. The Copy attribute is simply a counter that begins at 0 (for the original Picket) and adds one for each additional copy. So, Copy is equal to 1 for the first copy, equal to 2 for the second copy, equal to 3 for the third copy, and so on. However, you will only ever see the X value for the original Picket component in the Component Attributes dialog box.
Note: Multiplication takes place before addition.- Click on the close button.
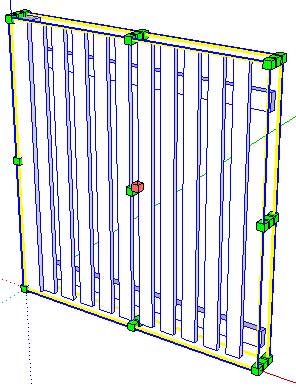
- Use the Scale tool to scale your component in the X direction. The component should add pickets as you scale.
You might consider hiding the scale handles so that only the handles in the X direction are visible when using the Scale tool. See Hiding scale handles for further information.