In SketchUp, the .skc file format stores the classification data that you see in the Classification tool. Each .skc file contains XML schema definition files and other files that help define additional schema metadata. All these files are zipped up in one file.
In this section, you learn about the guts of the .skc file and find steps that walk you through creating one.
For the purposes of this tutorial, you modify a sample ifcXML4.skc file to create a new SKC file with your schema data. Follow these steps to get started:
- Click here to download the sample ifcXML4.skc file.
- Rename the file from ifcXML4.skc to something else, like my_schema.zip.
- Unzip my_schema.zip.
In the sections that follow, you find an introduction to each of the files in my_schema.zip . You also find details about what you can change and how to customize your classification data. After you learn about each file, you find out how to back the .zip file back into an .skc file.
doc_thumbnail.png
This image file visually represents your schema. You can replace this file with your own image file and name it however you like.
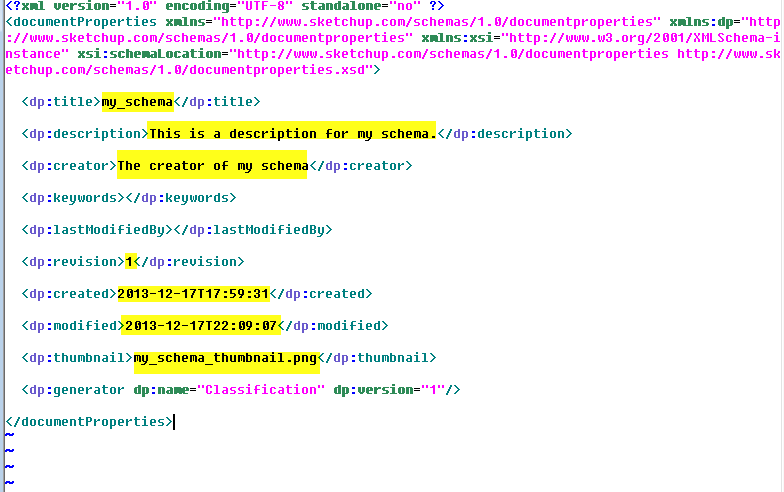
documentProperties.xml
This file is required, and you cannot change its name. However, you may want to change several fields in this file. Here's a list of all the fields in the documentProperties.xml file and what you can and can't change:
- The title field contains the name of your schema that appears throughout the SketchUp UI. Change it to reflect your schema's name.
- The description field contains the schema's description. Change it to describe your schema.
- The creator field contains the the schema creator's name. Change it to reflect the creator of your schema.
- The revision field reflects the revision of your schema. Change it if you would like or leave this field as it is. This field must have a value.
- The created and modified fields reflect the created and modified dates of the schema. You can change these fields or leave them as they are but they can't be blank. If you change the dates, the values must follow this format: YYYY-MM-DDThh:mm:ss. For example, sometime on January 30, 2014 looks like this: 2014-01-30T12:00:00
- The thumbnail field points to your schema's thumbnail. If you are using a schema-specific thumbnail, change this field to reflect the name of your schema's thumbnail.
The following figure shows the data you might want to change in the documentProperties.xml file. Don't modify any data other than what's highlighted here.
references.xml
This file is required to properly load the .skc file. You can't rename it or modify anything within it.
Schemas folder
This folder holds your schema's .xsd files. You also have the option of saving filter files in this folder. Filter files control what type data is displayed, as explained a little later in this section. Copy your .xsd files to this subfolder and delete the sample ifcXML4.xsd file.
SketchUp can process any valid .xsd file or collection of files that use the http://www.w3.org/2001/XMLSchema namespace, with the following exceptions:
- The XML Schema format allows for circular importing of .xsd files (i.e. two files referencing each other with the element). This is only supported in SketchUp 2015 and later.
- The XML Schema format allows for externally referenced .xsd files. This is only supported in SketchUp 2014 M1 and later.
- Any <xsd:list> or <xsd:choice> attributes don't appear in the Component Options dialog box where classification attribute data is displayed. These attributes may become visible in future versions of SketchUp.
Note: If your schema file contains included or imported .xsd files, the XML Schema file hierarchy must be maintained.
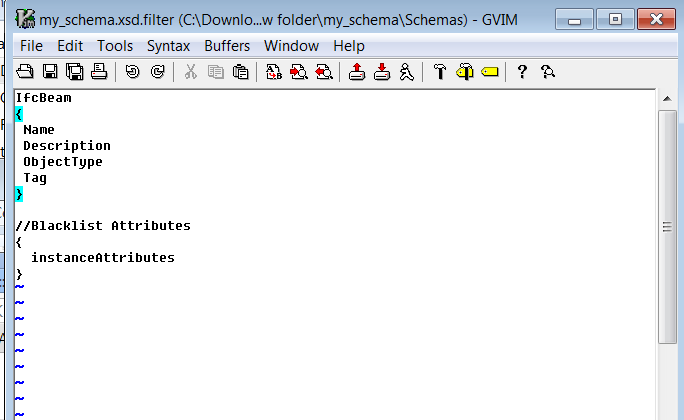
Filter files
Filter files enable you to restrict what type and attribute data is visible in the SketchUp UI by default. If an .xsd.filter file exists, a Simplify button appears in the SketchUp UI wherever type data is displayed. This Simplify button enables users to toggle between the restricted view of the schema data that you set up and the full set of data. If an .xsd file has no filter file, all types and attributes are visible.
Filter files can whitelist types and their attributes, and they can blacklist attributes:
- Whitelisting makes the types and attributes visible in the UI. When you whitelist a type, you can choose what attributes for that type appear in the Component Options dialog box.
- Blacklisted attributes are not displayed. Blacklisting an attribute affects all types that haven't whitelisted that attribute.
To create a filter file, follow these steps:
- Create a file with the same name as the .xsd file that you want to filter and a .filter file extension.
- List the type names you want to make visible by default in the UI.
- (Optional) In curly braces ({}), list any attribute data you want to make visible by default.
For example, here's how the my_schema.xsd.filter file shown in the following figure impacts the SketchUp interface:
- A Simplify button appears for the my_schema schema.
- By default, only the IfcBeam type as well as its Name, Description, ObjectType, and Tag attributes are visible. A user can, however, click the Simplify button to toggle the display all schema data and the simplified version you set up.
- The blacklisted instanceAttributes attribute isn't visible.
As you create your own filter files, the following tips are also good to know:
- To add comments to this file, start each line with a double forward slash (//).
- To create an attribute blacklist (instead of a whitelist), don't add a type name to the line before the open curly brace ({).
- Save a .filter file with its .xsd counterpart. For example, if base.xsd is saved in the Schemas\base folder, you need to save base.xsd.filter in the same folder.
- The .filter file format is subject to change in future versions of SketchUp.
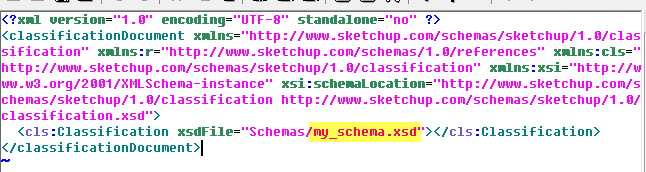
document.xml
This file indicates the relative path to the root .xsd file for your schema. This file is required and you can't rename it. As shown in the following figure, change xsdFile="Schemas/ifcXML4.xsd" to point at your root .xsd file that you copied to the Schemas folder.
Repackaging your .zip file
After you customize the files, you simply have to zip them back together. Include only the necessary files - not the folder that contains all your files. If you include that folder, SketchUp can't import your schema.
After you create the .zip file, change the extension from .zip to .skc and optionally rename the file. You are now ready to load your .skc file into SketchUp!