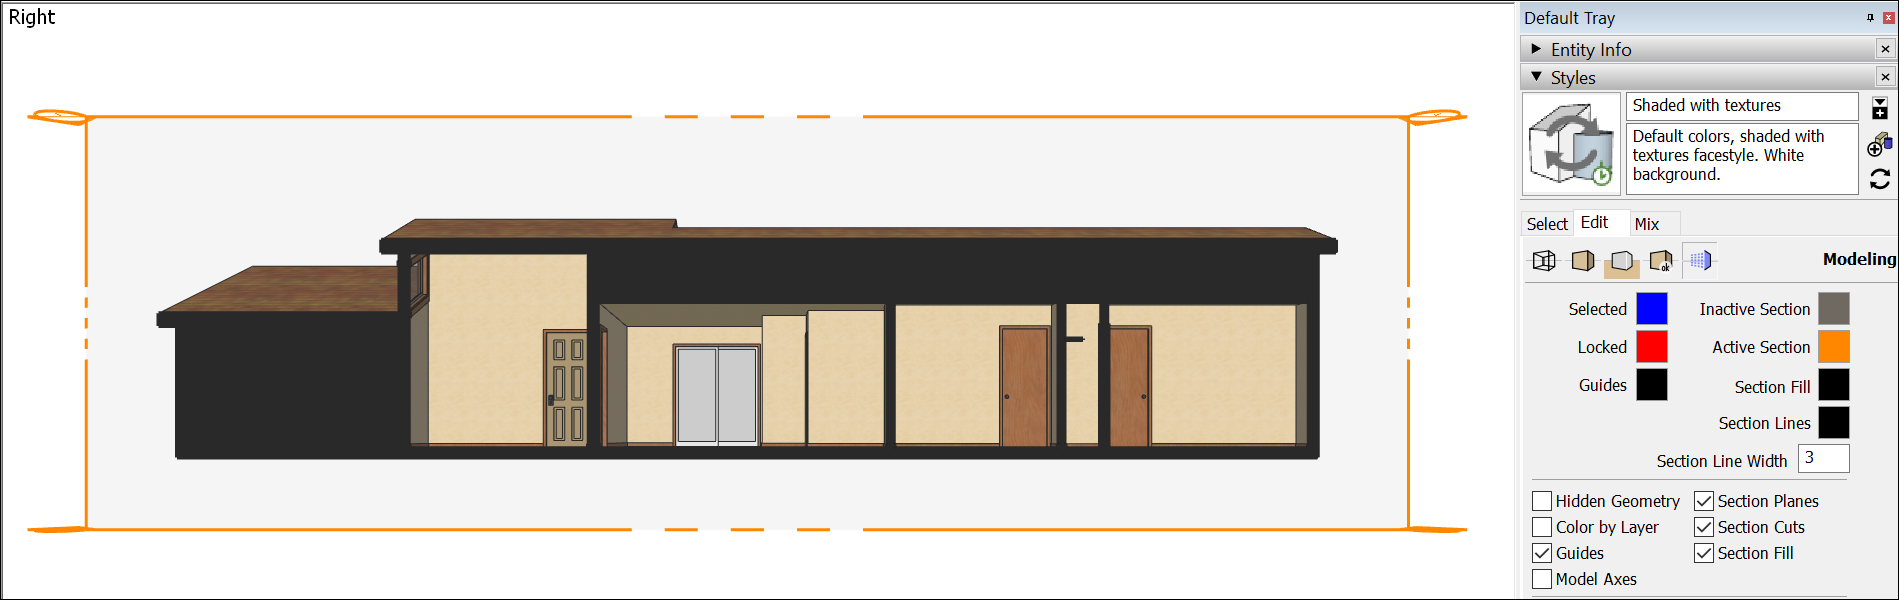
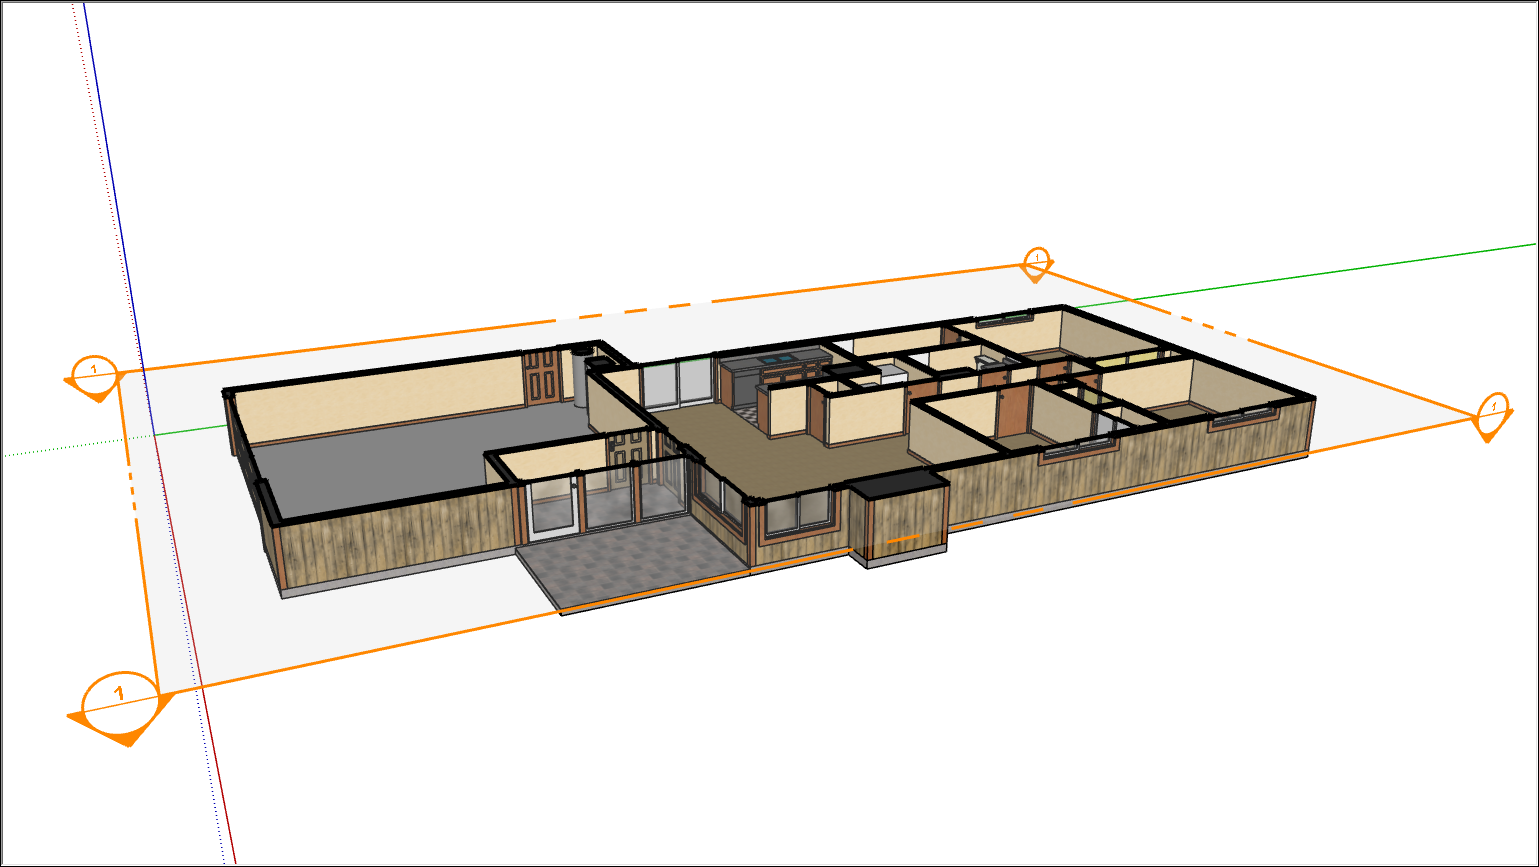
In SketchUp, section planes cut a model along a plane so that you can peer inside the model without moving or hiding any geometry. In a 3D model, an active section plane hides everything on one side of the plane, as shown in the following figure.
You can use section planes for all types of applications:
- Cut a building horizontally to see the floor plan. In architectural drawing, this two-dimensional top-down cut is called a planimetric view.
- Cut a building vertically to see inside the rooms of several floors at once. This type of cut is called a sectional view.
In SketchUp, you can insert multiple section planes, but only one section plane can be the active cut in each context. You create more than one context in a model by creating groups or components, each of which has a separate context.
Creating a Section Plane
Before you insert a section plane, make sure you don’t have any other entities selected or open besides the group or component context where you want to add one. When you're ready to add a section plane, follow these steps:
- Select the Section Plane tool (
 ) or select Tools > Section Plane.
 Click a face to place your section plane.
Tip: If you have trouble keeping the section plane in your desired orientation, hover over a face that matches the orientation you want and hold down the Shift key to lock the section plane cursor’s direction. You can also tap the arrow keys to orient the normal of the section plane to the default axes directions: Up for Blue axes, Right for Red axes, Left for Green Axes, and Down for parallel to face.
After you click a face, your section plane appears.
- Once the Section Plane has been placed, a prompt appears asking you to name your section plane and to assign it a number. Click Ok.
- After placing a section plane, you can make changes using the following methods:
- Use the Move tool or the Rotate tool.
- To reverse the cutting direction, right click the section plane and select Reverse.
- To align SketchUp's camera with the section plane, right click the section plane and select Align View.
- For multiple section planes, you can choose which one is active by right-clicking and selecting Active Cut or by double-clicking the section plane you'd like to activate or deactivate.
Filling Empty Space
When you slice a solid with a section plane, there may be empty space where solid material should be. You can fill these spaces using one of the following methods:
- Select Section Fill in the Styles panel.
- Use the Section Fill tool (
 ).
).
To control the Section Fill settings in the Styles panel, follow these steps:
- Open the Styles panel.
- Click the Edit tab.
- On the Edit tab, click the Modeling Settings icon (
 ).
). - To fill areas that are closed loops, select the Section Fill check box. Remember that, to create a filled section cut, the geometry in the section slice must form a closed loop within its group or component hierarchy. You can see that hierarchy in the Outliner.
- (Optional) To adjust the color, click the Section Fill color swatch and use the color picker to choose your desired color.
New Geometry
You can create grouped geometry from where a section plane intersects with your model. You can then move that group to a new location in your model, or explode the group so you can use the geometry to divide your model.
To create geometry in this way, context-click a section plane and select Create Group from Slice.

Hiding Section Planes and Cuts
You can separately control the visibility of the plane and the cut. Hiding the section plane makes the transparent plane with its color handles disappear. Hiding the section cut makes your model look whole again. To control the visibility of your section planes and cuts:
- Hide all section planes – To toggle the visibility of all the section planes in your model, select the Display Section Planes tool (
 ) or select View > Section Planes.
 - Hide a single section plane – Context click the section plane you want to hide and select Hide. A plane hidden in this way will no longer toggle on and off with the Display Section Planes tool until you unhide it.
- Hide all section cuts – Click the Display Section Cuts tool (
 ).
).
Exporting Section Cuts
To export a section cut, follow these steps:
- Select the section plane with the section cut you want to export.
- Click File >Export> Section Slice.
- Navigate to where you want to save the file and name it.
- Choose the file type for your export. By default SketchUp will use .dwg.
- Click Options to adjust the following options:
- True Section (Orthographic) exports the section slice as a true orthographic drawing.
- Screen Projection projects the section cut as you see it on your SketchUp screen, including any perspective distortion.
- AutoCAD Version determines the version of AutoCAD you plan to use from the drop-down list.
- Drawing Scale and Size options configure the scale of the exported section slice.
- Section Lines determines how the section cut lines in your exported slice appear.
- Click Ok and then click Export to save your file.