SketchUp Web 版中的模型创建和编辑操作非常类似于 SketchUp Desktop 版,但也有一些细微的不同之处。
注意:虽然 SketchUp Web 版无需订阅,但您仍需要 Trimble ID 才能使用。有关创建或登录 Trimble ID 的 的更多信息,请参阅 Trimble ID。要使用本文讨论的所有功能,您可能需要订阅 SketchUp Go、Pro 或 Studio。
创建新模型
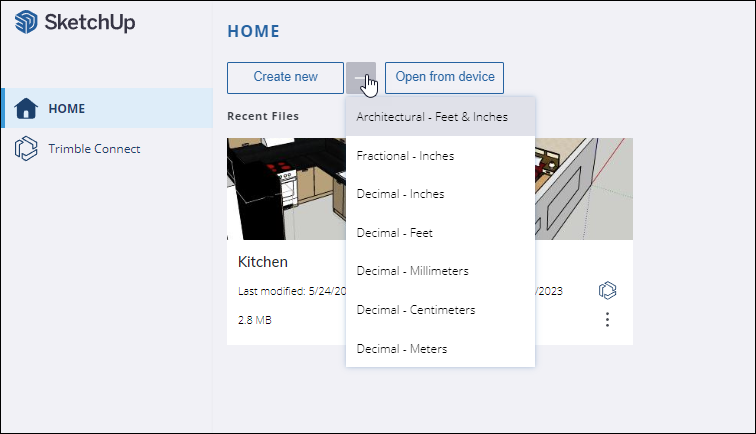
首次打开 SketchUp Web 版时,将显示 HOME(主页)页面。要创建新模型,请单击 Create new(新建)或使用下拉菜单,选择度量单位。
更改度量单位
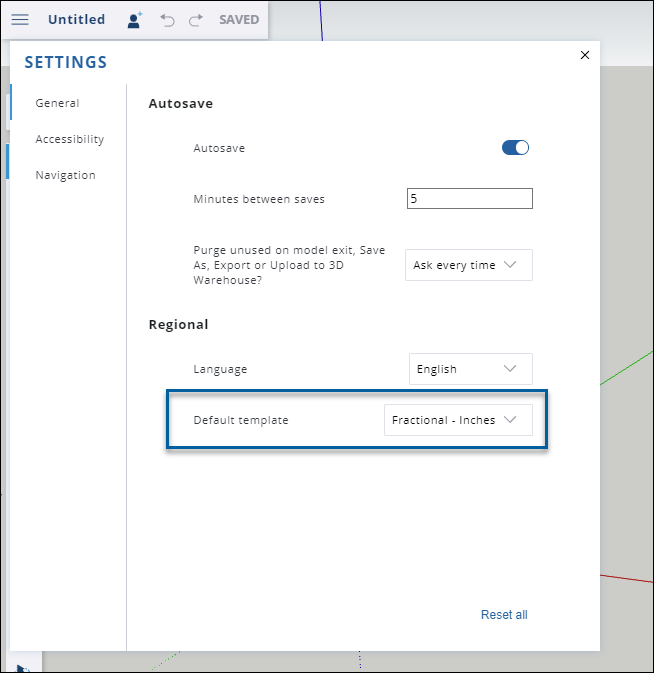
您可以在 App Settings(应用设置)中随时更改模型中使用的度量单位。从 Main Menu(主菜单)中,选择 App Settings(应用设置),并在 General(通用)标签中找到 Default template(默认模板)区域。
导入文件和图像
在 SketchUp Web 版中,您可以直接将文件导入模型中。支持的文件格式包括:
- 3DS
- DAE
- DEM
- DWG
- DXF
- KMZ
- STL
- JPG
- PNG
要导入文件:
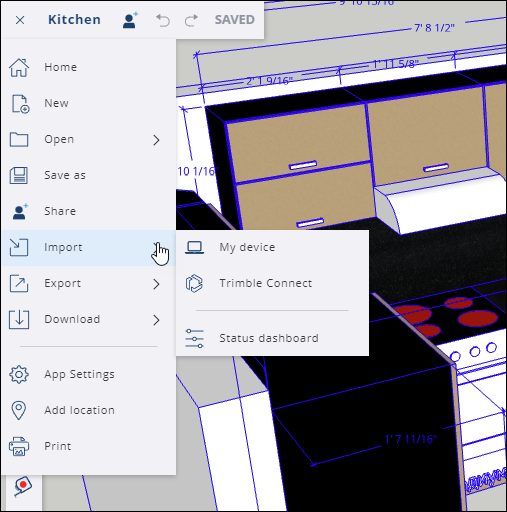
- 从 Main Menu(主菜单)中选择 Import(导入)。
选择文件位置,可选位置包括 My device(我的设备)或 Trimble Connect。
- 从设备中导入文件时,将文件拖放至出现的窗口中,或使用提供的链接浏览图像。
- 从 Trimble Connect 导入时,在保存的项目中选择您想要导入的文件。
导入模型中的图像文件将保存为图像或材质。如果您导入了 CAD 文件,那么它将保存为组件。关于如何使用导入模型中的文件的更多信息,请参阅在其他建模程序或工具中使用 SketchUp 数据下与您导入的文件类型相关的内容。
SketchUp Web 版的面板
SketchUp Web 版的面板位于界面右侧。每个面板上都有一组功能,可以帮助您进一步优化模型。
| 面板 | 图标 | 文章 | 描述 |
|---|---|---|---|
| Entity Info(实体信息) | 检查实体 | Entity Info(实体信息)面板显示了所选实体的各类信息,包括使用的材质、组件数量以及分配的标签。 | |
| Outliner(大纲) | 使用大纲中的层次结构 | 在 Outliner(大纲)面板中,可以以层次树的形式查看模型的对象。 | |
| Instructor(工具向导) | 不适用 | Instructor(工具向导)面板对初学者特别有帮助,可以根据他们在建模中使用的工具提供提示信息。 | |
| 3D Warehouse | 3D Warehouse | 3D Warehouse 是一个提供可搜索预构建 3D 模型的网站,能够与 SketchUp 无缝协作。 | |
| Components(组件) | 使用 SketchUp 中的组件 | 组件是模型的构建块。该面板列出了每一个组件,并提供了多种帮助您管理和操作组件的可选方式。 | |
| Materials(材质) | 使用材质添加颜色和纹理 | Materials(材质)面板可以帮助您添加或管理模型中使用的材质,添加细节和增强真实感。 | |
| Styles(样式) | 选择样式 | Styles(样式)是您可以一次应用于整个模型的分组设置。在 Styles(样式)面板中,可以添加样式,或者,管理已添加至模型中的样式。 | |
| Tags(标签) | 使用标签控制可见性 | 标签是 SketchUp 图层的增强版,可以帮助您组织对象,控制对象的可见性。使用 Tags(标签)面板管理或创建标签。 | |
| Shadows(阴影) | 投射真实世界中的阴影 | 设置想要的阴影呈现方式或模拟太阳在地理定位模型中投射阴影的方式。 | |
| Scenes(场景) | 创建场景 | Scenes(场景)面板提供不同背景的模型视图。在 Scenes(场景)面板中可以管理并创建场景。 | |
| Soften/Smooth Edges(柔化/平滑边线) | 柔化、平滑和隐藏几何体 | 改变边线的可见性,通过使用更少的几何体来使模型更逼真。 | |
| Display(显示) | 不适用 | Display(显示)面板可以帮助您管理可见性,包括隐藏的几何体、阴影和雾。 | |
| Model Info(模型信息) | 不适用 | 在 Model Info(模型信息)面板中,可以查找并调整模型的一些基本元素,包括度量单位和字体等。 | |
| Solid Inspector | SketchUp Web 版中的 Solid Inspector | Solid Inspector 可以帮助您检查组件和组的几何体错误,甚至还可以自动修复一些问题。 |