SketchUp’s Match Photo feature can help you apply a photo to your model, or even create a model from a photo.
Match Photo works best when your image meets certain criteria:
- Match Photo works best with structures made mostly of right angles. You definitely need at least one right angle for Match Photo to work.
- Use photos taken at a roughly a 45-degree angle from a corner. If you’re taking photos, you can use Match Photo on several parts of your model if you take photos of each corner.
- Do not crop photos. Although it may seem possible to use a cropped image, vertical lines don’t align well across a cropped image.
- Avoid warped or distorted photos. Match Photo doesn’t work well with images warped by an image editor or specialized camera. Warped images can interfere with the tools Match Photo uses.
- Avoid stitched images (panoramas). Stitched images can be warped and have multiple vanishing points for each axis.
- Choose photos without foreground features. When trees and other foreground objects block the view of a building, those foreground elements get in the way of drawing a model based on your photo.
- Make sure your image has two vanishing points. Photos with only one vanishing point or those taken with a long telephoto lens can make adjusting Match Photos options difficult.
You can start using Match Photo by selecting Camera > Match Photo or by importing an image and selecting New Match Photo. When you match a photo to your model, you’ll see the following tools:
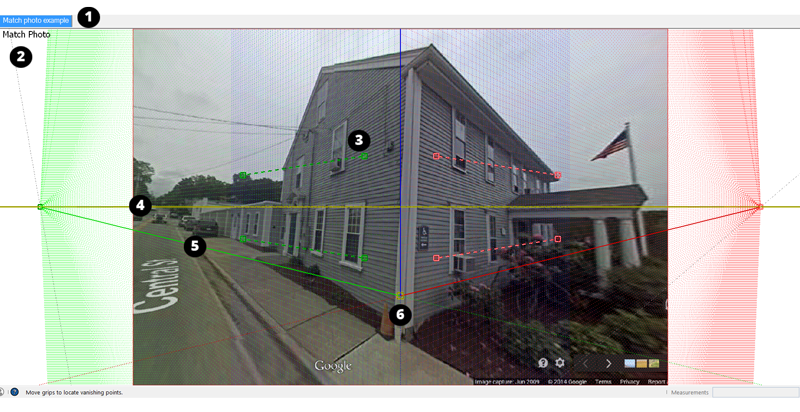
- Scene tab – Match Photo creates a scene for your matched photo. Orbiting away from the view will remove the scene. Clicking the tab brings the scene back.
- Match Photo View – When the camera is in Match Photo view, you see Match Photo in the upper left of the drawing window.
- Vanishing Point Bar – Two green bars and two red bars with dashed lines and a square grip on each end provide ways to align your vanishing points.
- Horizon Line – A yellow line aligning with the horizon of your model. If you set the vanishing point bars, the horizon line sets itself.
- Axis Bars – The solid green, red, and blue lines represent each axis. As you adjust the vanishing point bars, the axis bars will move. Click and drag the blue axis bar to scale your photo.
- Axis Origin – Where the three axes meet. A compatible image will locate the origin for you, but you might need to adjust it a bit.
Matching a Photo to a Model
To apply a photo to an existing model:
- Select Camera > Match New Photo.
- Choose the file you want to use as your matched photo and click Open. The camera will switch to Match Photo view and SketchUp will save it as a scene tab.
- The Match Photo panel will open. Use the panel to change the style, planes or spacing of your photo.

- Click and drag the axis origin to a distinct origin point on your photo.
- (Optional) Unselect Model in the Match Photo panel to hide your model from view. Removing your model can help when lining up the vanishing point bars.
Click and drag the grips on each of the four vanishing point bars as needed. Each vanishing point bar corresponds to one of the axes.
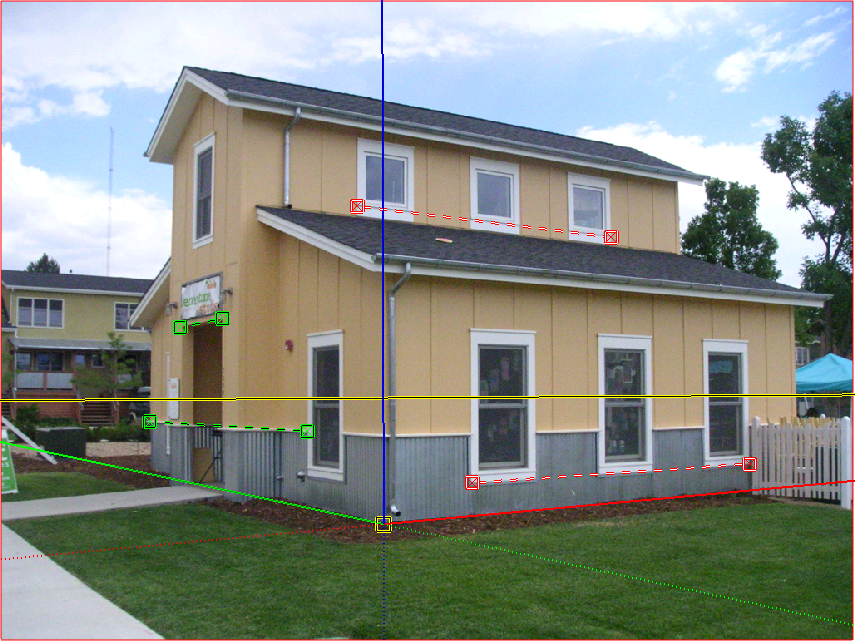
Tip: Door frames, roof lines, and other simple geometry in your photo make great reference points when aligning your vanishing points.
- Click and drag along the blue axis to scale your model.
- (Optional) Click Project Textures From Photo in the Match Photo panel to project the photo on the model as a texture.
- Click Done to exit Match Photo.
Creating a 3D Model from a Photo
Match Photo can help you draw a model with the help of a photo. To create a model from a photo:
- Follow the steps above to choose an image and import it into your model. Adjust the axes and vanishing point bars, scale the photo, and make any other needed adjustments.
- Select the Line tool (
 ).
). - Starting at the axis origin, trace an edge in the photo. Continue tracing until you create a face.
- Continue using SketchUp’s drawing tools to create a model based on the photo. Switch back to the Match Photo scene as needed.
Deleting a Matched Photo
To delete a matched photo:
- Context-click the scene tab and select Delete.
- Open the Scenes panel, select the scene, and click Remove Scene.