Showing or Hiding ACT Camera Geometry
When you add an ACT camera to your SketchUp model, SketchUp inserts a camera model with built in frustrums, safe zones, and aspect ratio masking bars. In the following sections, you find out to show or hide each element of the camera geometry.
Showing or hiding cameras
Every camera you create is added to a layer titled Cameras. If you're familiar with SketchUp's layers feature, you know the layer enables you to control the cameras' visibility. However, instead of using the Layers manger, you simply click Show/Hide All Cameras ( ) on the handy Advanced Camera Tools toolbar.
If you're not one for clicking toolbar buttons, you can instead select Tools > Advanced Camera Tools > Show/Hide All Cameras, and in an instant, the cameras are shown or hidden.
Showing or hiding frustrum lines
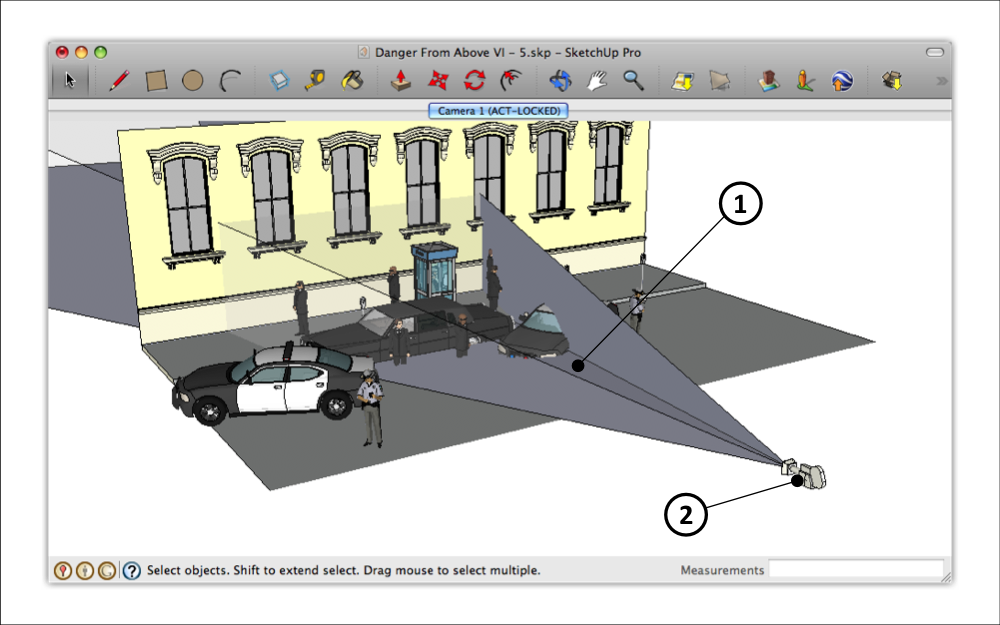
A camera’s frustum is the space that the camera can "see," given its focal length and aspect ratio. When you create a camera with the Advanced Camera Tools, SketchUp generates not only a camera model, but also geometry representing the camera's frustrum. This geometry helps you know whether the camera can see everything you want to include in the shot and nothing you don't.
In the following figure, you can see how frustrum lines (Callout 1) appear to show the boundary of each camera's shot (Callout 2).

To show or hide all camera frustrum lines, click Show/Hide All Camera Frustrum Lines ( ) on the Advanced Camera Tools toolbar. Or select Tools > Advanced Camera Tools > Show/Hide Camera Frustum Lines .
You can also show or hide all frustrum volumes. In the following figure, you see how frustrum volumes (Callout 1) show the boundary and the complete volume of the visible area for the camera ( Callout 2).
To toggle the display of frustrum volumes, dlick Show/Hide All Camera Frustrum Volumes ( ) on the Advanced Camera Tools toolbar. Or on the menu bar, select Tools > Advanced Camera Tools > Show/Hide Camera Frustum Volumes.
Showing or hiding aspect ratio bars
When you create an ACT camera, aspect ratio bars appear if your camera has a different aspect ratio than SketchUp's drawing area. To show or hide these bars, follow these steps:
- Ensure you are not in camera view mode. Clearing the aspect ratio bars while in camera view mode resets the camera to a default state.
- Click Clear Aspect Ratio Bars (
 ) or select Tools > Advanced Camera Tools > Reset cameras to hide all aspect ratio bars.
 - Click a camera's tab to restore aspect ratio bars.
Showing or hiding safe zones
A camera safe zone represents an area visible through the lens. Safe zones may represent any of the following:
- Different output resolutions
- Different aspect ratios
- How different viewing devices will crop the frame
Not all ACT cameras have safe zones, but some have several. When a camera has safe zones, the zones appear as blue rectangles in the drawing area. To display a camera's safe zones, follow these steps:
- Make sure you're in camera view mode.
- Context-click in the model window, and select Safe Zone Visibility > Show All Safe Zones to show all safe zones for the camera. Or, select an individual safe zone to show just that safe zone.