Making a Dynamic Component
To create a dynamic component, you add attributes to a basic component and then create values for those attributes.
For simple dynamic components, the process is easier than you might think, especially if you start with SketchUp’s predefined attributes and are familiar with SketchUp’s basic drawing tools and spreadsheet programs’ common functions. You don’t need to be a computer programmer, a math genius, or a benevolent wizard.
So what does that process look like? Here’s an overview of the steps:
- Create a new component that’s made entirely of groups or subcomponents. Creating a Basic Component explains how to turn selected geometry into a component. Organizing a Model gives you the lowdown on groups and nesting groups and components in hierarchies.
- Add attributes that make your component dynamic (that is, tell the component to do something). You can choose from predefined attributes or create custom attributes.
- For each attribute you add, define a value that tells the attribute how to take action. These values can be a simple number that constrains a component’s size, a formula that uses mathematical operators, or a function that iterates through several options that you define in the formula’s parameters.
- Test your dynamic component to make sure it works correctly. As mentioned earlier, you’ll probably go back to Step 1 or 2 a few times before the dynamic component works the way you hope.
- Save the component in a separate file that you can import into other models via the Components browser or share with others via the 3D Warehouse. For the component to work, make sure you context-click the highest level of the component and select Save As from the menu that appears. Then save the resulting
.skpfile in a component collection.
In the video, you can see these steps in action. In the sections that follow, you find details and tips for working through the preceding steps.
Tip: After you cover the basics in this article, check out a few examples that walk you through building specific dynamic components. Those examples can help you see how to apply the abstract concepts explained here to create all sorts of dynamic component interactions. You find several specific examples in Creating Common Types of Dynamic Components. Also, you can find the Dynamic Component Training collection in the Components browser and download the following tutorials from the 3D Warehouse:
Table of Contents
Befriending all the axes
In dynamic component development, component axes are like little elven tricksters, sabotaging your good intentions - unless you remain aware of these axes and keep them working for, rather than against, you. Before you create one attribute, review the following tips for keeping the axes on your side:
- Every component and subcomponent has its own axis origin point. If you use attributes to set the dimensions of, position, or move a dynamic component, the values you enter are relative to the component’s axis origin. If you position more than one subcomponent, each one will have a different axis origin. So know the whereabouts of each component’s axes origin, and reposition it if needed.
- The axes’ colors become letters. Everywhere in SketchUp, you see references to the red, green, and blue axes — except in the Component Attributes dialog box. Here, the red axis is X, the green axis is Y, and the blue axis is Z. For example, the
LenXattribute defines the length of the X, or red, axis. - Gluing and cutting planes can turn the axis origin sideways. When you create a component, you can set both gluing and cutting planes. When a component glues to only vertical surfaces, the blue (Z) and green (Y) axes are swapped:
LenZhas a length value for the green axis, andLenY’s value is what’s typically the blue axis. For example, if you want to constrain a gluing component that glues to vertical surfaces, such as window, to a specific height, your formula needs to constrainLenY, notLenZ. If your component has a cutting plane, remember that to create that cutting plane on a vertical face, you had to move the axes, because the red/green plane determines the cutting plane.
Adding attributes
Attributes make components dynamic by telling SketchUp what to do. You can choose from predefined attributes or create custom attributes:
- Predefined attributes enable you to quickly and easily set up dynamic behaviors for common features, such as constraining a dynamic component’s size or applying a material. You can browse predefined attributes in the Component Attributes dialog box, or check out the Dynamic Component predefined attributes reference.
- Custom attributes enable you to add your own attributes.
To add attributes, follow these steps:
- Select the component you want to make dynamic.
- On the Dynamic Components toolbar, click the Component Attributes tool (
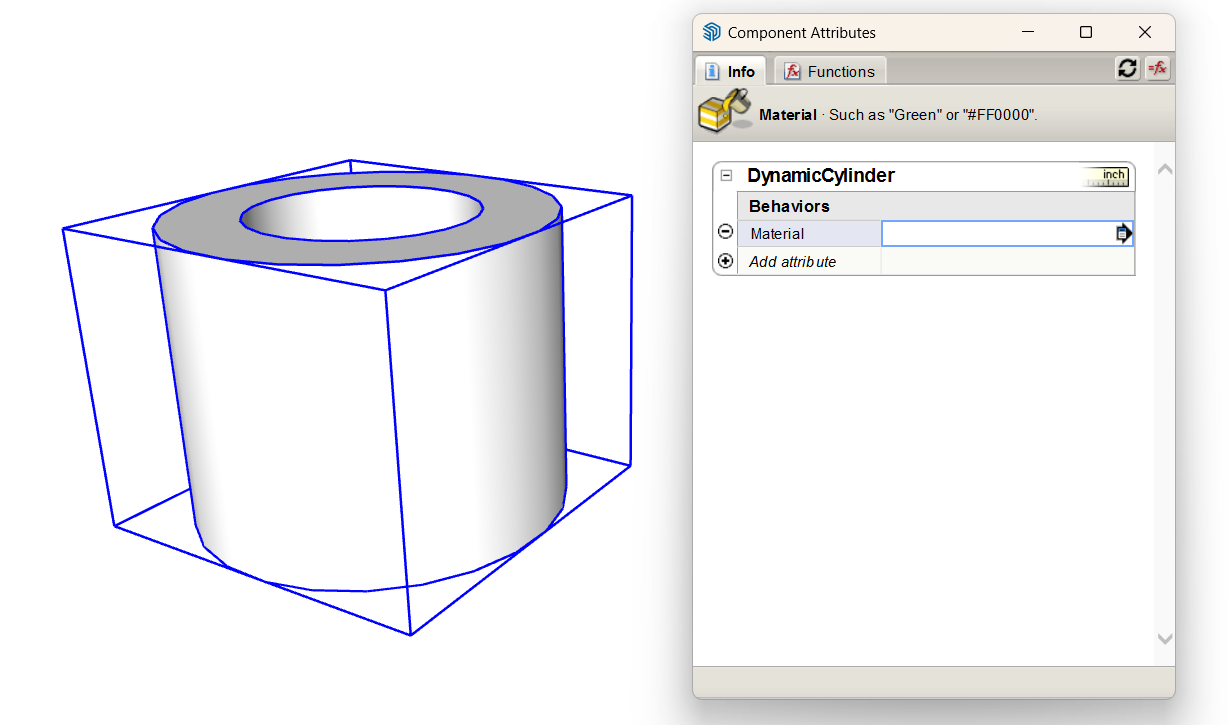
 ) or select Window > Component Attributes. Either way, the Component Attributes dialog box opens, as shown in the following figure. In this example, the Component Attributes dialog box shows the DynamicCylinder component.

- Click the Add Attribute plus sign icon to see a list of options.
- Select a predefined attribute or select the Or Enter a Custom Name option at the bottom. If you selected a predefined attribute, you’re ready to add values.
If you selected to add a custom name, type a name to replace the
Enter Nameplaceholder text that appears.
Tip: An attribute’s name must start with a letter and cannot contain any spaces. Otherwise, you can name the attribute anything you want. Choosing a name that reminds you what the attribute does is helpful.
In this example, you see the Material attribute added to the DynamicCylinder component.
Defining attribute values
After you set up an attribute or three, you’re ready to enter values that tell the attributes what to do. You can complete this step in a myriad ways, depending on the attributes you choose.
Generally speaking, you can define attribute values in the following ways:
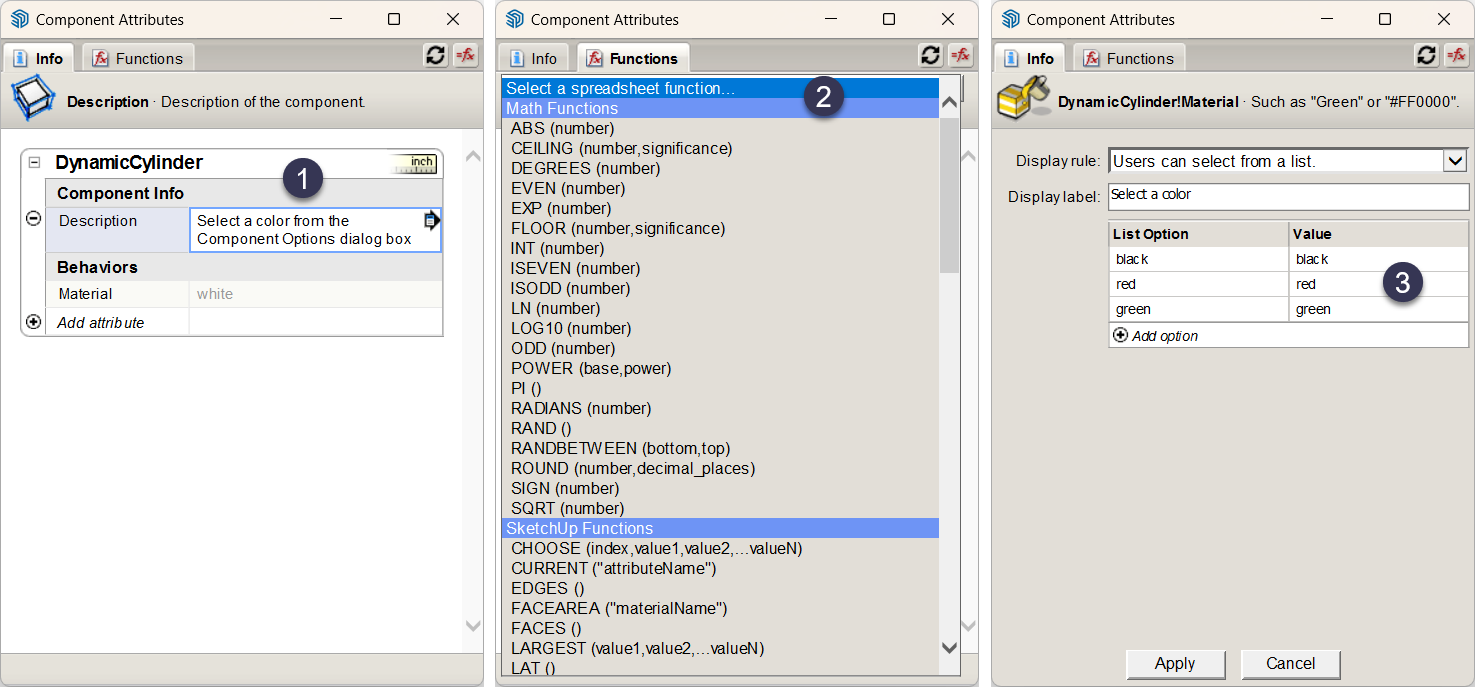
Type in the attribute value text box. For example, add a Description attribute and type a description directly in the value text box. (See Callout 1 in the following figure.) If you’re defining formulas, type an equal sign (=) and then enter your formula.
Tip: If you want to see the complete formulas in the attribute value box, click the Toggle Formula View button in the upper right of the Component Attributes dialog box. If you manipulate a component with a SketchUp tool while the Component Attributes dialog box is open, click the Refresh button to refresh values in the Component Attributes dialog box.- Insert a function from the drop-down list. To see the drop-down list, click the Functions tab. Open the drop-down list to select from any of the dynamic component functions. (See Callout 2.) After you select a function, you see a brief description (in very tiny text) below the drop-down list. Select the attribute value text box where you want to insert the function, and click the Insert button to add the function to the text box. Then you need to customize the value based on the function you chose.
- Click the Details arrow (
 ) in the attribute value field. You see a drop-down list that enables you to set display values for the attribute. Select whether or not users can see the attribute, and if so, whether the value appears as a text box or a drop-down list. If you select the Users Can Select from a List option, you can then define what values users can select. In this example, adding different materials values enables users to select from a limited range of materials. (See Callout 3.)
When you create formulas, here are the rules you need to follow:
- Put text in quotes.
- Concatenate a string with the ampersand (
&). For example:="I am a table with the cost of" & variable name - To display quotes in a text string, use a backslash (
\). For example:="This is the "\official\" retail price for this item:" & variable name - Formulas that return numbers will return them as floating values, never as integers. So, the formula
if(5=5,1,0)will return1.0instead of1. - All lengths are in inches and angles in degrees.
- Use an exclamation point (
!) to refer to a value outside of the current subcomponent. For example,Fence!spacingrefers to the value of thespacingvariable in theFencecomponent.
Testing a dynamic component
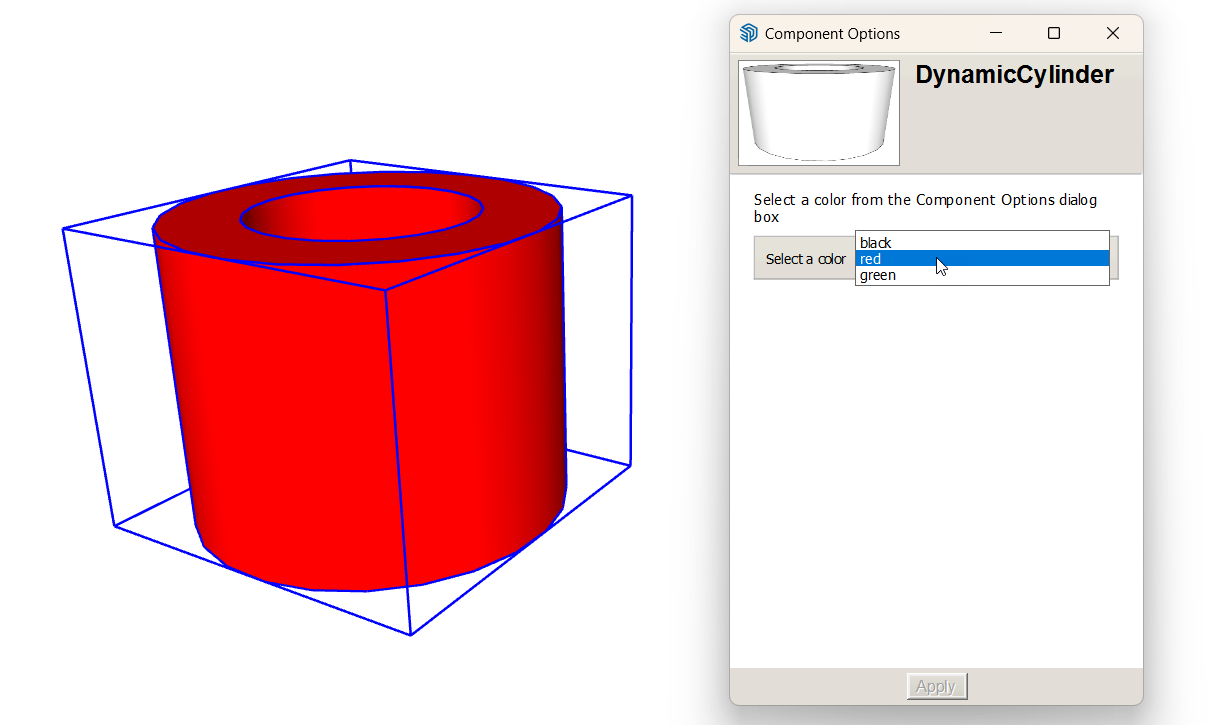
After you define the attributes and values for a dynamic component, test how it works in the Component Options window, which you can open in any of the following ways:
- Click the Component Options tool (
 ) on the Dynamic Components toolbar.
 - Select Window > Component Options.
- Context-click the component and select Dynamic Components > Component Options.
In the following figure, you see that each attribute appears in a drop-down list. Select an option and click Apply to change the component’s color.