Dressing up your text can add that extra professional touch to your LayOut document. For example, you might match the fonts and colors to your company’s or your client’s branding. And you definitely want to size the text so it’s easy to read.
Much like any word processor or other program that handles text, LayOut also enables you to apply character formatting (such as bold, italics, color, superscript, and more) and paragraph formatting (such as horizontal alignment, vertical anchoring, line spacing, and lists). The following sections guide you through all your options.
- To format all the text in the text box, choose the Select tool (
 ), click the text box that you want to edit, and select your formatting options.
 - To format only a certain word or characters in the text box, choose the Select tool, double-click the text box or select it and press Enter, select the text you want to format, and then choose the formatting options.
Table of Contents
Applying character formatting
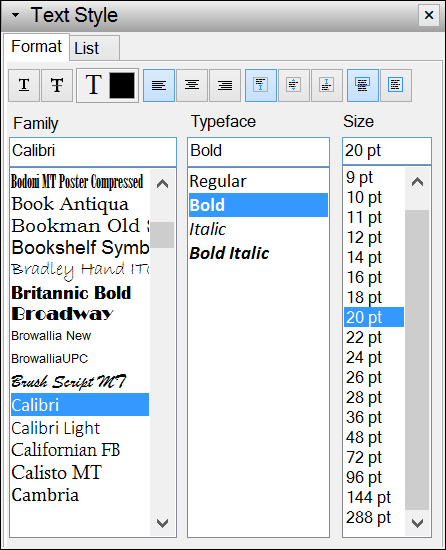
Character formatting can apply to only a word or a single character in your text. In LayOut for Microsoft Windows, you find character formatting options on the Text Style panel’s Format tab, shown in the following figure, or on the Text menu. To open the Text Style panel, click its name in the panel tray or, if it’s not on-screen, select Window > Text Style.
Here’s a quick look at your character formatting options:
- Font family: On the Text Style panel’s Format tab, the Family column lists all the LayOut-supported fonts installed on your computer. Select an option to apply it to your text. The current font appears in the box at the top. If you don’t find the font you want, see Managing fonts later in this article.
- Typeface: If your selected font has bold and italic styles designed specifically for that font, you see them in the Typeface column. You can also apply bold to selected text by choosing Text > Bold or pressing Ctrl+B. Similarly, apply italics by choosing Text > Italic or pressing Ctrl+I.
- Font size: You can select a point size from the Size column, or simply type a point size in the box at the top and press Enter. Alternately, to adjust the text size less precisely, choose Text > Bigger or Text > Smaller from the menu bar.
- Underline and strikethrough: In the upper left of the Text Style panel’s Format tab, you find an Underline button and a Strikethrough button. Alternately, apply underline by selecting Text > Underline or pressing Ctrl+U. You can also apply strikethrough by selecting Text > Strikethrough.
- Text color: On the Text Style panel’s Format tab, click the Text Color swatch to choose a new text color. The Colors panel appears, where you can select a color using the wheel, sliders, an image, or color presets.
- Superscript or subscript: Select Text > Baseline, and from the submenu that appears, choose Superscript or Subscript.
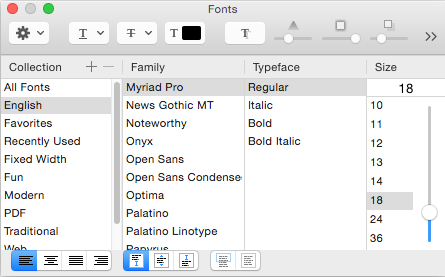
Character formatting can apply to only a word or a single character in your text. In LayOut for Mac OS X, you find character formatting options in the Fonts dialog box, shown in the following figure, or on the Text menu. To open the Fonts dialog box, select Window > Show Fonts.
Here’s a quick look at your character formatting options:
- Collection: In the leftmost column, you see collections of fonts, which is just the Mac’s way of helping you organize your fonts if you like. Select a different collection if you don’t like the font family options in the default collection.
- Font family: The Family column, you find a list of all the LayOut-supported fonts installed on your computer. Select an option to apply it to your text. If you don’t find the font you want, see Managing fonts later in this article.
- Typeface: If your selected font has bold and italic styles designed specifically for that font, you see them in the Typeface column. You can also apply bold to selected text by choosing Text > Bold or pressing Command+B. Similarly, apply italics by choosing Text > Italic or pressing Command+I.
- Font size: You can select a point size from the Size column, or simply type a point size in the box at the top and press Enter. Alternately, to adjust the text size less precisely, click and drag the slider on the right side of the Size column, or choose Text > Bigger or Text > Smaller from the menu bar.
- Underline and strikethrough: In the Fonts dialog box, an Underline button and a Strikethrough button appear in the toolbar at the top. Click the Underline or Strikethrough button to apply a basic line to the text. Each button also has a drop-down menu that enables you select a single or double line and a line color. To remove the underline or strikethrough, select None from this drop-down list. To apply underline, you can also select Text > Underline or press Command+U.
- Text color: In the toolbar at the top of the Fonts dialog box, click the color swatch to open the Colors panel and select a color using the wheel, sliders, an image, or color presets.
- Superscript and subscript: With the text selected, choose Text > Baseline, and from the submenu that appears, choose Superscript or Subscript. If you only want to slightly raise or lower the text from the baseline, select Raise or Lower instead.
- Kerning: Kerning refers to the spacing between characters. With the text selected, choose Text > Kern and from the submenu that appears, select Use Default, None, Tighten, or Loosen.
- Ligatures: Some fonts include ligatures, so that certain letter combinations are displayed as a unit. For example, many fonts have a ligature that tightens the capital V and A a when they appear next to each other (as in VA). Ligatures are typically only noticeable when text is quite large. To make sure your text uses ligatures built into a font, select the text and choose Text > Ligature > Use All. If you don’t want to use ligatures, select Use Default or Use None from the Ligature submenu instead.
Setting paragraph formatting
Paragraph formatting applies to a whole paragraph of text. For example, you can center a paragraph but not a single word in a paragraph. In LayOut for Microsoft Windows, you find paragraph formatting options on the Text Style panel’s Format tab and List tab, shown in the following figure, as well as the Text menu. To open the Text Style panel, click its name in the panel tray or, if it’s not on-screen, select Window > Text Style.

The following list explains the paragraph formatting options you find in LayOut:
- Horizontal alignment: You can align paragraphs to the left or right or center text within the text box. On the Text Style panel’s Format tab, you find a button for each alignment option in the toolbar at the top. Or select Text > Align and choose the Left, Center, or Right option from the submenu that appears.
- Vertical anchoring: Text is anchored to the top, center, or bottom of a text box. To change the vertical text anchor, select the text and click the Anchor Top (default), Anchor Center, or Anchor Bottom button in the toolbar at the top of the Text Style panel’s Format tab. Or from the menu bar, select Text > Anchor and choose an option from the submenu that appears.
- Lists: On the Text Style panel’s List tab, you can format selected paragraphs as bulleted or numbered lists. Select the text you want turn into a list and select a bullet or numbering option from the Style column. If you select a numbering option, you can choose what separator appears after the number and what number begins the list (if you don’t want to start with the default 1, a, I, or i).
- Line spacing: From the menu bar, select Text > Spacing and choose the Single, One and a Half, Double, or Custom option from the submenu that appears. If you select Custom, a Text Spacing dialog box appears, where you can also set spacing as a fixed point size and set how much spacing appears before and after a paragraph.
Paragraph formatting applies to a whole paragraph of text. For example, you can center a paragraph but not a single word in a paragraph. In LayOut for Mac OS X, you find paragraph formatting options along the bottom of the Fonts dialog box, as well as on the Text menu. To open the Fonts dialog box, select Window > Show Fonts.
The following list explains the paragraph formatting options you find in LayOut:
- Horizontal alignment: Within a text box, you can align paragraphs to the left, right, or center or justify text. In the Fonts dialog box, you find a button for each alignment option in the toolbar along the bottom. Or select Text > Align and choose the Left, Center, Justify, or Right option from the submenu that appears.
- Vertical anchoring: Text is anchored to the top, center, or bottom of a text box. To change the vertical text anchor, select the text and click the Anchor Top (default), Anchor Center, or Anchor Bottom button in the toolbar at the bottom of the Fonts dialog box. Or from the menu bar, select Text > Anchor and choose an option from the submenu that appears.
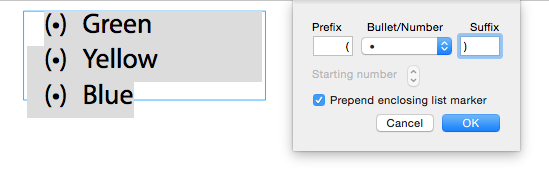
- Lists: Double-click a text box, select the text you want to turn into a list, and select Text > List to open the dialog box shown in the following figure, which enables you to format selected paragraphs as bulleted or numbered lists. If you want one or more characters to appear before the bullet or number, type it in the Prefix box. To add one or more characters after the bullet or number, type it in the Suffix box. Then select the Prepend Enclosing List Marker checkbox so the characters you entered are applied to the list. Click the Bullet/Number drop-down list to select from a range or bullet and numbered list styles.
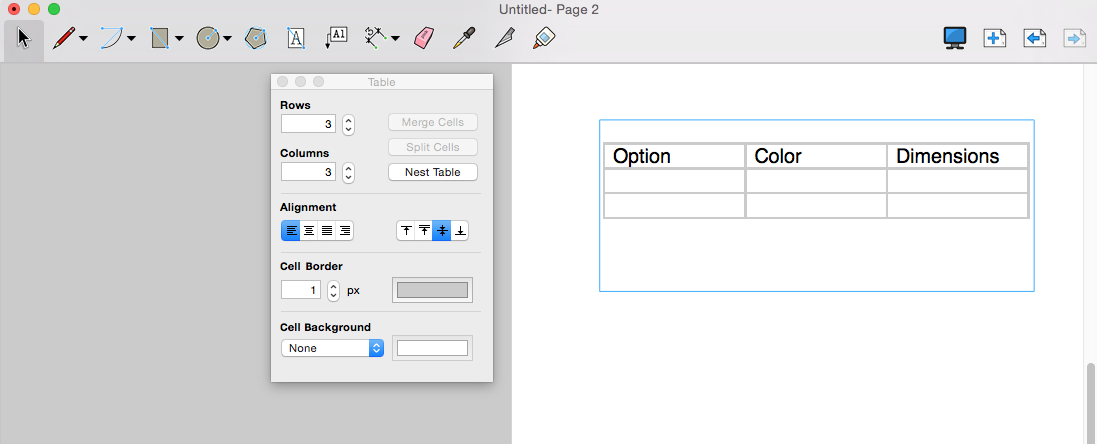
- Tables: To insert a table into a text box (preferably a bounded text box, because a table in an unbounded text box runs beyond the edge of the drawing area), click in the text box and select Text > Table from the menu bar. LayOut inserts a table with three columns and two rows and opens the Table dialog box, as shown in the following figure. To customize the rows, columns, alignment, and cells, place the text cursor somewhere inside the table and adjust the settings in the Table dialog box. To add text to the table, click in a cell and type.
Managing fonts
LayOut supports OpenType fonts with TrueType and PostScript outlines. Specifically, LayOut supports fonts with a .ttfor .otf file extension. If you install a supported font on your computer, the font appears among the font family options in LayOut.
If a font you applied on one computer doesn’t appear on another, remember that not all computers or operating systems have the same default set of fonts installed. Because LayOut doesn’t embed fonts into its files, all fonts used in a LayOut document must be present on the computer you’re using. If the font in question isn’t present on the computer, text in the LayOut file will appear in another font.
If you know the name of a missing font, try downloading the font from a reputable font foundry and installing the font on your computer. You can find more information about installing fonts by visiting the Microsoft or Apple support websites.