The SketchUp Viewer for Mobile app offers augmented reality (AR) viewing capabilities that enable you to view your 3D models within the context of your existing physical space. With AR, you can iterate faster on designs by experiencing your models in 3D, communicate your ideas more effectively, and wow both your clients and coworkers.
To view your models in augmented reality, you need a smartphone or tablet that supports ARKit (iOS) or ARCore (Android). Visit Meeting Hardware and Software Requirements for SketchUp Viewer for more info.
The SketchUp Viewer, app comes with two sample models that you can use to try AR, as denoted by the Try AR label. To view your own content in AR, you’ll need to obtain a paid license in one of the following ways: 1) via in-app subscription or 2) by purchasing a subscription to either the SketchUp Go, SketchUp Pro, or SketchUp Studio bundles.
If you have already purchased a subscription to the SketchUp Go, SketchUp Pro or SketchUp Studio bundles, the premium AR model viewing application features will be unlocked as soon as you sign in to launch the app.
If you are a SketchUp Free subscriber, you can purchase access to the AR Model viewing features on a standalone basis via in-app subscription. To purchase, simply open any model that is not one of the sample models and select the AR icon (![]() ). You then see a prompt to subscribe.
). You then see a prompt to subscribe.
Table of Contents
Opening and anchoring a model in augmented reality
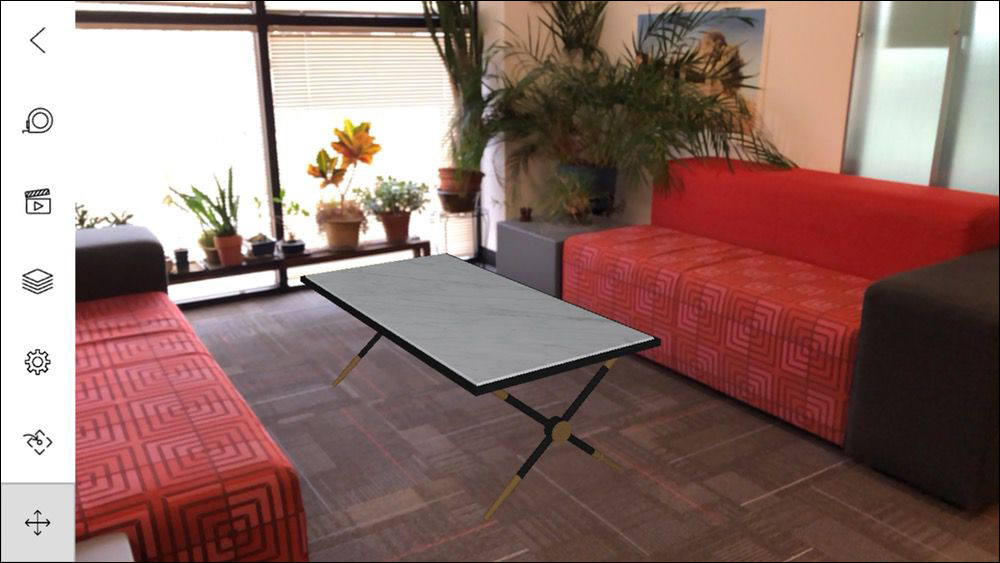
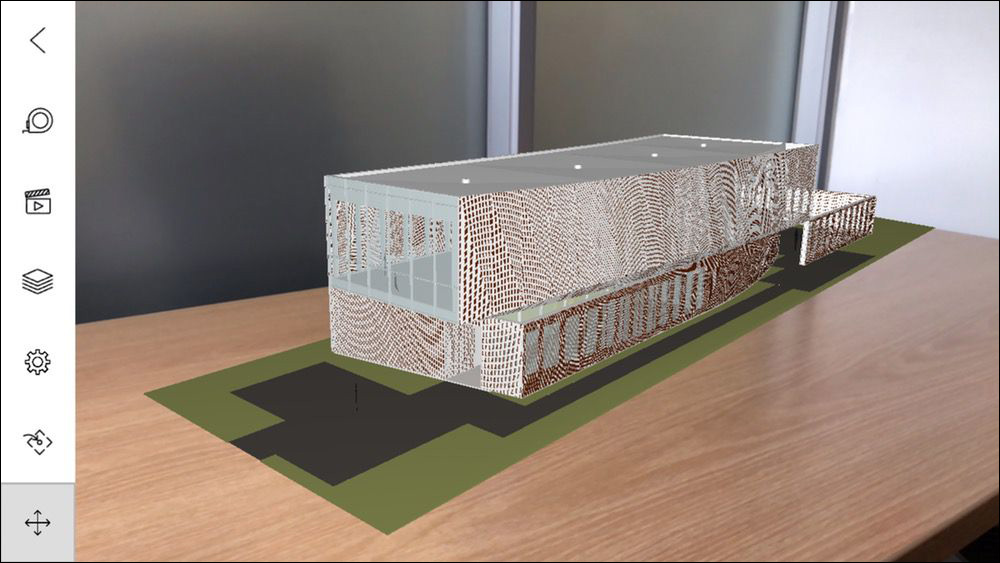
Select a model from the Home screen that you wish to view in AR. From the standard viewer, tap the AR icon (![]() ) to start the experience. First, aim your camera at a large flat surface like a table, counter or floor. Slowly move your device to scan the surface, and your model will be sized automatically to fit the scanned area. After your model is in position, tap to anchor it to the surface.
) to start the experience. First, aim your camera at a large flat surface like a table, counter or floor. Slowly move your device to scan the surface, and your model will be sized automatically to fit the scanned area. After your model is in position, tap to anchor it to the surface.
Fine-tuning the position of the model in Augmented Reality
The Transform panel includes the following tools to adjust the position of the model.
Move
Select the Move (![]() ) tool and use two fingers and drag to move the model. By default, models can be moved in all directions. To restrict movement to one or two axes, tap on the x, y or z axis in the Move panel to lock movement along that plane.
) tool and use two fingers and drag to move the model. By default, models can be moved in all directions. To restrict movement to one or two axes, tap on the x, y or z axis in the Move panel to lock movement along that plane.
You can also reposition the axes by tapping Position Axis to help align the model to the physical space. Tap and hold on the location where you wish to reposition the origin as you move your device to orientate the axes the way you want. Clear the Position Axis to return the axes to the bottom center of the model.
Scale
Select the Scale tool (![]() ) and pinch to scale or select a preset scale, enter in a customer scale or manually scale per axis.
) and pinch to scale or select a preset scale, enter in a customer scale or manually scale per axis.
Rotate
Select the Rotate tool (![]() ) and use one finger and drag to rotate the model. By default, rotation is about the z axis. Select another axis (x or y) to rotate the model about that axis. To undo all rotations and reset the model to its original orientation, tap the Reset button.
) and use one finger and drag to rotate the model. By default, rotation is about the z axis. Select another axis (x or y) to rotate the model about that axis. To undo all rotations and reset the model to its original orientation, tap the Reset button.
Anchor
To re-anchor the model, tap Anchor (![]() ) to set your model on a new surface. Be sure to scan any new surface before you tap to anchor the model.
) to set your model on a new surface. Be sure to scan any new surface before you tap to anchor the model.
Measuring dimensions in AR
Whether you’re in Tabletop view or Immersive view, you can measure dimensions in a model. To measure a dimension while in either view, follow these steps:
- Tap the Tape Measure icon.(
 )
) - At the prompt, tap on the model where you want to start the measurement.
- Move your device until the second point of your measurement is in view and tap to finish the measurement. A measurement appears on your model, as shown in yellow in the following figure.

After you add a dimension, it appears in the dimension list on the Model Viewer toolbar. The dimensions are listed on the menu when you’re in Dimensions mode. On the dimension list, you can choose to hide or delete individual dimensions, or use the commands at the top to hide or delete all dimensions in the model.
Viewing scenes in AR
When you tap the Scenes (![]() ) icon, you’ll see a list of the default views (Top, Bottom, Front, and so on) as well as the Layer visibility configuration and Face styles, which include X-Ray mode. Scenes will store the camera location and properties, the camera mode (Perspective versus Orthographic), hidden geometry, Layer visibility, active Section Planes, Face styles, Axes location, the camera field of view, and Background Style settings (such as Sky, Ground, and Background color).
) icon, you’ll see a list of the default views (Top, Bottom, Front, and so on) as well as the Layer visibility configuration and Face styles, which include X-Ray mode. Scenes will store the camera location and properties, the camera mode (Perspective versus Orthographic), hidden geometry, Layer visibility, active Section Planes, Face styles, Axes location, the camera field of view, and Background Style settings (such as Sky, Ground, and Background color).
You can play or loop a scene animation. And if you want to walk through scenes one-by-one, you have options for viewing the previous scene as well as the next scene. Keep in mind that the animation will respect the Include in Animation Scene setting as set in SketchUp. So if the checkbox is cleared in SketchUp, the SketchUp Viewer Play Animation feature will skip that scene.
Viewing layers in AR
If a model contains layers that were created in SketchUp, you can view those layers in SketchUp Viewer. (For an introduction to layers in SketchUp, see Controlling Visibility with Layers in the SketchUp area of the Help Center.)
The Layers (![]() ) panel allows you to control the visibility of any layers that you have added to your SketchUp model. The Eye icon (
) panel allows you to control the visibility of any layers that you have added to your SketchUp model. The Eye icon (![]() ) next to the layer name in the Layers panel indicates that the contents of a layer are visible in the model. Tap the Eye icon to toggle the layer’s visibility.
) next to the layer name in the Layers panel indicates that the contents of a layer are visible in the model. Tap the Eye icon to toggle the layer’s visibility.
Adjusting model settings
You can adjust settings specific to a model on the Settings panel. After you tap on the Settings (![]() ) icon, you can adjust the following settings:
) icon, you can adjust the following settings:
- Tap on the unit of measure listed in the upper right to display a list of options. Tap the preferred unit to display all dimensions in that unit.
- Tap the Auto-Select Immersive or Tabletop Based on Scene checkbox to clear or select the checkbox. The checkbox is enabled by default.
Exploring a Model in Immersive View
In Immersive view, you step into your model at full scale, as shown in the following figure. Only moments after you create a model in SketchUp, you can experience what a space will really feel like! The following sections help you move around and set your options in Immersive view.
Switch to Immersive view
After you open and place a model, it appears at either a 1:1 scale or if the model is larger than the surface detected then, by default, it will be rescaled to fit the surface in Tabletop view. From Tabletop view.
You can switch to Immersive view by following these steps:
- Tap the Immersive View icon (
 ).
). - Tap on a surface on the model, and you jump to that point in Immersive view. Now, you can move through your model in real space and view it in full 3D, as if you’re walking through it with your device as the view window.
Navigate in Immersive view
When you first enter Immersive view, you’re in Walk mode by default. Here’s how to navigate in Walk mode:
- To move forward through the model, tap and hold. As long as you hold down your finger, you move in the direction you're facing.
- To stop, simply remove your finger.
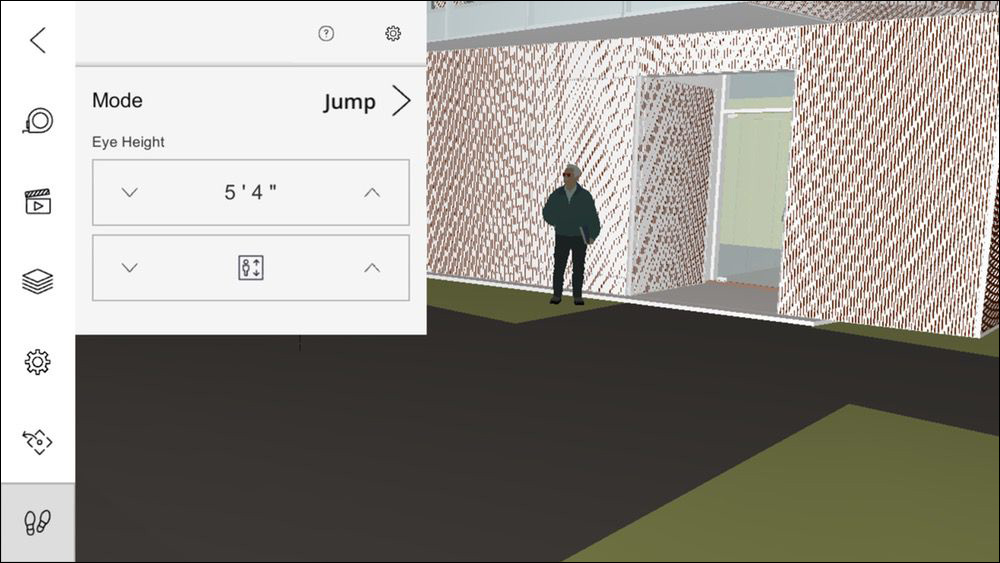
You can also switch to Jump mode, as discussed in the next section, Set navigation options. In Jump mode, you see a SketchUp figure, and you can instantly jump to another location in the model, as shown in the following figure.
To jump, position the SketchUp figure somewhere in your model and then tap. If your SketchUp figure is on a vertical surface, your placement point is offset and dropped to the next horizontal surface.
Set navigation options
While you’re in Immersive mode, you can adjust your navigation options. Tap the Navigate icon (![]() ) to access the following options:
) to access the following options:
- Tap Mode to toggle between Walk or Jump.
- To adjust your eye height, tap the eye height value and enter an offset value. To change the eye height incrementally, tap the arrows on either side of the offset value.
- To jump vertically to the next horizontal surface, tap the upper or lower area of the trackpad. You can also tap the up or down arrows either side of the Elevator icon (
 ). The Elevator is ideal for moving vertically through a multistory structure.
 - To change your navigation settings, tap the Settings icon (
 ) in the upper-left corner of the navigation options panel. You can adjust the following settings:
- Walk Speed: Tap the up and down arrows for Walk Speed, and you change the speed at which you move through the model. The default setting reflects the average walk speed for a human, which is 3 mph.
- Walk Collision: This setting controls whether you can walk through surfaces in the model. If you want to walk through walls, tap to clear the checkbox.
- Walk Gravity: This setting controls whether you stay on the lowest horizontal surface as you move through the model.
Leave Immersive view
When you’re ready to leave Immersive view, you have the following options:
- To return to Tabletop view, tap the Tabletop icon (
 ).
). - To leave AR mode completely, tap the Back icon (
 ).
).