SketchUp for iPad includes most of the features available in the desktop version, along with some features only available on an iPad. With SketchUp for iPad you can create, edit, and mark up 3D projects on-site, on the go, and in the office.
What You Need
To get started with Sketchup for iPad, the first thing to do is Install SketchUp from the Apple app store and sign into your Trimble Account. If you already have a Trimble account and an active SketchUp subscription, you're ready to go! If not, you can purchase a Monthly or Annual SketchUp subscription through the App Store or purchase a subscription at SketchUp.com. For more information about the available subscription options see SketchUp Subscription. For more information on how to set up a Trimble Account see Trimble and SketchUp Accounts.
The SketchUp for iPad Interface
Home
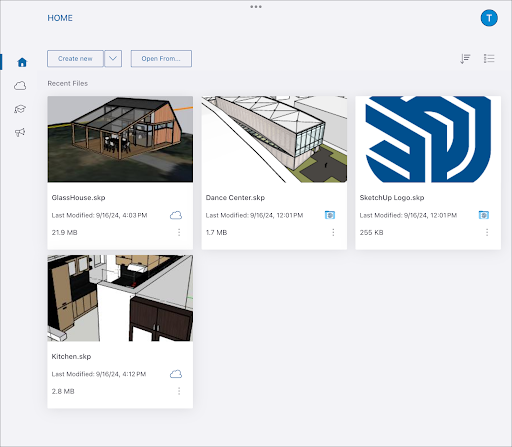
The Home screen is the first thing you see after launching and signing in to SketchUp for iPad and contains the following:
- Create new - Create a new SketchUp model. Use the dropdown menu to choose a template with your preferred default units.
- Open From - Opens iPad’s Finder to help you open locally saved files or files saved to another location.
The Home screen navigation bar with the following options:

Home - Returns you to the recent models list. Trimble Connect - Access the projects you have stored in Trimble Connect. Learn - This tab covers interactive self-paced tutorials, printable resource guides, and video tutorials to help you level up your SketchUp skills. Feedback- We love hearing from our users. This page provides a few options to help you get in touch with us and engage with an awesome, global community of SketchUp users. 
About SketchUp - This page includes information about the app version and links to legal information. - User icon - When selected you’ll see some information about the account you’re signed in with and an option to sign out.
Navigating the Interface
SketchUp for iPad’s interface includes a number of toolbars and Panels that provide easy access to all of the features you’ll need to create models.
Here's an overview of what you'll see when you open a model:

- The main Navigation bar including the following options:
- Home/Save - Select this icon to exit your document and return to SketchUp’s Home screen. On your way back to the Home Screen, SketchUp will ask if you want to save or discard any changes you’ve made to your model.
- Share – Creates a shareable link to your model. For more information, see Link Sharing.
Undo and Redo - We all make mistakes. We also sometimes just want to experiment and explore different options.
Tip: When using your finger or a touchpad, a two-finger tap can undo, while a 3-finger tap will redo.- Import - Launch a file browser with options to browse the Files app or Trimble Connect for files to import into your model. See Importing and Exporting for more information.
- Settings - Opens the Settings panel.
- Save - Tap to save your model. For models published to Trimble Connect, you’ll save a new revision. This icon also notifies you through a visual indicator when SketchUp for iPad autosaves your model. Remember, autosaves only create a local recovery backup file.
- Toolbars - Your SketchUp tools all in one place. When you first open a new document you will see the Getting Started toolbar, showcasing some of the most used SketchUp tools. When a tool is selected, you’ll see an additional toolbar with that tool’s optional modes. Tapping the (...) at the bottom opens an Extended tool palette where you’ll see the rest of the available tools. As you begin using various tools from the tool palette, they‘ll appear in one of three spaces showing tools you’ve recently used. For more details about using the tools, the different toolbars, as well as customizing the toolbar and the tool palette, see our Tools Overview.
- Context Menu Toolbar - Each icon represents a feature normally seen in the context menu in other versions of SketchUp. The available options depend on what type of entity is currently selected.
- Panels Toolbar - SketchUp’s panels provide a lot of ways to fine tune your models. See iPad Panels for more information.
Measurements Box - A box where you can enter specific measurements while creating your model.
iPad Input Methods
When you’re used to Sketchup’s other platforms, navigating Sketchup for iPad’s interface can be a bit of a shock. You can interact with SketchUp for iPad using several input methods, and each input method interacts with the interface in a different way.
In addition to supporting classic mouse/trackpad and keyboard inputs, SketchUp for iPad provides options to create and view models using multitouch gestures or an Apple Pencil.
Tip: If you are new to SketchUp for iPad, we recommend using Just Draw for all input methods to get you started.Multitouch
SketchUp for iPad offers full multitouch support that allows you to navigate the interface, select tools, and view and create models. Here’s a quick overview of the gestures you can use while creating your models:
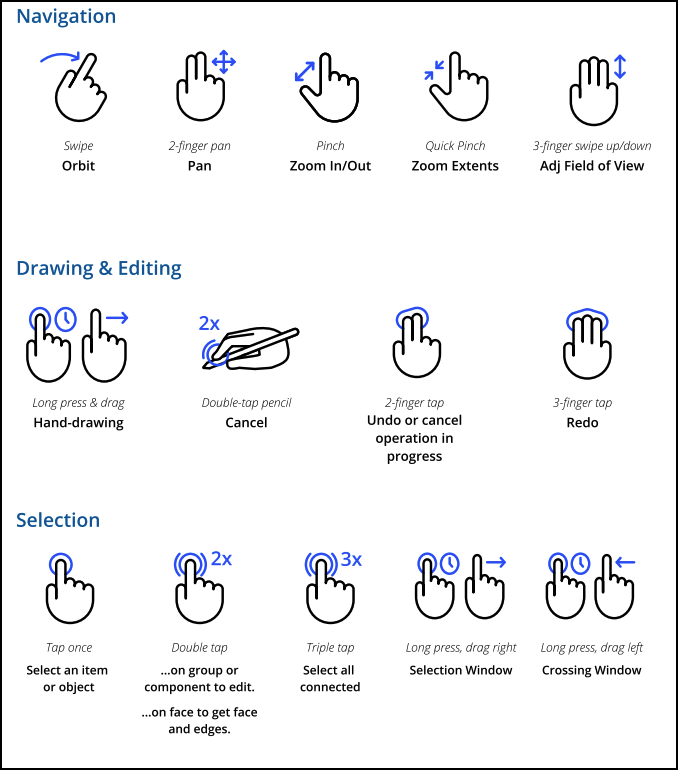
Depending on the tool, you’ll use a combination of gestures such as hard presses and taps to create and manipulate geometry.
Pencil
You can interact with the interface and use tools with an Apple Pencil through a combination of taps, hard-presses and drawing gestures. From the Settings Panel you can choose to set your Pencil to one of two explicit modes:
Tip: When using a second generation Apple Pencil on an M2 iPad Pro you can hover the tip of the pencil over your model, unlocking SketchUp’s full inferencing capabilities. Hovering before you start drawing can help find an exact midpoint, exact endpoint, or identify precise alignments without using additional guides or temporary geometry.- Just Draw - This mode allows you to use your pencil in the most simple and intuitive way, by ‘just drawing’ as you would with a pencil and paper. For example, to draw a rectangle using the Rectangle Tool, just touch your pen to the screen where you want your first corner to be, lightly drag the pencil to where you want your second corner, then lift your pencil to complete the shape.
- Click-Move-Click - This mode is a bit more versatile and takes advantage of Apple Pencil’s pressure sensor. Lightly dragging the pencil across the screen allows you to infer things in the model before then hard-pressing with the pencil tip to start and/or complete an operation. For example, to draw a rectangle using the Rectangle Tool, hard-press where you want your first corner to be, lift your pencil, then use another hard-press to designate the diagonal corner, completing your shape.
Note: When using Multitouch or a Pencil, many tool modes require what we call a "hard press". To perform a hard press, you’ll firmly press the Pencil or your finger to the surface of the iPad until you see a circle with a green progress bar. Once the bar is filled, the "hard press" is complete.Touchpad & Mouse
Using a touchpad or mouse in SketchUp for iPad works a lot like SketchUp for desktop. Actions such as click-and-drag, double click, and triple click, all work about the same as they do on other platforms.
Note: Just like SketchUp for Desktop, we recommend using a mouse with a scroll wheel when using a mouse with SketchUp for iPad.Keyboard
If you have a keyboard, many of SketchUp’s keyboard shortcuts are available on iPad. To see what keyboard shortcuts are available, press and hold the CMD key or search for them using the Omnibar. You can also use your keyboard to enter measurements without selecting the measurements box first, just like you can in SketchUp for Desktop.