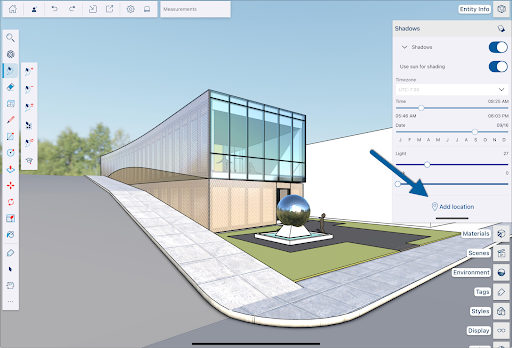
Add Location helps you geolocate your model and add site context and terrain. In SketchUp for iPad, you can get started by selecting Add Location in the Shadows panel.
If it's your first time using Add Location, a modal with some basic information about how it all works appears. Once you are ready, you can start using add location to geolocate your model and add site context.
Geolocating a Model
To start geolocation, type an address or location name in the search bar to narrow down the area where you will place your model. Use the zoom controls or zoom gestures as needed.
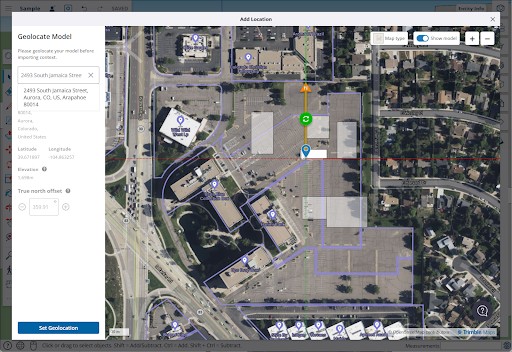
In the upper right you can adjust the following options:
- Up – Tells Add Location what to use as a reference for the up direction. You can choose to use the green axis in your model, true north, or grid north. By default, Add Location will use true north.
- Map Type – Tap to toggle between satellite imagery or a basic map.
- Show Model – Tap to toggle the visibility of your model on or off.
You can then adjust the positioning of your model. The following elements appear to help you:
- The blue pin represents the location of the drawing axes in your model. Drag the blue pin to adjust your model's location.
- Drag the green rotate icon to rotate your model around the drawing axes.
- The orange arrow represents True North. You can adjust the True North Offset using the box on the left side of the window.
When you are satisfied with the location and positioning of your model, click Set Geolocation to geolocate your model.
After geolocating your model, a confirmation window appears letting you know that your model is geolocated and shadows in your model are now accurate. You can also review location data like latitude and longitude, elevation, and the address.
Adding Site Context
After geolocating your model, click Add Context on the confirmation window to start adding additional site context to your model.
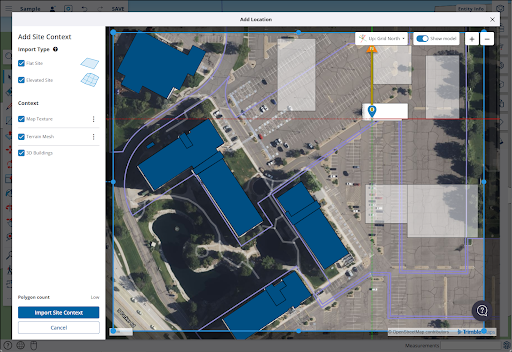
After geolocating a model, you can close the Add Location window, or click Import Context to add site context. To define how you want to import site context, choose from the following options:
- Import Type – These options determine how SketchUp imports your site contexts. Choose from Flat Site, Elevated Site, or both. Flat Site applies the map texture to a flat, 2D plane where all context will exist at the same elevation. An Elevated Site gives you the option to import a terrain mesh. With both selected, the elevated site will be hidden by default. Use the Geolocation Content tags in the Tags panel to switch between the different sites.
- Map Texture – Selecting this Context option uses the map texture type you selected under Import Type. To further adjust how the map texture appears, click the context menu (
 ) and choose between Satellite Imagery and Street Map. For either option, the Resolution can be set to High, Medium, or Low using the slider. If Satellite Imagery is selected, you can choose to use Bing or Digital Globe as your image provider.
 - Terrain Mesh – Available when choosing to import an Elevated Site. Click the context menu () to adjust the mesh density. Higher density increases the number of triangles used in the mesh, but also increases the file size.
- 3D Buildings – Select to integrate the existing buildings from your selected area into the site context you import. As you move the blue frame, SketchUp highlights the buildings that can be imported as site context in dark blue. SketchUp will create simple geometry based on the buildings in your selection during the import process. Tap the context menu () to adjust the Terrain Positioning and Building Geometry.
After adjusting these settings, click Import Site Context. You can then click Import More to add more site context, or Close to return to the modeling window.
For more details on how you can use all the features in Add Location, see Geolocation and Terrain.