Editing a SketchUp Model's View and Style Settings in LayOut
In LayOut, you can change the view of your model or its style settings right within the model entity. This timesaving feature enables you to make adjustments without endlessly switching back and forth between the SketchUp and LayOut applications, or having to redo even more complex processes that other presentation programs require so that your model presentation stays up to date.
In the sections that follow, you find out how LayOut's SketchUp Model panel and context menus make several SketchUp tools and features available right in LayOut.
Table of Contents
Accessing the Camera tools
SketchUp uses the metaphor of a camera to reflect how you can view a model in three dimensions. The Camera tools help you adjust how a model appears within your LayOut documents. Use these steps to access the Camera tools:
- Select the SketchUp model entity and perform one of the following actions:
- Context-click the selection and choose Edit 3D View from the menu that appears.
- Double-click the selection.
- Select the model entity and press Enter.
- Context-click anywhere inside Edit 3D View and select a tool from the Camera Tools submenu, as shown in the following figure. Your options include the following:
- Orbit ()
- Pan ()
- Zoom ()
- Zoom Window ()
- Look Around ()
- Walk ()
- To exit 3D Edit View, click anywhere in the drawing area, outside the model entity's bounding box.
For details about using these tools, see the related articles in the SketchUp Pro area of the Knowledge Center. Viewing a Model introduces the Orbit, Pan, and Zoom tools, and Walking through a Model explains how to use the Look Around and Walk tools.
Selecting scenes
In SketchUp, scenes enable you to save different views of your model and switch among them. When you import a SketchUp model into LayOut, any scenes you've created are ready to use, which is handy if you want to show those same views in your LayOut document.
To change the view to a scene from your model, follow these steps:
- Select the SketchUp model entity in the drawing area.
- Open the SketchUp Model panel by clicking its name in the tray or selecting it from the Window menu.
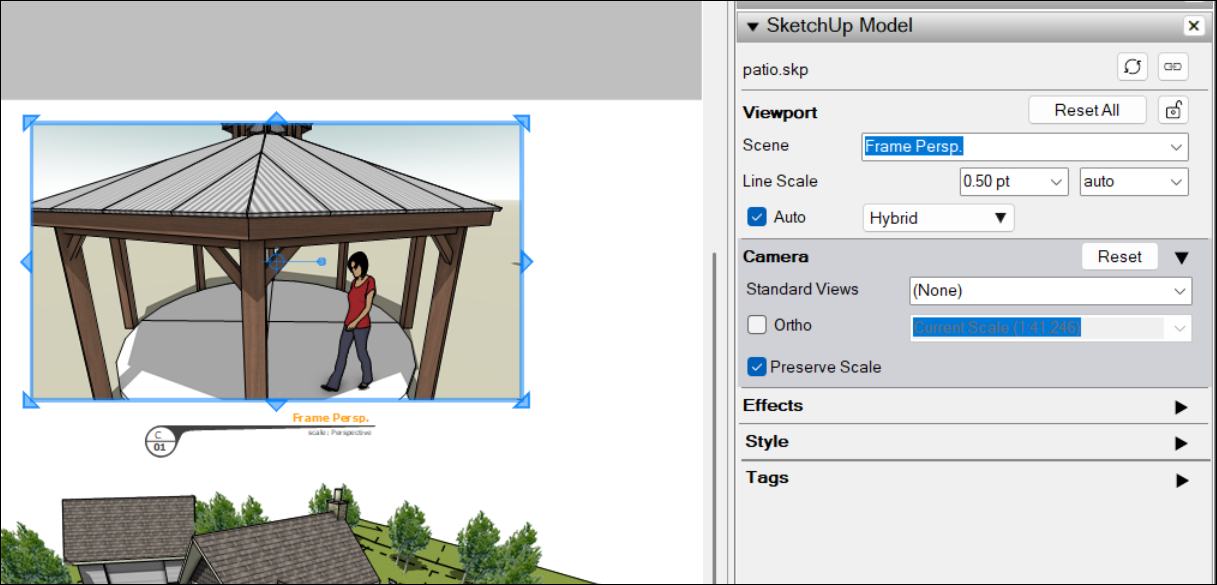
- From the Viewport section, select the scene name from the Scenes drop-down list, as shown in the following figure.
Choosing a standard view
All of SketchUp's standard views are available in LayOut. Simply follow these steps:
- Select the SketchUp model entity in the drawing area.
- Open the SketchUp Model panel.
- Select a standard view from the Standard Views menu.
For an introduction to SketchUp's standard views, see Viewing a Model in the SketchUp Make and SketchUp Pro area of the Knowledge Center.
Setting the perspective and scale
When a SketchUp model is in Perspective view, elements in the model are not to scale. To show your model's scale in your document, you need to switch to Parallel Projection view, which displays what's also called an orthographic projection.
You can switch to an orthographic view and set a scale for your model right in LayOut. Simply follow these steps:
- Select the SketchUp model entity in the drawing area.
- Open the SketchUp Model panel.
- Click the Ortho button, which becomes highlighted when your model displays an orthographic view, as shown in the following figure. Alternately, context-click the model entity and deselect the Perspective option from the context menu that appears. When the model entity view is orthographic, the scale options in the SketchUp Model panel become available.
Click the Scale dropdown (next to the Ortho toggle). Select a scale preset or simply type in your desired scale and hit enter. For instance, type 1:5, 20%, .2, or 1/5 and to apply a 1:5 scale to a viewport.
To add your own custom scale to the list of preset options, scroll to the bottom of the Scale dropdown and select the Add Custom Scale (Microsoft Windows) or Custom (Mac OS X) option to create a custom scale.
- (Optional) If you want your model to maintain a constant size as you scale its bounding box, select the Preserve Scale on Resize checkbox. When this check box is deselected, your model scales as you resize the bounding box.
On the Scales pane, you see a list of available scales in the list box. In Microsoft Windows, you add a scale below the list box and then click Add Custom Scale. On Mac OS X, click the + button (the plus sign) to open a new dialog box where you set the scale. To delete a scale, select it in the list box and click Delete Scale button (Microsoft Windows) or the - (or minus sign) button (Mac OS X).
Switching on shadows and fog
SketchUp's Shadows feature enables you to study how the time of year and time of day impact the light and shadows in and around your model. Fog can add a mystical effect, or add a touch of realism to models in foggy places, like San Francisco or London.
In LayOut, you can toggle these effects on or off and adjust a few settings as follows:
- In the SketchUp Model panel, simply click the Shadows button or the Fog button respectively. You can also toggle Shadows by context-clicking the model entity and selecting Shadows on the menu that appears.
- When either option is selected, in the SketchUp Model panel, you can adjust the time of day and year for shadows or adjust the fog color. Click the color well to select a fog color from the Colors panel, or select the Use Background Color checkbox if you want the fog to match the background.
In the SketchUp Make and SketchUp Pro area of the Knowledge Center, see Casting Realistic Shadows or Letting the Fog Roll into Your Model for details about how these features work.
Applying styles
In SketchUp, styles bundle preset line widths, colors, materials, backgrounds, and so on. In LayOut, you can change a model's style, or apply a different style to each copy of a model. For example, you might apply one style to show the materials applied to the model's exterior, and use a wireframe or sketchy edges style with a Top view setting to show the model's floor plan.
To change a model entity's style settings in LayOut, follow these steps:
- Select the SketchUp model entity in the drawing area.
- Open the SketchUp Model panel and select the Styles tab. By default, you see the In Model styles, which are the styles saved with the SketchUp model file.
- To apply a new style, click one of the other In Model styles, if the model contains more than one. (If you select an In Model style, jump to Step 6.) Or to see other style options, click the Style Collections drop-down menu (it's the down arrow next to the little house icon), and select Styles. A list of folders containing different categories of style settings appears. (On Mac OS X, you can also jump right to a style collection subfolder from this menu.)
- Double-click a folder to see the preset styles it contains. You can switch between the Thumbnail View and List View of the styles by clicking the respective icon in the upper right.
- Select a style, and a preview of the style appears in the drawing area. In the following figure, the Sketchy Edges style collection is open, and the Tech Pen style is applied to the model.
Tip: If you don't like your first choice, you can continue selecting styles until you find one you like. To open a new style collection, select Style Collections > Styles and select a new folder.
- (Optional) If the style you selected includes a background, select or deselect the Background checkbox to display or hide the background.
- (Optional) To adjust the line thickness, type a point value in the Line Weight box.
To improve accessibility there is a Color Blind style, which is calibrated to make SketchUp models easy to see for people who experience color blindness. In LayOut, you find this style on the SketchUp Model panel. Click the Styles tab, and at the top of the tab, open the Styles Collections menu (it looks like a house). Select Styles, double-click Color Sets, and scroll down until you find the Color Blind style, shown in the following figure.
Rendering model entities
After you select a view or style setting that changes a SketchUp model entity's appearance, you may need to render the SketchUp model entity before the entity reflects your changes in LayOut's drawing area. To help you manage how and when LayOut renders model entities, the bottom of the SketchUp Model panel includes a few rendering features.
The Auto checkbox and Rendered/Render button
If you've deselected the Auto checkbox and your model references are up to date, a yellow warning icon appears whenever a SketchUp model entity needs to be rendered. To update the model entity in the document area, select the entity, as shown in the following figure, and click the Rendered button (Microsoft Windows) or Render button (Mac OS X).
Rendering Mode drop-down list
In the lower right of the SketchUp model panel, the Rendering Mode drop-down list enables you select one of three options for rendering your models on-screen and in any outputted format (such as print or PDF).
Select Vector to display and output all lines, faces, and text in vector format. Before you select this mode, here's what you need to know:
- Pros: The Vector mode provides crisp and scalable line work that can efficiently scale up to very large paper sizes.
- Cons: Raster elements, such as textures, fog, and shadows, don't display in vector mode. Rendering complex models can take awhile.
Select Raster mode to display and output all lines, faces, and text in a pixel-based format. Raster is the default mode.
- Pros: The Raster mode shows a model exactly as it appears in SketchUp.
- Cons: When you select a high resolution or large paper size, the Raster mode can slow LayOut's performance.
Select Hybrid mode to use vector rendering for sharp, scalable line work as well as raster rendering for raster-only features.
- Pros: Renderings in Hybrid mode provide the best final product.
- Cons: Of the three modes, Hybrid mode takes the longest to create a rendering.